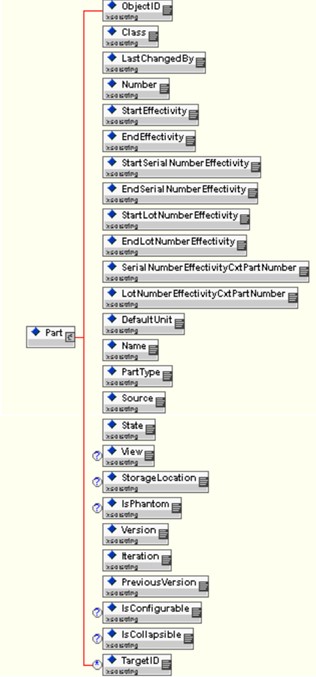
示例:通过扩展呈现器向 <Part> 添加属性
新 <Part> 元素现在具有附加的子元素 <Team>。
修改后的映射和响应元信息文件的 MapInformation 元素将采用如下所示的形式:
<esi:Map id="ESINewPart">
<esi:attributeMapping sourceAttribute="obid">ObjectID</esi:attributeMapping>
<esi:attributeMapping sourceAttribute="xxxx" defaultValue="com.ptc.windchill.esi.Part">Class</esi:attributeMapping>
<esi:attributeMapping sourceAttribute="modifier">LastChangedBy</esi:attributeMapping>
<esi:attributeMapping sourceAttribute="number">Number</esi:attributeMapping>
<esi:attributeMapping sourceAttribute="xxxx">StartEffectivity</esi:attributeMapping>
<esi:attributeMapping sourceAttribute="xxxx">EndEffectivity</esi:attributeMapping>
<esi:attributeMapping sourceAttribute="xxxx">StartSerialNumberEffectivity</esi:attributeMapping>
<esi:attributeMapping sourceAttribute="xxxx">EndSerialNumberEffectivity</esi:attributeMapping>
<esi:attributeMapping sourceAttribute="xxxx">StartLotNumberEffectivity</esi:attributeMapping>
<esi:attributeMapping sourceAttribute="xxxx">EndLotNumberEffectivity</esi:attributeMapping>
<esi:attributeMapping sourceAttribute="xxxx">SerialNumberEffectivityCxtPartNumber</esi:attributeMapping>
<esi:attributeMapping sourceAttribute="xxxx">LotNumberEffectivityCxtPartNumber</esi:attributeMapping>
<esi:attributeMapping sourceAttribute="defaultUnit">DefaultUnit</esi:attributeMapping>
<esi:attributeMapping sourceAttribute="name">Name</esi:attributeMapping>
<esi:attributeMapping sourceAttribute="partType">PartType</esi:attributeMapping>
<esi:attributeMapping sourceAttribute="source">Source</esi:attributeMapping>
<esi:attributeMapping sourceAttribute="state.state">State</esi:attributeMapping>
<esi:attributeMapping sourceAttribute="view" plantSpecificAttribute="true">View</esi:attributeMapping>
<esi:attributeMapping sourceAttribute="storageLocation" plantSpecificAttribute="true">StorageLocation</esi:attributeMapping>
<esi:attributeMapping sourceAttribute="phantom">IsPhantom</esi:attributeMapping>
<esi:attributeMapping sourceAttribute="versionInfo.identifier.versionId">Version</esi:attributeMapping>
<esi:attributeMapping sourceAttribute="iterationInfo.identifier.iterationId">Iteration</esi:attributeMapping>
<esi:attributeMapping sourceAttribute="PreviousVersion">PreviousVersion</esi:attributeMapping>
<esi:attributeMapping sourceAttribute="genericType">IsConfigurable</esi:attributeMapping>
<esi:attributeMapping sourceAttribute="collapsible">IsCollapsible</esi:attributeMapping>
<esi:attributeMapping sourceAttribute="team">Team</esi:attributeMapping>
</esi:Map>
<esi:MapInformation id="ESIPartInfo">
<esi:typedef>wt.part.WTPart</esi:typedef>
<esi:elementMetaName>Part</esi:elementMetaName>
<esi:keyAttribute>Number</esi:keyAttribute>
<esi:keyAttribute>Version</esi:keyAttribute>
<esi:keyAttribute>PreviousVersion</esi:keyAttribute>
<esi:keyAttribute>View</esi:keyAttribute>
<esi:keyAttribute>StorageLocation</esi:keyAttribute>
<esi:mapRef>ESINewPart</esi:mapRef>
</esi:MapInformation>
具有上述变更的响应元信息文件位于 <Windchill>/codebase/com/ptc/windchill/esi/examples/ESIResponseMetaInfoExample2.xml 中。
如果使用 ESIResponseMetaInfoExample2.xml 文件,则 Windchill ESI 映射器将生成以下输出:

由于 WTPart 对象没有名为 team 的属性,因此映射器可能无法获取所需数据。因此,激活响应元信息文件的已修改版本会在 ESI 响应中生成空 <Team> 元素。可通过扩展 WTPart 以包括 team 属性,或通过扩展 Windchill ESI 的 ESIWTPartRenderer 类填充空 team 值来解决此问题。类 Example2MyRenderer 用于展示如何扩展类 ESIWTPartRenderer。类的源代码位于
<Windchill>/codebase/com/ptc/windchill/esi/examples/Example2MyRenderer.java。
以下是示例文件的内容:
package com.ptc.windchill.esi.examples;
import com.infoengine.object.factory.Att; import com.infoengine.object.factory.Element;
import com.ptc.windchill.esi.esipart.ESIWTPartRenderer; import com.ptc.windchill.esi.rnd.ESIRendererException; import java.util.Collection;
import wt.eff.Eff; import wt.part.WTPart;
public class Example2MyRenderer extends ESIWTPartRenderer {
// This example method will adjust the mapper to return a value for the attribute "Team". If the attribute "Team" is found
// and the value is null or empty, then this method will update the value.
protected Element adjustPartElement( Element elem,
String group, WTPart part, Eff [] effs,
Collection targets )
throws ESIRendererException {
Att att = elem.getAtt("Team"); // get the attribute "Team" from the mapper output
if ( att != null ) // verify that the attribute exists in the mapper
{
// Check to see if the value of "Team" is null or is empty.
if ( att.getValue() == null || att.getValue().toString().trim().equals(""))
{
// Get the value for "Team" from the part object and use it to set
// the value for the "Team" attribute in the mapper output. att.setValue(part.getTeamName());
}
}
return elem;
}
}
请考虑以下方面:
• package 语句可确保 java 编译器的输出写入正确的目录。
• 由于类和自变量会继承到 adjustElement() 方法中,因此需要 java 导入语句。
• if 语句允许 if ( att != null ) 映射器控制 team 属性的存在。它通过尝试从映射器输出获取名称为 Team 的 Att 对象来执行此操作。如果响应元信息文件的相关映射元素中没有具有值 Team 的 attributeMapping 条目,则尝试获取 Att 对象的结果将为空。
• if 语句,if ( att.getValue() == null || att.getValue().toString().trim().equals("")) 检查映射器是否能够获取所需数据。如果已获取数据,则不执行任何操作。推荐使用此方法改写映射器行为。
您可以通过执行以下操作来编译和运行示例:
• 从使用此命令安装 Windchill 时定义的 <Windchill> 目录中启动 Windchill shell:
bin/windchill shell
• 使用 java 编译器编译类
javac -d ./codebase ./codebase/com/ptc/windchill/esi/examples/*.java
• 使用“管理分布”用户界面打开“编辑分布目标”(或“新建分布目标”) 对话框,并将 ESI Response Meta Information File Path 字段值改为指向文件 ESIResponseMetaInfoExample2.xml。单击“确定”保存变更,并使编辑的 (或新创建的) 分布目标关联到要发布的部件。
上述过程可使 Windchill ESI 服务在呈现部件时使用示例响应元信息文件。这将更改 GetPart、GetBOM、GetECN、GetProcessPlan 和 GetPromotionRequest 的 ESI 响应结构。更改结构会导致 Windchill 中的 XML 模式与 EAI 软件组件不同步。如果已更改响应元信息文件,则必须按照本文档的“创建/修改 XML 架构”一节所述修改 XML 架构。还必须修改 EAI 软件组件才能使用新模式。有关详细信息,请参阅本文档的“XML 模式”一节。 |
以下 XML 文档用作激活新部件呈现器类的 xconfmanager 命令的输入:
<?xml version="1.0" encoding="utf-8"?>
<!DOCTYPE Configuration SYSTEM "xconf.dtd">
<Configuration targetFile="codebase/service.properties">
<!-- The ESIRenderer entries for use by com.windchill.esi.rnd.ESIRendererFactory -->
<Service context="default" name="com.ptc.windchill.esi.rnd.ESIRenderer">
<Option cardinality="duplicate" requestor="wt.part.WTPart" serviceClass="com.ptc.windchill.esi.examples.Example2MyRenderer"/>
</Service>
</Configuration>
文件位于
<Windchill>/codebase/com/ptc/windchill/esi/examples/Example2.service.properties.xconf。
以下命令会将文件中指定的变更传播到文件
<Windchill>/codebase/service.properties:
xconfmanager –i
codebase/com/ptc/windchill/esi/examples/Example2.service.properties.xconf –p
codebase/com/ptc/windchill/esi/examples/Example2.service.properties.xconf –p
使用自定义响应元信息文件时所生成的 Windchill ESI 响应的 XML 模式定义位于
<Windchill>/codebase/com/ptc/windchill/esi/examples/Example2.xsd。
使用自定义响应元信息文件时生成的 Windchill ESI 响应位于 <Windchill>/codebase/com/ptc/windchill/esi/examples/Example2.xml 中。
除了扩展 VDB 构建器和任何 ESI 呈现器外,也可以扩展 ESI 响应生成器和 ESI 服务实施。有关详细信息,请参阅 ESIResponseGenerator 和 StandardESIService 小节。 |