Troubleshooting the Worker Agent
The Worker Agent Administration utility provides several troubleshooting options.
Using this utility, you can start and stop workers, test whether a worker is set up properly, view worker log files, and start verbose workers.
Troubleshooting the Network Connectivity
The configuration of the workers to the Worker Agent can prove to be difficult. It requires that files are configured correctly, and when workers are on a remote system, that the network connectivity between machines is correct.
The Worker Agent usually runs as a service, defined in the wt.properties file as:
wt.services.service.nn=com.ptc.wvs.server.cadagent.
CadAgentService/com.ptc.wvs.server.cadagent.
StandardCadAgentService
CadAgentService/com.ptc.wvs.server.cadagent.
StandardCadAgentService
The Worker Agent can run in its own Java Virtual Machine, as described in the Local Windows section.
The Worker Agent reads configuration settings from a file. The name of the file is defined in wvs.properties by the entry:
cadagent.inifile=$(wt.home)\\conf\\wvs\\agent.ini
To change file settings, click the Configure link at the top of the window to invoke the Worker Agent Configuration wizard.
Starting and Stopping Workers
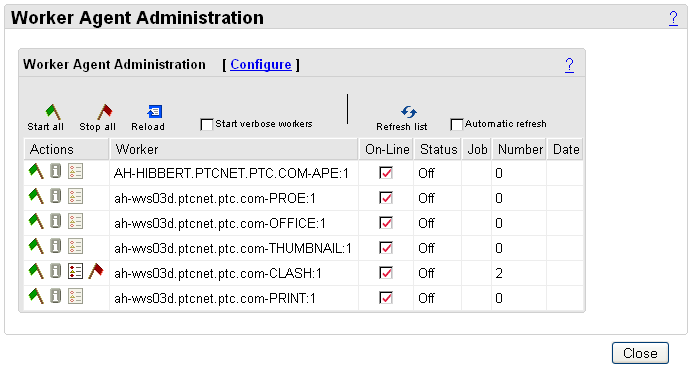
With the Worker Agent still running in debug mode, but with the workers disconnected, you can view the status of the workers in Worker Agent Administration.
1. To start a worker, select the green flag icon  in the Actions column. This sends a message to the Worker Agent to start the worker. TheStatus column shows that the worker is On, and the icon in the Action column changes to a red flag icon.
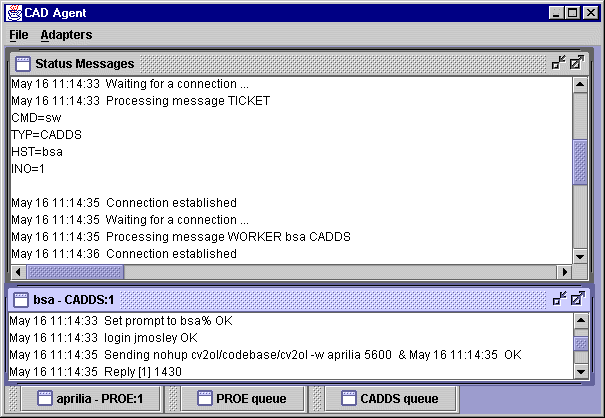
In the Worker Agent Status Messages pane, messages indicate that the Agent has received the request, and has attempted to start the worker. A flag should appear against the Adapter menu entry for the worker.

2. To stop the worker, select the red flag icon  .
.

If the Worker Agent shows that the worker has successfully connected, but the status still says Off, select the Automatic refresh check box. If the worker then shows that it is On, this indicates that the start time specified for the worker is set too low. Click the Configure link at the top of the window to invoke the Worker Agent Configuration wizard, where you can change this setting.
It is important that the worker starts within the specified time-out period. When the system is fully running, the worker should start automatically. If the time-out is set too low, the Worker Agent will make up to 3 attempts to start the worker, and if it does not achieve a connection, the worker is marked as unable to start.
Starting Verbose Workers
Using the option to Start verbose workers, you can dynamically change the level of debugging verbosity to restart the worker. This option applies to workers manually started from the user interface. Selecting this option instructs the worker to use the command-line options specified in the debug_options.txt file, located in the worker setup directory specified during the Creo View Adapter configuration.
1. To troubleshoot workers, select the Start verbose workers check box in the Worker Agent Administration window.
2. Check the green flag icon in the Actions column to start the worker.

Manually Publishing a Document
With the worker connected to the Worker Agent, the next step is to publish data.
Locate a Document stored in Windchill. From the Document’s Details tab, click on the Creo View image of the Document or Part, as shown in the example below.

After the Visualization panel is clicked, the Sent To Publisher message is displayed. From this window, you can access the WVS Job Monitor, which is described next.

If the Details tab displays this image, you need to install or update Creo View before proceeding. Click on the image and select the required action.  |
Testing a Worker from Windchill
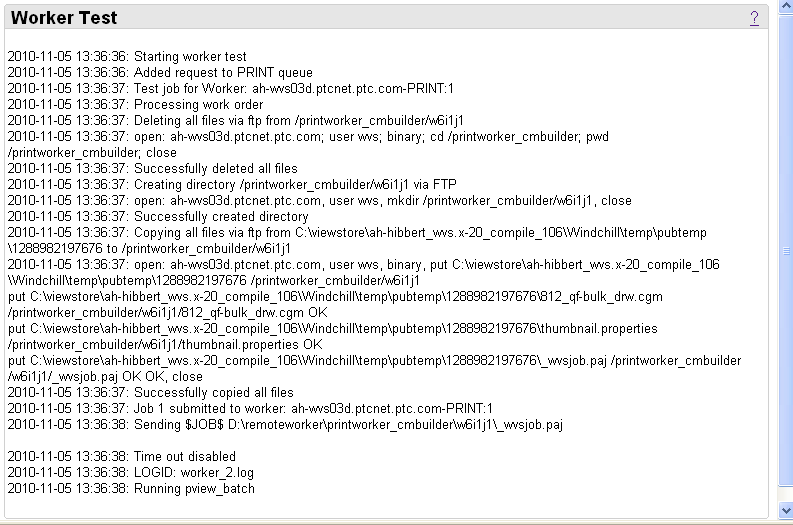
Click the test worker icon  in the Actions column to test the worker. This tests the configuration of FTP or shared file systems, application (such as CAD), license availability, and general worker functioning prior to populating data in Windchill. Before running a worker test, ensure that the worker is started, and put offline (so it cannot be sent any jobs). The worker test action is then enabled. The Worker Test window shows a log of the process of converting a test file, as well as a message as to its success or failure.
You can also test workers using Worker Agent Administration. This process ensures that the basic Worker Agent worker setup was successful. It determines whether the worker is responding, and runs a test conversion of data that is not stored in Windchill to ensure that it is being properly converted.
Before you can test a worker, you must start the worker, and it must be offline (deselect the On-Line option). |
To test a publishing job, click the  icon in the Actions column of the Worker Agent Administration. This displays the Worker Test window.

The Worker Test window displays messages logged by the Worker Agent during the publishing test process, including all files created by the worker, file size, and any failure or errors that occur. This information can be used for debugging purposes.