Copy and Paste
|
Click Copy  to create a duplicate object. Click Paste
  to save the duplicated object in a new location.
The pasted object appears as a child object in the product or part structure beneath the selected part and is simultaneously added to a new row beneath the last usage being displayed in the Uses table, in the applicable browsers. The empty part row preceded by the Insert Existing |
Copy and Paste Rules |
|---|
The following rules apply when you copy and paste objects within Windchill PDMLink: • When you copy an object, any primary content or secondary content (such as attachments) is also included. • CAD documents are not eligible to be copied and pasted. Use the Move action instead. • When a part with dependents is copied and pasted, a new object, with no dependents, is created. • The Created By and Last Modified By fields are set to the user who copied and pasted the new object. • Date and time stamps are set to the current date and time. • The Windchill clipboard does not recognize keyboard shortcuts to copy and paste an object. |
For more information, see About the Windchill Clipboard.
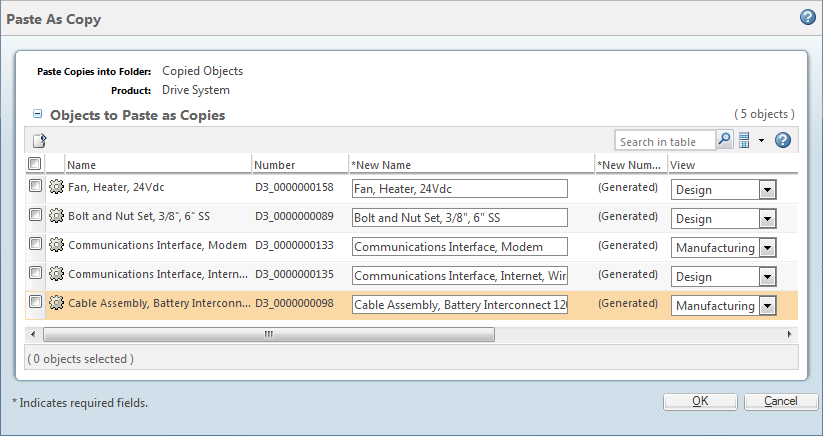
When you paste a copied object, the Paste as Copy window opens:

Column | Description |
|---|---|
Name | The name of the source object. |
Number | The number of the source object. |
New Name | Optionally, enter a name for the object being pasted. |
New Number | If you are pasting objects into a product or library that does not have auto-numbering, enter a new number for the object being pasted. |
View | Optionally, select a new view for a pasted part or end item. |
The following actions appear on the table toolbar:
Action | Description | ||
|---|---|---|---|
This action appears only if parts or end items are included in the table. Select this action to search for views and to set the view for multiple objects. For individuals objects, select an option from the menu in the View column. | |||
Select this action to set the organization ID for selected objects.
|