Editing Multiple Documents
To edit multiple documents at once, use the Edit Multiple Objects action. The Edit Multiple Objects action allows editing of either multiple documents or parts. For documents, the action is available from the Folder Contents table. When only documents are selected for editing, the Edit Multiple Documents window is displayed; the action is not applicable when both parts and documents are selected.
Use the following procedure to edit multiple documents:
1. Navigate to the Folder Contents table and select the check boxes for the documents you want to edit.
2. Select Edit Multiple Objects in the Actions menu.
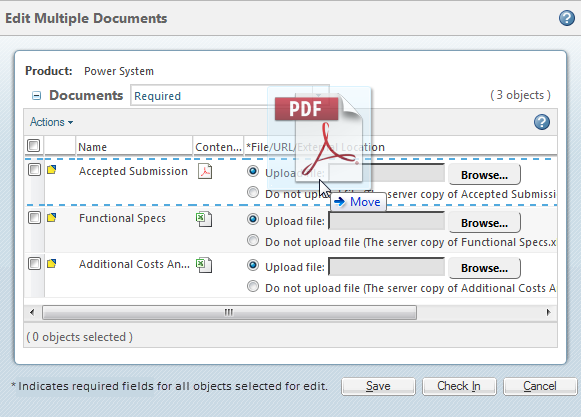
The selected documents are automatically checked out to you and the Edit Multiple Documents window is displayed with the selected documents displayed in the table.
|
|
Only the attributes required by all types of selected documents are denoted with an asterisk (*). Attributes required for some document types or instances of the documents, due to cascading attribute rules, are not denoted with an asterisk (*).
|
3. From the Edit Multiple Documents window, you can individually edit the attribute fields directly in the row for each document.
To include additional attribute values, you can customize the table view to add attribute columns. For information on customizing table views, see Customizing Table Views.
4. From the Edit Multiple Documents window, you can edit attributes for multiple documents so that the selected documents have the same values for an attribute:
a. Select one or more documents in the Documents table.
b. Click the “Edit Attribute Value” icon  .
.
.c. From the Edit Attribute Value window, select an attribute from the Set menu. The attributes that are available are dependent upon whether they are included in the table view and if they are applicable to the document type.
d. Provide a value and click Apply or OK.
For information on setting cascading attribute values from the Edit Attribute Value window, see the “Setting Cascading Attribute Values” section in the Creating Multiple New Parts topic.
5. If a document includes a primary content file, select one of the following options:
◦ Do not upload file—Check in the document without replacing the primary content.
◦ Upload file—Browse to a file to replace the primary content in Windchill. You can also drag and drop a new file onto the action window to upload it:
You can use the Upload Primary File on Checkin preference to control whether Upload file or Do not upload file is selected by default. For more information, see the “Attachment Preferences” section in Content Management Preferences. |
6. Click Check In or Save to save the changes to your document. If you have omitted any required values, an error message is displayed informing you of the missing information.
Other editing operations are available to modify the attributes associated to all versions of a specific document. It is recommended to modify these common document attributes using the Rename or Edit Common Attributes actions. |
a. Click Check In to apply your changes and check the documents back in.
If you choose to save the document rather than check in, and you later select Undo Checkout from the Actions menu, any attributes you had changed will revert to the original values. |
b. Click Save to apply your changes without checking in the document. Whether the Save button appears is controlled by the > preference. This preference is set at the context level. For more information, see About the Preference Management Utility.