Configuring NX to Read PMI
Prerequisite
Before you configure NX to read PMI, ensure that you have NX version 1899 or higher installed.
To configure Windchill to read PMI, set the following:
• Windchill Workgroup Manager client-side setting
◦ Configure the wgmclient.ini file
◦ Create a dedicated parameter
• Windchill server-side settings
• ug2pv.pvr file for the client-side viewable
• NX CAD Worker for the server-side viewable
Configuring the wgmclient.ini File
In the wgmclient.ini file, set the expose.model.annotations property to All or Designated. The default value of the preference is None. For more details on the property, refer to Frequently Used Preferences in the wgmclient.ini File.
Creating a Parameter on the Windchill Workgroup Manager Client-Side
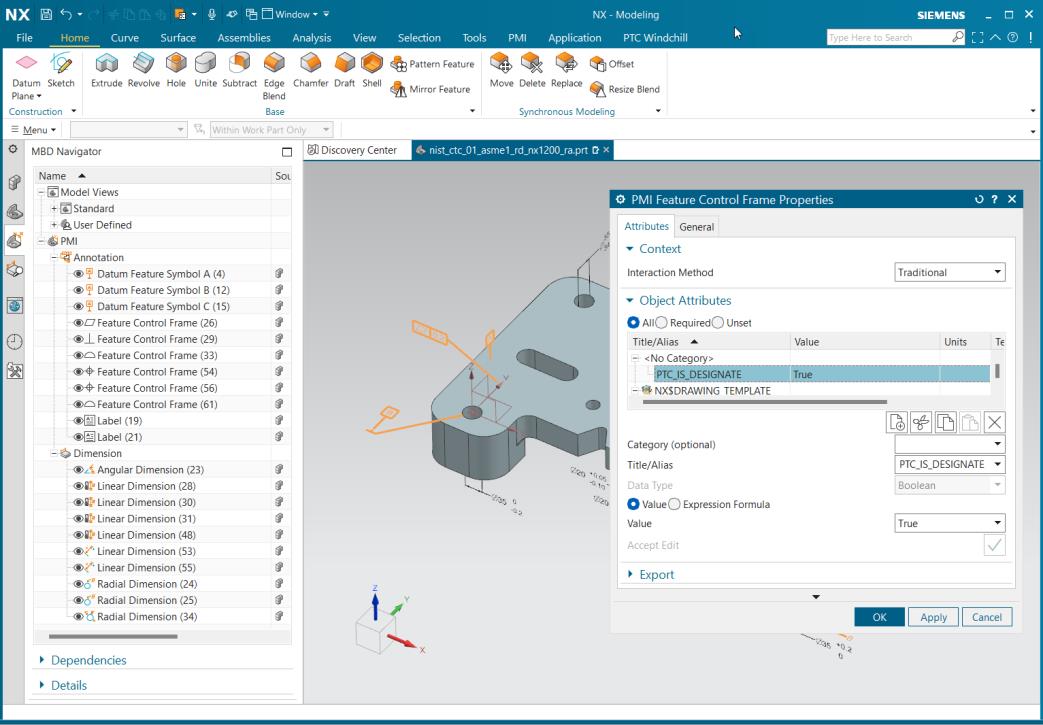
Create a dedicated parameter on a 3D annotation or dimension using these steps:
1. Go to > , right click on an annotation or dimension, and go to Properties. This opens PMI Feature Control Frame Properties wizard.
2. In the wizard, do the following:
a. In the Title/Alias, add a parameter PTC_IS_DESIGNATE.
b. In the Value, select True.
3. Click the right button.
4. Click OK. The parameter is created.

Windchill Server-Side Setting
1. In the codebase\wvs.properties.xconf file, set the property publish.copyrepresentationsforward.restrict to false.
2. In the codebase\wt.properties file, set the property com.ptc.core.meta.common.NumericToolkit.IGNORE_PRECISION_ENABLED to true.
3. To view the Model item tab in Model Structure Report (MSR) page, set the server property in the codebase\wt.properties file, com.ptc.windchill.cadx.ShowModelItemInMSR=true.
Configuring the ug2pv.pvr File to Read PMI in the Client Side Viewable
To read PMI in the client-side viewable, set the preference adapter/outputAnnotPlanar=1 in ug2pv.pvr file located at \wgm\libs\i3libs\resources\recipe.
NX CAD Worker for the Server-Side Viewable
The NX CAD Worker converts the native NX data into Creo View format and enables Windchill to use PMI data from 3D models for the downstream processes.
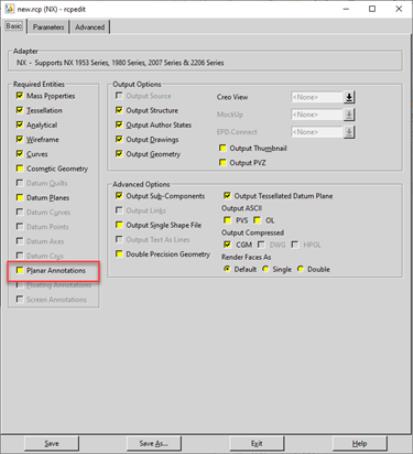
To configure NX CAD Worker, perform the following steps:
1. Open ug2pv.pvr file in the recipe editor.
2. In the Basic tab, enable the Planar Annotations.

3. Click Save.