Refine and Review Workflow Transitions
Sometimes you need to set all the Resulting Items into a new state that cannot be checked out or modified so everyone has a consistent view of the Resulting data.
Prerequisite knowledge
To apply this knowledge, you need to have an understanding of the following:
• Knowledge of creating and modifying a workflow.
• Familiarity with change management concepts such as resulting data.
• Access to a system where the Refine and Review workflow transitions are supported.
• That you have administrator access to the workflow and life cycle back end on the Windchill application.
Adding the Transitions
1. Navigate to >
2. Edit the Change Notice Workflow
3. Upon editing the Change Notice workflow, add a new Expression Robot.
a. Select the icon.
icon.
b. Click the workflow to add the transition.

4. Next you must link the expression with the workflow so it is executed.
a. You can modify or add new arrows using the Action tool ( ).
).
 ).
).b. Holding CTRL and drag arrows between states. In this example it is added before the Change Notice is submitted.

5. Now that it is part of the Change Notice’s workflow execution, you must make it a Refine or Review transition. You can do this by adding some code to the expression. Double click the new Expression and then select the Expression tab.
a. To add a Refine transition add the following expression code to the transition:
wt.maturity.TransitionHandlerFactory.getInstance().transitionTargets
(primaryBusinessObject,wt.lifecycle.Transition.toTransition(“REWORK"),false);
(primaryBusinessObject,wt.lifecycle.Transition.toTransition(“REWORK"),false);
b. To add a Review transition add the following expression code to the transition:
wt.maturity.TransitionHandlerFactory.getInstance().transitionTargets
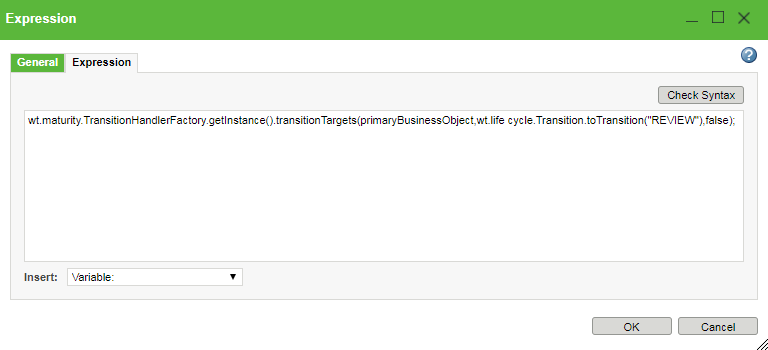
(primaryBusinessObject,wt.life cycle.Transition.toTransition("REVIEW"),false);
(primaryBusinessObject,wt.life cycle.Transition.toTransition("REVIEW"),false);
In this example a Review Transition has been added.

6. Select Check Syntax.
If you copy and paste the transition code out of Word and directly into Windchill, Word will copy invalid quotes which are not valid for the java compiler. To get around this, when adding your expression code, paste it into a Notepad first, copy it from Notepad, then paste into the Windchill Expression box. |
7. Save your changes and then Exit the Change Notice Workflow window. Now you have a working copy of the new workflow with a Review Transition.
You can use the same process to add Refine transitions.
Understanding the Transitions
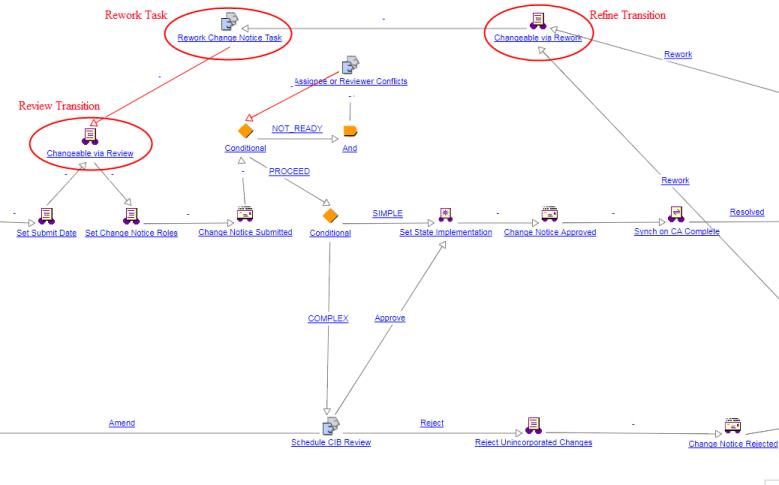
After the default Change Notice life cycle has been modified to contain the Refine and Review transitions, you might have a workflow that looks something like this:

Understanding the execution of Refine and Review above
If an Auditor is reviewing changes made to several Resulting Objects on a Change Notice. When the Auditor reviews them, the changes do not appear to be complete, so the changes are disapproved. The Refine and Review transitions will help to complete the changes and get to the Auditor so that he or she can review the complete changes.
1. During the Audit Change Notice, the changes are disapproved.
2. Refine Transition will be executed internally, changing the state of the Resulting objects back to something modifiable.
3. The workflow will create a task for the Change Admin I to make the proper updates. This is the Rework Task.
4. The Change Admin I makes the proper updates, and completes the Rework Task.
5. Next, the workflow will execute the Review Transition. Once this Review Transition is executed, the workflow will internally set the Resulting objects to a state in which they can no longer be modified. Once the Review Transition is executed, the Auditor who originally disapproved the changes would be able to review the new complete changes.
Changing the Life Cycle of Part to Handle Refine and Review Transitions
In this scenario, the part is using the Two Phase Development Life cycle instead of the default one.
1. Navigate to the Site/Utilities level of Windchill
2. Find the Life Cycle Administrator and navigate to it
3. Edit the Two Phase Development Life Cycle, you will have to check it out
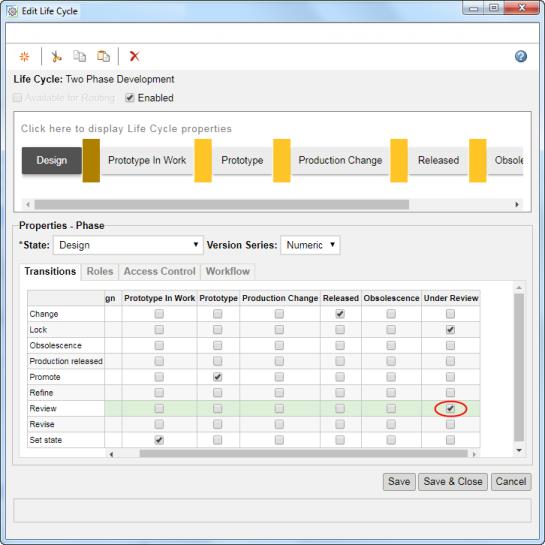
4. Configure what the new state will be when the Review transition is executed. Suppose the business needs require to set the state of the Resulting objects to Under Review if the Review transition is executed. To configure this, make the following change in the life cycle:

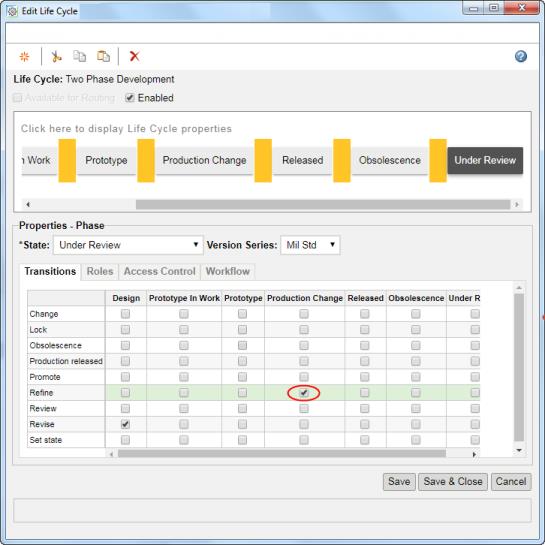
5. Configure what you want the state to do if it is under the Refine transition. Keep in mind this would likely be useful to use just after the Review has occurred. Because of this, when the Change Notice is in Under Review state, you will want to use the Refine transition to change the object back into something editable. To do this, change the state to Production Change:

6. Once the changes are made, click Save
7. Click Ok.
8. Back in the Life Cycle Administrator, check in the changes to the Two Phase Life cycle
Executing the Use Case
Verify the changes with the UI.
1. Create a few new Parts (this will ensure they are all in the design state)
2. Copy the new Parts to the clipboard
3. Launch Create Change Notice wizard
4. On the implementation table of the Change Notice wizard, find the Default Change Task, edit it.
5. Go to the Affected and Resulting step of the Change Task
6. Paste the parts into the Resulting Objects table.
7. Finish the Change Task wizard.
8. Finish the Change Notice, and select submit now.
9. Modify the Resulting Object, and complete the workflow tasks for the Change Task
10. Upon Auditing the Change Notice, disapprove the changes made. The Change Notice will now enter Refine Transition > Rework Task > Review Transition as depicted above.
At this point, the workflow will execute the Refine Transition. This takes the Change Notice and places it into a state in which the Resulting objects can be modified.
11. As the Change Administrator you can go back and modify the Resulting Object again. This time, modify it correctly so that the changes will be approved by the Auditor.
12. Complete the Rework Task.
At this point, the Rework Task is completed, and the workflow will internally run the Review Transition. This results in placing the Resulted objects back into a state which cannot be modified. This ensures that the proper changes will be reviewed by the Auditor the next time around.