Creating the JNDI Adapter Entry
Adapter properties are maintained as attributes in adapter configuration entries. Use the Info*Engine Property Administration utility to add or modify entries.
You can access the Property Administration utility by navigating to > and clicking Info*Engine Administration.
For general information about using the Info*Engine Property Administration utility, see Info*Engine Administration Utility.
Use the following procedure to create a JNDI adapter entry:
1. To create a new adapter service entry, select JNDI Adapter from the Create Entry drop-down menu on the Info*Engine Property Administration main page.
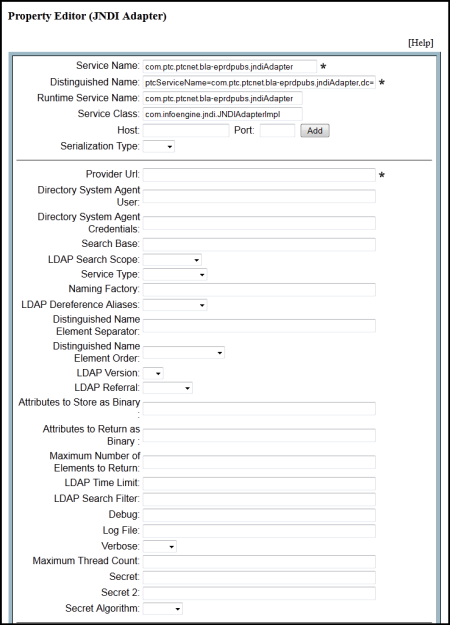
A form similar to the following opens:

2. Enter values for the required fields. Hover over property names to view a brief description of each property.
Most adapter forms include the following fields:
Service Name
Distinguished Name
Runtime Service Name
The Property Administration utility automatically populates the Service Name, Distinguished Name, and Runtime Service Name fields with suggested names. These names are based on information provided when you logged in to the administration utility and also information that is stored in the form.
You can change these names to match the criteria set up for your site entries. For additional information about these fields, click the property name field or the help link available from the form. Additional information about creating entries can be found in the 《Windchill 安装和配置指南》.
Service Class
Host
Port
Service Class contains the service class name used for the adapter.
If you are using the adapter in process:
▪ Leave the default service class name in the Service Class field
If you are using the adapter out of process:
▪ Delete the name in the Service Class field
▪ Add the host and port used to access the adapter in the Host and Port fields
Serialization Type
The Serialization Type field allows you to change the type of data serialization Info*Engine uses when passing data to an out-of-process JNDI adapter.
By default, Info*Engine uses Java serialization when passing data between components. Java serialization preserves data type information so that the data can be easily manipulated from within an Info*Engine custom application, task, or Java Server Page. If you are configuring an out-of-process adapter that accepts only XML, change the serialization type to XML.
3. Set any remaining properties as appropriate for your site. For a description of the remaining properties, see JNDI Adapter Properties.
4. Click Create Adapter when finished.
For more information about properties and creating adapter entries, see the following help topics:
• JNDI Adapter Properties provides additional properties descriptions.
• Common LDAP Entry Properties defines common properties used in most adapter forms.
• Performing Info*Engine Administration Activities provides detailed instructions on using the Property Administration utility, including editing adapter forms.
• Entering Your LDAP Settings describes the configuration settings performed during the Windchill installation process.