Building Wizards to Create a Single Object
Objective
You need to develop a wizard to capture user input and from that input create a Windchill business object in the database.
Background
Windchill provides a framework for creating wizards and navigating between wizard steps. It also provides data utilities, GUI components, renderers, and validators for creating input elements in your wizard JSPs. Finally, it provides a framework for processing the data sent to the server when the wizard form is submitted. These frameworks and components are described in other documents listed in the section Prerequisite Knowledge.
This document builds upon that information to describe how to develop and process wizards designed specifically to create Windchill objects. It will tell you how to use out-of-the-box components as building blocks to create your own wizards. Components you will typically make use of are:
• action definitions for wizard steps that are common to multiple wizards
• jsp and jspf files for wizard steps that are common to multiple wizards
• custom tags for managing wizard data and displaying elements on the page
• Java classes for processing the wizard data after the user submits the wizard
Scope/Applicability/Assumptions
Assume you have created a custom Windchill business object class or subtype and you want to develop a wizard that will allow users to create one instance of that object type in the database.
The object to be created should be a Persistable. It may or may not implement the Typed, Foldered, and/or Iterated interfaces. Where this document makes reference to attributes that are not applicable to your object type it is correct to ignore those implementation details.
This document describes the creation of a very basic wizard to create objects. There are many reusable steps available to you out of the box. For more details on adding these steps to a wizard see Customizing Reusable Wizard Steps.
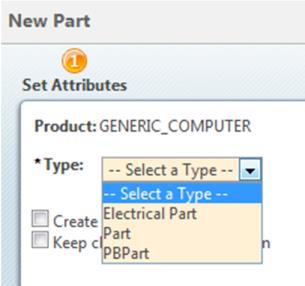
Be aware that it may not be necessary to develop your own custom wizard to create instances of a custom type. If your type is a Windchill business class for which a wizard with a type picker is already available, it may be possible to use the out-of-the-box wizard for the type. The out-of-the-box wizards will automatically find subclasses and subtypes of a given base type such as WTPart or WTDocument and display those subtypes in the type picker so that a user can create instances of them. For example, if you have created a soft subtype of WTPart called PBPart, it will be displayed in the New Part wizard as follows:
You need to specify any non association attributes you have defined for your sub type in the Type and Attribute Management utility Layout for them to appear as Input fields in the non driver attributes table. Attributes will be displayed in the UI exactly as you specify them in the Type and Attribute Management utility.
If you want to order the attributes on this step differently, you will need to create a new jsp for this step specifically for your subtype but you can still use the New Part wizard.
However, if you need to associate other objects to your new object or require additional wizard steps, you will likely need to develop a custom wizard.
This document describes the process of developing a wizard that creates a single object. See Building Wizards to Edit a Single Object, for information on constructing a wizard to edit an object.
Intended Outcome
Add a single- or multi-step HTML wizard to the product that allows a user to create a business object in the database. The arrangement of steps and presentation of attributes within the wizard should be similar to that of other Windchill wizards to provide a consistent user experience.
Solution
Use common jsp, tag, JavaScript, and Java class components built on top of the jsp wizard framework to create a wizard for capturing user input and for processing that input and creating the object in the database.
Prerequisite Knowledge
To apply this process, you need to have an understanding of the following:
• Java programming
• Basic web development using JSPs , custom tags, and HTML forms
• How to create hard or soft Windchill business object types.
See the following chapters for more information on creating your business object classes:
See Working with the Type and Attribute Management Utility for more information on creating subtypes and attributes.
• The use of actions to launch jsp pages and wizards.
See Adding Actions and Hooking Them Up in the UI for information on how to create actions.
• The Windchill framework for creating wizards and processing wizard data. See Constructing Wizards, for more information on this topic.
• The use of tables and property panels to present information in the UI and how to acquire the data for these components. For more information see
• The use of data utilities, gui components, and renderers to create HTML elements for presenting and editing object attributes within tables and property panels. See Presenting Information in the UI for more information.
• The use of the UI Validation Service for validating the user’s ability to perform actions and for validating the data entered in wizards. See Adding Validation Logic for Actions and Properties for more information.
• The Windchill service APIs or other APIs necessary to perform the data processing tasks appropriate to the wizard
• Attribute Layout
See Attribute Customization for more information.
This document will build on this knowledge and provide additional information on the components available to help you create and process wizards for the specific purpose of creating a Windchill business object in the database.
Definition of Terms Used in This Section
Term | Definition |
|---|---|
base type | A hard or subtype class that is the root type of the wizard's type picker. If the wizard does not have a type picker, this is the type of object that will be created. The base type is used to look up the correct JSPs for wizard steps that have different jsp variants for different subtypes until a specific type is selected by the user. |
dependent attribute | An attribute whose value and/or display characteristics are wholly or partially determined by the value of another attribute (called the "driver attribute") via an object initialization rule (OIR), access control policy, or other mechanism. |
driver attribute | An attribute whose value drives the value and/or display characteristics of another attribute (called a "dependent" attribute) via an object initialization rule (OIR), access control policy, or other mechanism. |
hard attribute | An object attribute defined in a Java class. |
hard type | An object type defined in a Java class. Hard types are typically created in java classes using annotations and may extend out-of-the-box Windchill business object classes. |
object type | A Java class or subtype defining the attributes and behavior of the business object(s) you want to create. |
global attribute | An attribute of the object defined in the Windchill Type and Attribute Management client. These attributes are not defined in the Java business object class and are stored in database tables separate from the table for the business class. |
subtype | An object type defined using the Type and Attribute Management utility rather than in a Java class. Subtypes may extend other soft types but all have a hard type as their root type. |
target object | The object you are creating in your wizard. |
Solution Elements
Element | Type | Description |
|---|---|---|
JSPs The following jsp and jspf files can be used to create and display components common to many create wizards. Unless otherwise noted, they are located in the <WT_HOME>/codebase/netmarkets/jsp/object and <WT_HOME>/codebase/netmarkets/jsp/components directories. | ||
createEditUIText | JSP file | Contains some UI text common to create and edit wizards. |
includeWizBean | JSP file | Defines the CreateAndEditWizBean called during the generation of jsp pages to access wizard data. |
Beans | ||
CreateAndEditWizBean | Java class | This bean is available to your jsps if you include the includeWizBean jspf file. It has getter methods for wizard data set by the initializeItem tag such as the operation, default container, the base type, and so forth. |
Javascript | ||
validateCreateLocation | A javascript method you can specify on the onClick parameter of the wizard action for wizards that can be launched from a folder browser toolbar. This checks to make sure that the user does not have more than one folder checked and that the user has not checked an object that is not a folder. If either is the case, a popup error message is displayed. Location: <WT_HOME>/codebase/netmarkets/javascript/util | |
Java Classes You can use the classes below to help create and process your wizard. They are located in the <WT_HOME>/codebase/WEB-INF/lib/wncWeb.jar file. | ||
CreateAndEditModelGetter | Java class | A class that may be called via a getModel tag to generate the data for property panels and attributes tables in create wizards. |
CreateObjectFormProcessor | Java class | A class that may be used or extended to process your wizard form data. Extends DefaultObjectFormProcessor. |
DefaultObjectFormProcessorDelegate | Java class | A class that may be extended to implement various processing subtasks. |
ObjectBean | Java class | A container for the form data specific to one target object and for the data common to all objects. Provides methods to retrieve the form data for the associated object. A wizard creating only one object will have only one ObjectBean. |
FormResult | Java class; runs in the Method Server and client | A class used to pass method results between server processor methods and from the server to the WizardServlet. |
Procedure — Creating Your Wizard
You will need to perform the following tasks to create your wizard:
• Create an Action for the wizard
• Create a main jsp file for your wizard
• Create your first custom step
• Select Reusable Steps
Create an Action for the wizard
You will need an action to launch your new wizard. For more details on the options available for this action see the Wizard Processing. A simple action could look like this:
<objecttype name="Novel">
<action name="create">
<command class="com.ptc.core.components.forms.CreateObjectFormProcessor"
method="execute"
url="netmarkets/jsp/carambola/customization/examples/wizard/
wizardExampleTwo.jsp"
windowType="popup"/>
</action>
</objecttype>
<action name="create">
<command class="com.ptc.core.components.forms.CreateObjectFormProcessor"
method="execute"
url="netmarkets/jsp/carambola/customization/examples/wizard/
wizardExampleTwo.jsp"
windowType="popup"/>
</action>
</objecttype>
If you follow the standard naming convention for actions and place your jsp in the <objecttype>\<actionname>.jsp location you do not need the url parameter. The pretend object types for the examples do not follow that in order to avoid cluttering your system. |
We recommend that you name your action (and main wizard jsp file) “create.” If you will have more than one create action for your objecttype based on launch point or other criteria, you can add a suffix to the action name to qualify it, as shown below:
createFrom<launch point>
Example: createFromWorkspace
create<type of object>
Example: createSharedDocument
Add this action to an action model so that you can access it on your system.
Create a main jsp file for your wizard
You will need to create a jsp which describes your create wizard. To start with we will put in just the wizard tag. This does not specify enough information for the wizard to work but at this point you can click the action and see the wizard open.
<%@ taglib prefix="jca" uri="http://www.ptc.com/windchill/taglib/components"%>
<%@ taglib uri="http://www.ptc.com/windchill/taglib/fmt" prefix="fmt"%>
<%@ taglib uri="http://java.sun.com/jsp/jstl/core" prefix="c"%>
<%@ include file="/netmarkets/jsp/components/beginWizard.jspf"%>
<%@ include file="/netmarkets/jsp/components/includeWizBean.jspf"%>
<jca:wizard title="Create Literature">
</jca:wizard>
<%@include file="/netmarkets/jsp/util/end.jspf"%>
At this point, if you launch your wizard, you should see the message “No Valid Actions to Display” as we have not yet defined any steps.
For additional information on the customizations you can make to your main wizard jsp see the Wizard Processing and Sample Code.
Create your first custom step
A custom wizard step is also made up of an action and a jsp.
Action:
<action name="createNovelStep">
<label>Welcome to your Create Novel Wizard</label>
<command url="netmarkets/jsp/carambola/customization/examples/wizard/createNovelStep.jsp"
windowType="wizard_step"/>
</action>
<label>Welcome to your Create Novel Wizard</label>
<command url="netmarkets/jsp/carambola/customization/examples/wizard/createNovelStep.jsp"
windowType="wizard_step"/>
</action>
Initial JSP content: Hello World.
Update the WizardTag to include your step:
<jca:wizard title="Create Literature">
<jca:wizardStep action="createLiteratureStep" type="fakeLiterature"/>
</jca:wizard>
<jca:wizardStep action="createLiteratureStep" type="fakeLiterature"/>
</jca:wizard>
At this point you have created a simple wizard and when you launch it you should see:
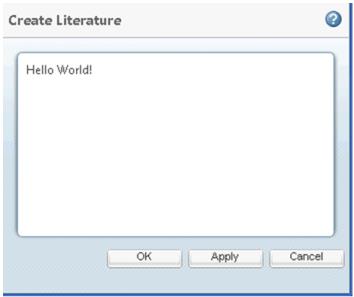
You can now develop your own jsp files for your unique steps using the same table, property panel, and javascript components used in the jsp files for common steps.
Select Reusable Steps
When you are unable to use one of the out of the box wizards for you object type, you can still reuse some of the out of the box steps.
For this example, we will add the defineItemAttributesWizStep and the attachments step. For full details on all the options available for these steps see Attachments and Customizing Reusable Wizard Steps.
Update the create.jsp to include these steps:
<%@ taglib prefix="jca" uri="http://www.ptc.com/windchill/taglib/components"%>
<%@ taglib uri="http://www.ptc.com/windchill/taglib/fmt" prefix="fmt"%>
<%@ taglib uri="http://java.sun.com/jsp/jstl/core" prefix="c"%>
<%@ include file="/netmarkets/jsp/components/beginWizard.jspf"%>
<%@ include file="/netmarkets/jsp/components/includeWizBean.jspf"%>
<jca:initializeItem operation="${createBean.create}" baseTypeName=
"wt.doc.WTDocument|org.example.FakeLiterature"/>
<jca:wizard buttonList="DefaultWizardButtons" helpSelectorKey="AssignView_help"
title="Create Literature">
<jca:wizardStep action="createLiteratureStep" type="fakeLiterature"/>
<jca:wizardStep action="defineItemAttributesWizStep" type="object"/>
<jca:wizardStep action="attachments_step" type="attachments" />
</jca:wizard>
<%@include file="/netmarkets/jsp/util/end.jspf"%>
For the defineItemAttributesWizStep we also had to include the initializeItem tag to setup the type we are creating. For more details on this tag and on the other options available when using this step see Customizing Reusable Wizard Steps. |
At this point your wizard can create FakeLiterature objects. There are many variations on this basic setup. For more information see the customizations below, the sample code below, the Wizard Processing and Customizing Reusable Wizard Steps.
Customization Points
Creating Your Form Processor and Form Processor Delegates
This section assumes you are familiar with the standard wizard processing framework described in the Wizard Processing.
The class com.ptc.core.components.forms.CreateObjectFormProcessor is available as a default form processor for wizards creating Persistable objects. This class may be extended as necessary to meet your purposes.
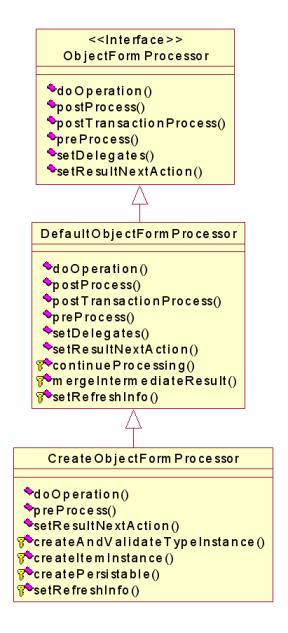
The CreateObjectFormProcessor does the following:
preprocess() method
• extracts all of the ObjectBean form data that has a special name attribute as described in Attribute Tables.
• creates a TypeInstance for the new object and applies the attribute values from the form to it, validating the values against any constraints defined for the attributes in the Type and Attribute Management utility
• converts the TypeInstance into a Persistable and sets it as the “object” attribute on the ObjectBean
• calls super.preProcess() to call the preprocess() methods of any FormProcessorDelegates registered for the wizard
doOperation() method
• calls super.doOperation() to call the doOperation() methods of any FormProcessorDelegates registered for the wizard
• calls PersistenceHelper.manager.store() to store the Persistable in the database
• getSuccessFeedbackMessage() method (called by setResultNextAction())
▪ This method is called when FormResult is SUCCESS.This constructs the FeedbackMessage see Inline Messaging for more information on configuring message content.
In the UI this inline message is shown as below for single object creation:

For Multi-object create the UI as shown below:
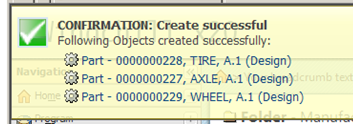
Note the CreateObjectFormProcessor does not implement postProcess() or postTransactionProcess() methods so these are inherited from the DefaultObjectFormProcessor. See the javadoc for more information.
If you are extending an existing Windchill business class, there may be a processor specific to that class that you should use or extend instead of CreateObjectFormProcessor. These are shown in the table below. Consult the javadoc for these classes for more information on their behavior.
If your class extends: | Use processor class: |
|---|---|
WTPart | If creating a wizard to be launched from a workspace: com.ptc.windchill.enterprise.part.forms.CreatePartFromWorkspaceFormProcessor If creating a wizard to be launched from the Edit Structure client: com.ptc.windchill.enterprise.part.forms.CreatePartFromTabularInputProcessor All other single-object creation wizards: com.ptc.windchill.enterprise.part.forms.CreatePartFormProcessor |
WTDocument | For creating a document from a template: com.ptc.windchill.enterprise.doc.forms.CreateDocFromTe mplateFormProcessor For creating a document template: com.ptc.windchill.enterprise.doc.forms.CreateDocTemplateFormProcessor For all other single-object create wizards: com.ptc.core.windchill.enterprise.doc.forms.CreateDocFormProcessor |
WTChangeIssues | com.ptc.windchill.enterprise.change2.forms.processors.CreateProblemReportFormProcessor |
WTChangeRequest2 | com.ptc.windchill.enterprise.change2.forms.processors.CreateChangeRequestFormProcessor |
WTChangeOrder2 | com.ptc.windchill.enterprise.change2.forms.processors.CreateChangeNoticeFormProcessor |
WTChangeActivity2 | com.ptc.windchill.enterprise.change2.forms.processors.CreateChangeTaskFormProcessor |
If the behavior of one of the provided form processors meets your needs, you do not need to write your own processor, just specify that processor as the value of the class attribute of the command subtag of your wizard action. If it does not meet your needs, you should write a subclass of it to process the wizard form data. Note that you do not need to create your own processor if you only want to provide special code for setting an attribute. In that case, you need only to write a FormProcessorDelegate to handle this task. Remember to register the FormProcessorDelegate in a hidden form field and make sure that the attribute input field does NOT have a special name attribute that will be recognized by the CreateObjectFormProcessor.
See Attribute Tables for more information.
The FormProcessorDelegate should extend from DefaultObjectFormProcessorDelegate. NumberPropertyProcessor and KeepCheckedOutDelegate are examples of custom FormProcessorDelegates available out of the box. The class structure for FormProcessorDelegates is shown below.
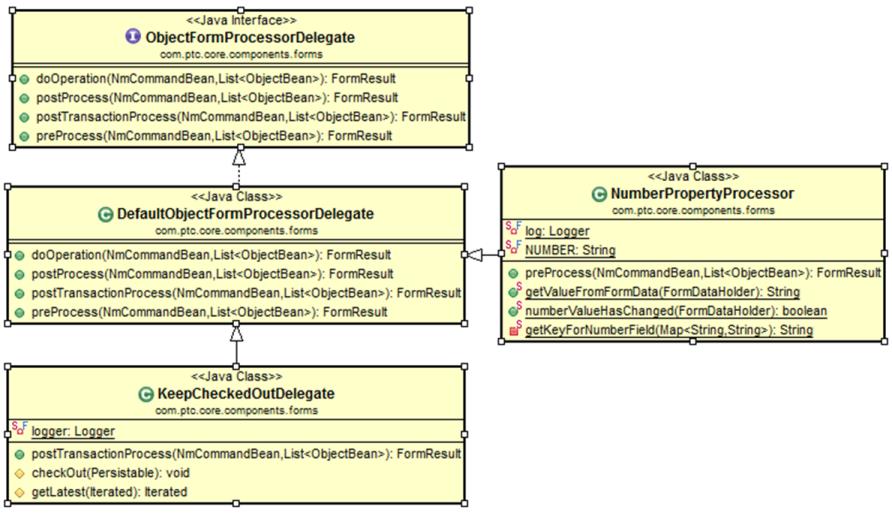
If you create your own processor, be aware that its preProcess() method will be called by the standard validator classes after each wizard step. Make sure you do not modify the database in this method.
Here are some of the more common cases where you may need to write your own ObjectFormProcessor class and the methods you would override to handle them:
Case 1: You need to perform a different action when the wizard closes.
For example, perhaps you want to load a new page when the wizard closes instead of refreshing the launch page. Or, perhaps your wizard can be launched from multiple points and you want to refresh the launch page in one case and load a new page in another case.
Solution: Subclass the out-of-the-box processor and override the setResultNextAction method. From the NmCommand.getCompContext() method you can obtain information about the launch context of the wizard. Here is an example of how this is done for the create baseline client:
String compContext = cb.getCompContext();
if (compContext != null) {
try {
NmContext compContextObj = NmContext.fromString(compContext);
Stack<NmContextItem> contextItems = compContextObj.getContextItems();
for (NmContextItem contextItem : contextItems) {
String action = contextItem.getAction();
if ("addToBaseline".equals(action) ||
"addToBaselineSingle".equals(action) ||
"addToBaselineStep".equals(action)) {
< set some next action >
}
}
.
.
.
Note that if your wizard is launched from a table and you have specified “ajax=”row”” on the wizard action, you must set the refreshInfo attribute on the FormResult to tell the system what rows to refresh. Typically, the attributes of the DynamicRefreshInfo object will be as follows:
action = NmCommandBean.DYNAMIC_ADD
oid = the NmOid of the object that was created
location = the NmOid of the table object containing the new row. Typically, this will be a folder.
If you have used an ajax attribute of “page” or “component” you do not need to set the refreshInfo attribute.
See the Customizing the UI with Ajax section in the Customizing HTML Clients Using the Windchill JSP Framework chapter and the javadoc for the FormResult and FormProcessingStatus classes for more information.
Case 2: You need to do some post processing after the object is persisted.
For example, change object wizards have a dialog to allow the user to submit the object to workflow immediately after creation. For this, they need to perform another operation after the object is created. In some cases, this kind of requirement can be handled by creating an ObjectFormProcessorDelegate for the input field and implementing a postProcess() or postTransactionProcess() method on it that will be called automatically by the infrastructure. However, in other cases you may prefer for your form processor to handle this. For example, you cannot control the order in which FormProcessorDelegates are called so if operation ordering is a requirement you would need to do the operations in the form processor.
Solution: Subclass the CreateObjectFormProcessor and override the postProcess() or postTransactionProcess() method (which are inherited from DefaultObjectFormProcessor) to perform your operation.
(Note that if you put a “Keep checked out checkbox” in your wizard by including the keepCheckedOutCheckbox.jspf file, this will be processed automatically by the KeepCheckedOutDelegate. You do not need to handle this).
Case 3: You need to use a special API to persist the object.
For example, change objects are persisted using the StandardChangeService2 class, which handles some life cycle and foldering tasks in addition to persisting the object.
Solution: Subclass the out-of-the-box processor and override the doOperation() method. In your method you can’t call the super method, but you should still make sure the doOperation() method of any registered FormProcessorDelegates are called. You can accomplish that by calling the processDelegates() method inherited from DefaultObjectFormProcessor. For example:
FormResult doOperationResult = new FormResult();
doOperationResult.setStatus(FormProcessingStatus.SUCCESS);
doOperationResult = processDelegates (DO_OPERATION, clientData,
objectBeanList);
if (!continueProcessing(doOperationResult)) {
return doOperationResult;
}
try
{
< persist the object >
}
catch(WTException e)
{
< do error handling >
}
return doOperationResult;
Note that delegates are called after form processor tasks in most processing phases, but in the doOperation phase they should be called before the form processor does its tasks. This is to allow delegates to perform operations after all attributes have been set but before the object is persisted.
Case 4: You need to set attributes on the new object programmatically
You may have attributes that you need to set on the object before it is persisted which are not exposed in the UI.
Solution: There are alternate ways to handle this.
• Create a FormProcessorDelegate and implement its preProcess() method. In that method, set the attribute values on the object in the ObjectBean. Add a hidden form field to your wizard jsp specifying the name of your delegate, which will be automatically instantiated by the framework. For example:
<input type="hidden" name="
${createBean.formProcessorDelegateConstant}" value=" <path name
of your delegate> ">
${createBean.formProcessorDelegateConstant}" value=" <path name
of your delegate> ">
• Subclass the out-of-the-box processor and override the preProcess() method. You can call the createItemInstance() method of the superclass to create the Persistable for you and then set the attributes you desire on the Persistable. For example:
FormResult preProcessResult = new
FormResult(FormProcessingStatus.SUCCESS);
for (ObjectBean objBean: objectBeans) {
FormResult objectResult =
new FormResult(FormProcessingStatus.SUCCESS);
objBean.setObject(createItemInstance(clientData,
objBean, objectResult));
preProcessResult =
mergeIntermediateResult(phaseResult, objectResult);
if (!continueProcessing(preProcessResult)) {
return preProcessResult;
}
Object newObj = objBean.getObject();
< set additional attributes on the new object here>
}
// Call processDelegates() which will call registered
processor delegates
delegatesResult = processDelegates(DO_OPERATION,
clientData, objectBeanList);
preProcessResult =
mergeIntermediateResult(preProcessResult, delegatesResult);
if (!continueProcessing(preProcessResult)) {
return preProcessResult;
}
Note that the above example is written so that the processor could be used for wizards creating more than one object.
In general, it is probably preferable to use the delegate approach for setting your attributes rather than the subclass approach as it will insulate you from any modifications that might be made to the CreateObjectFormProcessor preprocess() method in the future.
Limitations
When laying out the steps and attributes of a Windchill object creation wizard, it is important to keep in mind the interdependencies between the object type, container context, organization context, folder location, default life cycle, and, possibly, other attributes of your new object. These interdependencies can result from:
• type definitions
• object initialization rules (OIRs)
• access control policies (ACLs)
Type Definitions
Many wizards allow a user to create one of several object subtypes derived from a given base type. You can define soft subtypes and global attributes in the Attribute and Type and Attribute Management utility at the organization or site level. This means that the organization container of the object must be known before the list of available object types is displayed and the input fields for global attributes are rendered. Also, the default type for some Windchill business types is determined by preferences which can be set at the container, organization, and site levels so these must also be known
Access Control Policies
The object types which a given user has permission to create are defined by the access control policies for the administrative domain to which the object belongs and by ad hoc rules. Administrative domain is typically, although not always, determined by the object’s folder. In addition, access rules can be further refined based on the initial state of the default life cycle for the object type.
Object Initialization Rules
Object initialization rules are defined by object type at the site, org, and/or container levels. Such rules can dictate whether or not the server assigns an attribute’s value or it is entered by the user; what the default value of an attribute is, if any; whether the value is editable; and other display characteristics of an attribute. Attributes for which OIRs are defined in the out-of-the-box product include:
• Organization
• Number
• Name (variant parts only)
• Folder location
• Life cycle template
• Team template
• Versioning scheme
These OIRs may be modified or deleted by customizers and additional OIRs for other attributes may be written by customizers. These actual and potential interrelationships between properties are illustrated in the following diagram, where the shaded boxes represent wizard elements.
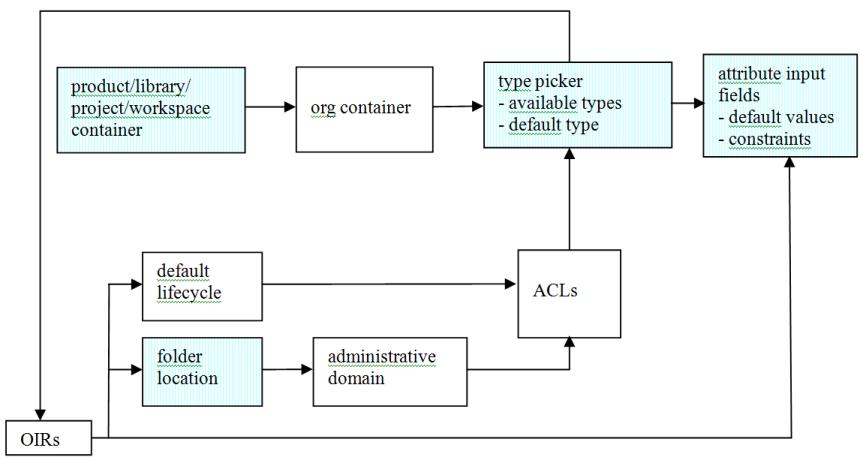
As you can see from this diagram, the relationships between various object properties can become complex and circular. For example, to display an input field for folder location you must know the default folder set by the OIR, which requires knowledge of the type of object being created. However, to display a picker with the available object types you must know the administrative domain, which is determined by the folder.
This document will refer to attributes whose values affect the values of other attributes as “driver attributes.” The affected attributes will be called “dependent” attributes. Driver attribute values must be determined “upstream” of any attribute values dependent on them. By “upstream” we mean either from the wizard launch context, entered by the user on a previous wizard step, or, in some cases, entered by the user in a table or panel on the same step but above that of dependent attributes. Any time a driver attribute value is changed the downstream parts of the wizard must be refreshed if they contain dependent attributes and have been preloaded. (see Loading the wizard step content when it is visited for information on preloaded and non-preloaded steps.)
The exact nature of the interrelationships between attributes depends on how a site defines its OIRs and access control policies. The wizards delivered by PTC are set up to gather attribute information in an order consistent with the access control rules and OIRs defined out-of-the-box and with anticipated common customizations. They make certain assumptions about how a customer site has set up its OIRs and ACLs. These include the following:
• A site has OIRs defining the default life cycle for different object types
• OIRs are only defined for base types such as WTPart or WTDocument and not defined differently for subtypes of the base types
If these assumptions do not hold or your site introduces additional attribute dependencies via its OIRs or access control policies, the layout of wizard steps and attributes may need to be customized to ensure that driver attributes are always upstream of their dependent attributes.
Sample Code
Main JSP for the New Baseline Wizard
Filename: <WT_HOME>/codebase/netmarkets/jsp/baseline/createBaseline.jsp
This is a one-step wizard so it uses the “NoStepsWizardButtons” actionmodel defined in <WT_HOME>/codebase/actionmodels.xml.
<%@ taglib prefix="jca"
uri="http://www.ptc.com/windchill/taglib/components"%>
<%@ include file="/netmarkets/jsp/components/beginWizard.jspf"%>
<%@ include
file="/netmarkets/jsp/components/includeWizBean.jspf"%>
<script src='netmarkets/javascript/baseline/baseline.js'></script>
<jca:initializeItem operation="${createBean.create}"
baseTypeName="wt.vc.baseline.ManagedBaseline"/>
<jca:wizard buttonList="NoStepsWizardButtons"
helpSelectorKey="baseline.createHelp">
<jca:wizardStep action="setBaselineAttributesStep"
type="baseline" />
</jca:wizard>
%@include file="/netmarkets/jsp/util/end.jspf"%
Main JSP for the New Product Wizard
Filename: /codebase/netmarkets/jsp/baseline/create.jsp
<%@ taglib uri="http://www.ptc.com/windchill/taglib/components"
prefix="jca"%>
<%@ taglib uri="http://www.ptc.com/windchill/taglib/fmt"
prefix="fmt"%>
<%@ page import="com.ptc.windchill.enterprise.part.PartConstants"
%>
<%@ include file="/netmarkets/jsp/components/beginWizard.jspf"%>
<%@ include
file="/netmarkets/jsp/components/includeWizBean.jspf"%>
<fmt:setBundle
basename="com.ptc.windchill.enterprise.product.productResourceClie
nt"/>
<jca:initializeItem operation="${createBean.create}"
baseTypeName="wt.pdmlink.PDMLinkProduct"
<jca:wizard helpSelectorKey="PDMAdminProdCreate_Help"
buttonList="DefaultWizardButtonsNoApply">
<jca:wizardStep action="defineItemWizStep" type="object" />
<jca:wizardStep action="setAttributesWizStep" type="object" />
</jca:wizard>
<SCRIPT language="javascript">
.
.
.
</SCRIPT>
<%@ include file="/netmarkets/jsp/util/end.jspf"%>
Parent topic