Solutions
• Pre-Validation - Determine whether the business logic is specific to a single action or attribute, or if the same logic could apply to multiple actions or attributes. If the logic is specific to a single UI Component (action or attribute), add the logic to a Validator. If the logic could apply to multiple UI Components, add the logic to a Filter. Finally, associate the Validator or Filter with the UI Component to ensure that the business logic is applied to that component.
◦ Pre-Validation in a Validator - Implement the performFullPreValidation() and performLimitedPreValidation() methods in a Validator to contain the desired business logic.
◦ Pre-Validation in a Filter - Implement the preValidateAction method in a Filter to contain the desired business logic.
• Post-Select Validation - Implement the validateSelectedAction() and validateSelectedMultiSelectAction() methods in a Validator to define the desired business logic, and associate the Validator with the action.
• Post-Submit Validation - Implement the validateFormSubmission() method in a Validator to define the desired business logic, and associate the Validator with the wizard step or the entire wizard.
Prerequisite Knowledge
To achieve this objective, you need to have an understanding of the following:
• The actions framework in the Windchill client architecture.
• The Application Context or service.properties mechanism for registering delegates.
• A basic familiarity with the NmCommandBean and its methods will be helpful.
• The validation service is very generic in nature. It does not provide the APIs you’ll need in order to determine whether or not something is valid. The service will provide your validators or filters with the context data and form data you need to determine whether or not a UI Component is valid. But you will need to know what to do with that data in order to apply your validation business logic.
Solution Elements
In addition to the solution elements involved in UI Validation, this section also contains some definitions of key terms (in bold italic).
|
Element
|
Type
|
Description
|
|---|---|---|
|
StandardUIComponentValidation Service
|
Java class
|
Often referred to as the validation service. This is the service class that controls UI Validation. It receives validation requests from the client infrastructure and delegates to the appropriate validators and filters for validation results. It then passes the validation results back to the client infrastructure.
Customizers and application developers should not have to interact directly with this class.
|
|
UIValidationKey
|
Java class
|
Often referred to as a validation key. A UIValidationKey is used to identify the UI Component being validated. You can think of a UIValidationKey as having a one-to-one relationship with an action or attribute.
|
|
UIValidationCriteria
|
Java class
|
Often referred to as the validation criteria.
The UIValidationCriteria is a bean class that contains the context (request, session) data which is passed from the client infrastructure to the validators and filters via the validation service.
Most of the content in the UIValidationCriteria is taken directly from the NmCommandBean, although the objects are typically returned as WTReferences, as opposed to NmOids.
|
|
UIValidationResult
|
Java class
|
Often referred to as a validation result.
A UIValidationResult represents one unit of validation. In other words, it associates a validation status with a UI Component (action or attribute). In cases where validation is being performed for the same action on multiple objects, a UIValidationResult can be associated with each object.
|
|
UIValidationResultSet
|
Java class
|
Often referred to as a result set.
A UIValidationResultSet is just a collection of UIValidationResult objects. The result sets are used in situations where multiple validations are being performed at the same time. For example, if a validator was doing a pre-validation check for the same action on multiple objects, it could aggregate the validation results for each of the objects into a UIValidationResultSet.
|
|
UIValidationStatus
|
Java class
|
Often referred to as validation status.
This is an enumeration used to determine if or how a UI component should be displayed in the UI. For example, there are values to indicate that an action should be hidden, that an action should be disabled, or that an action should be enabled.
|
|
UIValidationFeedbackMsg
|
Java class
|
Often referred to as a feedback message.
This is a message that can be associated with a validation result. It is only used for post-select validation and post-submit validation. Any feedback messages associated with validation results returned by pre-validation will be ignored.
Feedback messages can have different feedback types (FeedbackType.java) associated with them to indicate whether they are, for example, error messages, warning messages, or info messages.
|
|
UIComponentValidator
|
Java interface
|
This is the interface that all validator implementations need to implement. However, validators should not directly implement this interface. Rather, they should extend DefaultUIComponentValidator.
Each UI component can have zero or one validators associated with it. Typically, a validator will contain logic specific to a single UI component. For more generic validation logic that applies to multiple UI components, a filter is typically used.
Validators are called by the validation service to determine the validation status for a specific UI component.
Customizers and application developers should not have to interact directly with this class.
|
|
DefaultUIComponentValidator
|
Java class
|
This is a default implementation of the UIComponentValidator interface. All validator implementations should extend this class.
|
|
ValidationFilter
|
Java interface
|
This is the interface that all filter implementations need to implement. However, filters should not implement this interface directly. Rather, they should extend DefaultSimpleValidationFilter or DefaultUniversalValidationFilter.
Each UI component can have zero to many filters associated with it. Typically, a filter will contain generic validation logic that could apply to multiple UI components. For validation logic that is specific to a single UI component or a small set of UI components, a validator is typically used.
There are two categories of filters: simple filters and universal filters. Simple filters are applied on a component-by-component basis. In other words, you have to choose which UI components the logic in a simple filter will apply to. Conversely, universal filters are applied to all UI components, which means you have to choose which UI components the logic in a universal filter does not apply to.
Filters are called by the validation service to determine the validation status for a specific UI component.
Customizers and application developers should not have to interact directly with this class.
|
|
SimpleValidationFilter
|
Java interface
|
This is the interface that all simple filter implementations need to implement. However, simple filters should not implement this interface directly. Rather, they should extend DefaultSimpleValidationFilter.
Customizers and application developers should not have to interact directly with this class.
|
|
UniversalValidationFilter
|
Java interface
|
This is the interface that all universal filter implementations need to implement. However, universal filters should not implement this interface directly. Rather, they should extend DefaultUniversalValidationFilter.
Customizers and application developers should not have to interact directly with this class.
|
|
DefaultSimpleValidationFilter
|
Java class
|
This is a default implementation of the SimpleValidationFilter interface. All simple filter implementations should extend this class.
|
|
DefaultUniversalValidationFilter
|
Java class
|
This is a default implementation of the UniversalValidationFilter interface. All universal filter implementations should extend this class.
|
|
UIComponentSolutionGroup
|
Java interface
|
This is an interface that all solution group implementations need to implement.
A solution group is a special type of validator that is used for pre-validation based on the installed solutions. For example, if a given action should not be available if Windchill ProjectLink is not installed, that logic should be defined in a solution group.
|
|
*actions.xml
|
XML file(s)
|
There are multiple “satellite” versions of actions.xml files (typically one per module), which contain action definitions.
It is also in these files that we configure actions to include simple filters, and exclude universal filters.
|
|
*service.properties.xconf
|
XConf file(s)
|
There are multiple “satellite” versions of service.properites.xconf files (typically one or more per module), which contain class delegate registry entries.
These files are where you register your validators, filters and solution groups so that the validation service knows where to find them.
|
Pre-Validation Sequence
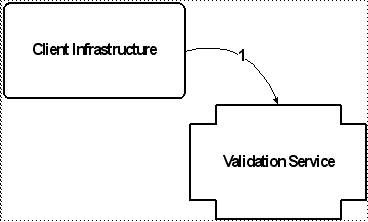
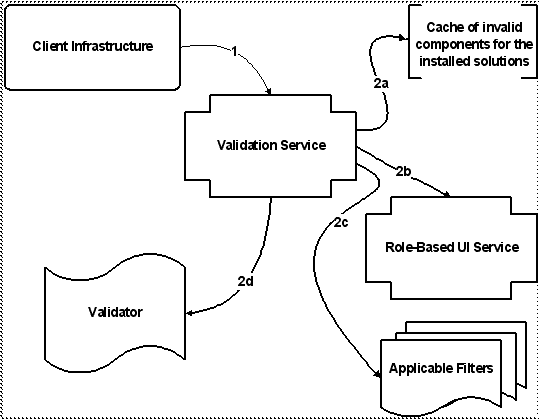
The pre-validation sequence begins with the client infrastructure (typically, but not exclusively, the StandardNmActionService) sending a list of UI components to the validation service. The expectation is that for each of those UI components, the validation service will return a validation result indicating the display status for the UI component. Each UI component is represented by a validation key. It is also expected that the Client Infrastructure passes context (session, request, or form) data to the validation service inside of a validation criteria object.
Key |
|---|
1. The Client Infrastructure calls the validation service, passing an action (represented by a validation key) corresponding to the page being rendered, and the context data (represented by a validation criteria instance). |
Once the validation service receives the validation request from the client infrastructure, the validation service iterates through each of the validation keys, and performs several tasks to determine the validation status for each of the keys.
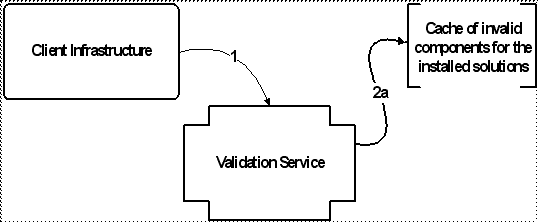
The first such task that the validation service performs is to see whether or not a given validation key represents a component that should be hidden, based on the PTC solutions that are installed. This is accomplished by referencing a cache of invalid validation keys that is created when the validation service is first started. To create the cache, the validation service simply calls all registered solution groups and asks for a list of invalid validation keys from each of them, based on the installed solutions.
If the cache of invalid solution-based keys contains the current validation key, the validation service sets the component’s status to “hidden” and does not perform any additional validation on the component. Otherwise, if the cache of invalid solution-based keys does not contain the current validation key, the validation service continues with its pre-validation checks.
Key |
|---|
1. The Client Infrastructure calls the validation service, passing an action (represented by a validation key) corresponding to the page being rendered, and the context data (represented by a validation criteria instance). 2. For each validation key, the validation service performs a series of tasks to determine the validation status for that key. The tasks are executed in the following order: a. Check to see if the validation key is in the list of invalid keys for the installed solution set. |
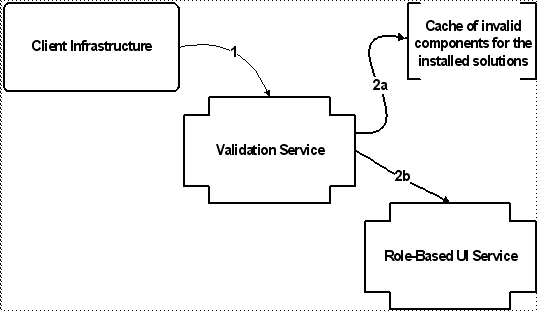
The second pre-validation check performed by the validation service is to see whether or not the component is hidden or disabled by the role-based UI service. The role-based UI service was introduced in 8.0 as a way for admin users to configure the display of UI components based on a user’s role. With the introduction of the UI Validation Service in 9.0, the role-based UI service has become a special delegate of the UI Validation Service.
If the role-based UI service returns a status of “hidden” or “disabled”, the validation service sets the component’s status correspondingly and does not perform any additional validation on the component. Otherwise, if the role-based UI service returns an “enabled” status, the validation service continues with its pre-validation checks.
Key |
|---|
1. The Client Infrastructure calls the validation service, passing an action (represented by a validation key) corresponding to the page being rendered, and the context data (represented by a validation criteria instance). 2. For each validation key, the validation service performs a series of tasks to determine the validation status for that key. The tasks are executed in the following order: a. Check to see if the validation key is in the list of invalid keys for the installed solution set. b. Check to see if the role-based UI service was configured to disable or hide the component. |
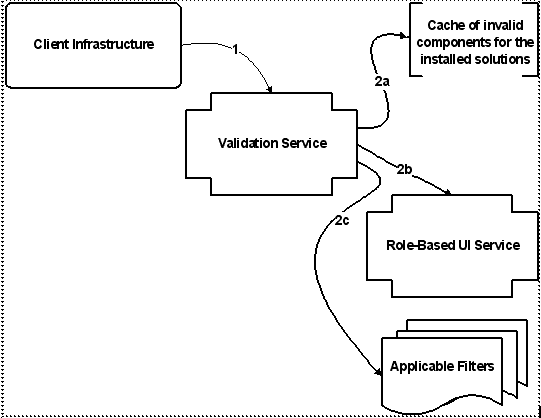
Assuming the role-based UI service says the component should be enabled, the validation service will next check to see if any filters are associated with the UI component.
To determine which filters should be applied to a UI component, the validation service references some additional cached data that is stored when the validation service is first started. The first cache referenced contains a list of all registered universal filters. When a filter is defined and registered as a universal filter, it is automatically applied to all UI components by default. If any OOTB universal filters are found in this cache, they are automatically added to the list of filters that will be applied to a given UI component.
Although universal filters are applied to all UI components by default, there is support for configuring actions to ignore individual universal filters. (Currently, there is no similar support available for configuring attributes to ignore universal filters, meaning that any universal filter will always be applied to all attributes.) If you want to configure an action to ignore a universal filter, you do so in the action’s definition in an actions.xml file. When the validation service is started, a second cache is created containing a map of actions and any universal filters they are configured to ignore. If an entry is found in this cache for a given action, the universal filters that are supposed to be ignored will be removed from the list of filters to be applied to the UI component.
Finally, the validation service references a third cache to determine any additional filters that should be applied to a UI component. This third cache is a map that associates actions with simple filters. A filter that is defined and registered as a simple filter must be explicitly associated with an action in order for it to be applied to any actions. (Currently, there is no support for associating a simple filter with an attribute.) If you want to configure an action to use a simple filter, you do so in the action’s definition in an actions.xml file. When the validation service is started, this third cache of actions and associated simple filters is created.
To summarize, the algorithm used by the validation service to determine which filters should be applied to a given UI component, you could use the following formula:
Filters per component = all universal filters – ignored universal filters + associated simple filters
Once the list of filters is established, the validation service calls each of the filters to determine the validation status for the UI component. Please note that the order in which the filters are called can not be guaranteed. If any of the filters return a validation status of “hidden” or “disabled”, the validation service sets the component’s status correspondingly and does not perform any additional validation on the component. Otherwise if all of the filters applied to a given UI component return an “enabled” status, the validation service continues with its pre-validation checks.
Key |
|---|
1. The Client Infrastructure calls the validation service, passing an action (represented by a validation key) corresponding to the page being rendered, and the context data (represented by a validation criteria instance). 2. For each validation key, the validation service performs a series of tasks to determine the validation status for that key. The tasks are executed in the following order: a. Check to see if the validation key is in the list of invalid keys for the installed solution set. b. Check to see if the role-based UI service was configured to disable or hide the component. c. Check to see if any of the filters associated with the UI component indicate that the component should be disabled or hidden. |
(See the diagram on the following page for additional details.)If none of the filters indicate that a UI component should be disabled or hidden, the final check performed by the validation service for a given UI component is to check to see if there is a validator associated with the UI component.
A validator is associated with a UI component by creating an entry in a service.properties.xconf file that links the action id (for actions) or the descriptor id (for attributes) to the class name of the validator class that should be used for that component.
If there is not a validator registered for the UI component, the component is enabled. Otherwise, if there is a validator associated with the UI component, the validation service calls that validator to get a validation status for the UI component.
Key |
|---|
1. The Client Infrastructure calls the validation service, passing an action (represented by a validation key) corresponding to the page being rendered, and the context data (represented by a validation criteria instance). 2. For each validation key, the validation service performs a series of tasks to determine the validation status for that key. The tasks are executed in the following order: a. Check to see if the validation key is in the list of invalid keys for the installed solution set. b. Check to see if the role-based UI service was configured to disable or hide the component. c. Check to see if any of the filters associated with the UI component indicate that the component should be disabled or hidden. d. Get the validation status from the validator, if there is one associated with the UI component. |
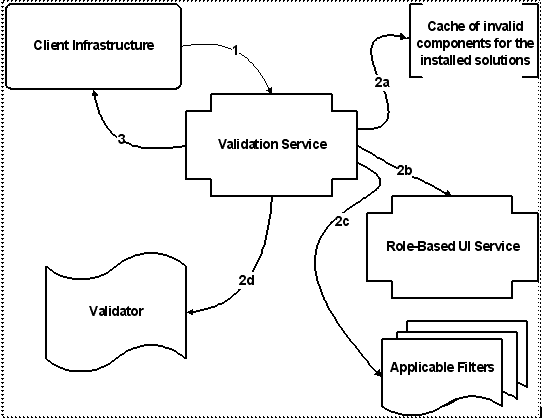
(See the diagram on the following page for additional details.)At this point, the validation service has completed its validation checks for each UI component. If the client infrastructure passed a single UI component to the validation service to be pre-validated, the validation service will return a single validation result to the caller. If multiple UI components were passed to the validation service for pre-validation, the validation service will organize the validation results for each component into a validation result set, which contains one result per UI component. The validation result set is then returned to the caller.
Key |
|---|
1. The Client Infrastructure calls the validation service, passing an action (represented by a validation key) corresponding to the page being rendered, and the context data (represented by a validation criteria instance). 2. For each validation key, the validation service performs a series of tasks to determine the validation status for that key. The tasks are executed in the following order: a. Check to see if the validation key is in the list of invalid keys for the installed solution set. b. Check to see if the role-based UI service was configured to disable or hide the component. c. Check to see if any of the filters associated with the UI component indicate that the component should be disabled or hidden. d. Get the validation status from the validator, if there is one associated with the UI component. 3. Return the validation result or validation result set to the client infrastructure. |
Post-Select Validation Sequence
Conceptually, post-select validation occurs immediately after a user invokes an action in the UI. In reality, however, post-select validation actually takes place when the target page is being rendered. In other words, there is logic in begin.jspf (code that is included on every JSP page authored in the Windchill Client Architecture) that will call the validation service to determine whether or not the page should be rendered before actually rendering it.
Validators are the only accepted locations for post-select validation logic. Unlike pre-validation, there is no interaction with the solution groups, role-based UI service, or filters for post-select validation. Therefore, the sequence for post-select validation is much simpler than for pre-validation.
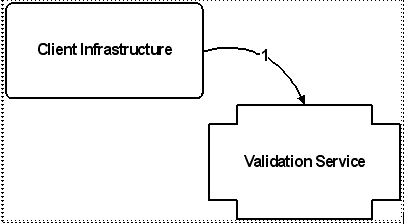
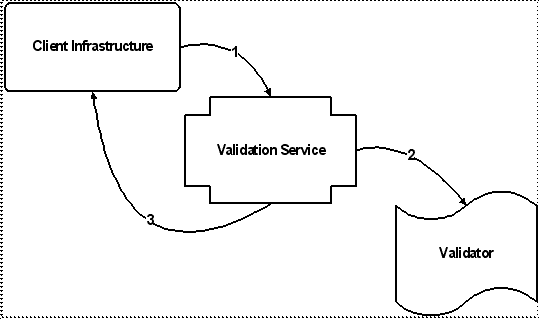
First, the client infrastructure calls the validation service, passing the action corresponding to the page being rendered (this action is represented by a validation key). Along with the action, the client infrastructure passes the context data in the form of a validation criteria instance.
Key |
|---|
1. The Client Infrastructure calls the validation service, passing an action (represented by a validation key) corresponding to the page being rendered, and the context data (represented by a validation criteria instance). |
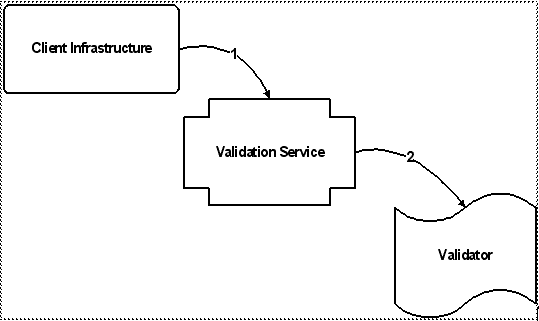
After receiving a post-select validation request from the client infrastructure, the validation service checks to see if there is a validator associated with the specified action.
As is the case with pre-validation, a validator is associated with an action by creating an entry in a service.properties.xconf file that links the action id to the class name of the validator class for that action.
If there is not a validator registered for the action, the user is permitted to perform the action. Otherwise, if there is a validator associated with the action, the validation service calls that validator to get a validation status for the action.
Key |
|---|
1. The Client Infrastructure calls the validation service, passing an action (represented by a validation key) corresponding to the page being rendered, and the context data (represented by a validation criteria instance). 2. The validation service checks to see if there is a validator associated with the action. If so, it calls the validator to get the validation status (permitted or denied) for the action. |
After the validator returns its validation result, the validation service simply passes along the validation result returned by the validator to the client infrastructure. The client infrastructure will check to see whether that status is “permitted” or “denied”. If the status is “permitted”, the page or wizard is displayed. If the status is “denied”, the user is redirected to the previous page, and if the validator returned a message indicating why the action was denied, that message is displayed to the user.
Key |
|---|
1. The Client Infrastructure calls the validation service, passing an action (represented by a validation key) corresponding to the page being rendered, and the context data (represented by a validation criteria instance). 2. The validation service checks to see if there is a validator associated with the action. If so, it calls the validator to get the validation status (permitted or denied) for the action. 3. The validation service passes the validation status (wrapped in a validation result) from the validator to the client infrastructure, which either displays the target page/wizard, or brings the user back to the page where the action was invoked. |
Post-Submit Validation Sequence
Post-submit validation occurs when a user navigates from one step to another in a wizard, or when a user submits the entire wizard.
Validators are the only accepted locations for post-submit validation logic Unlike pre-validation, there is no interaction with the solution groups, role-based UI service, or filters for post-submit validation. Therefore, the sequence for post-submit validation is much simpler than for pre-validation. In fact, it is nearly identical to the sequence for post-select validation.
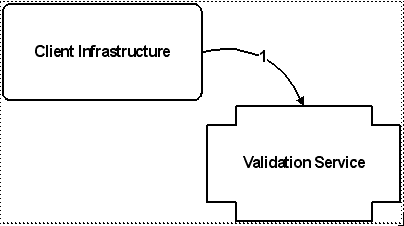
First, the client infrastructure calls the validation service, passing the id associated with the “Next” or “OK” wizard action (this id is represented by a validation key). Along with the validation key, the client infrastructure passes the context data in the form of a validation criteria instance.
Key |
|---|
1. The Client Infrastructure calls the validation service, passing an id associated with a wizard's "Next" or "OK" action (represented by a validation key), and the context data (represented by a validation criteria instance). |
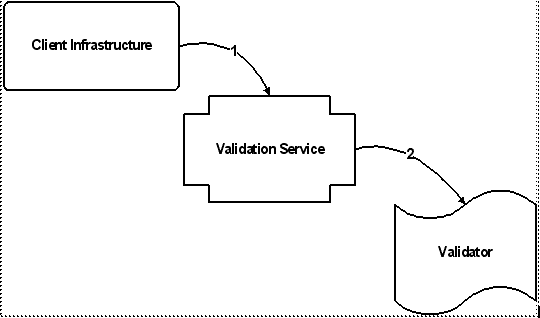
After receiving a post-submit validation request from the client infrastructure, the validation service checks to see if there is a validator associated with the wizard’s “Next” or “OK” action.
As is the case with pre-validation and post-select validation, a validator is associated with a wizard’s “Next” or “OK” action by creating an entry in a service.properties.xconf file that links the action id to the class name of the validator class for that action.
If there is not a validator registered for the action, the user is permitted to move to the next step or submit the entire wizard. Otherwise, if there is a validator associated with the “Next” or “OK” action, the validation service calls that validator to get a validation status for the action.
Key |
|---|
1. The Client Infrastructure calls the validation service, passing an id associated with a wizard's next or OK action (represented by a validation key), and the context data (represented by a validation criteria instance). 2. The validation service checks to see if there is a validator associated with the "Next" or "OK" action. If so, it calls the validator to get the validation status (permitted or denied) for the action. |
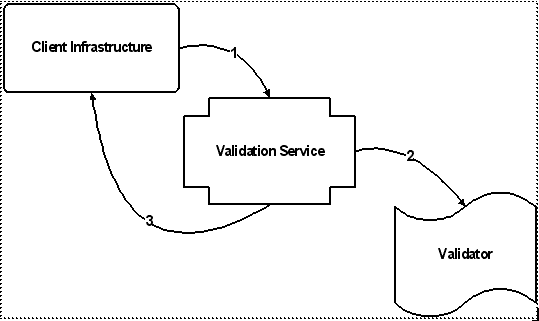
After the validator returns its validation result, the validation service simply passes along the validation result returned by the validator to the client infrastructure. The client infrastructure will check to see whether that status is “permitted” or “denied”. If the status is “permitted”, the user is allowed to proceed to the next step in the wizard, or complete the wizard submission. If the status is “denied”, the user restricted from moving to the next wizard step or submitting the wizard, and if the validator returned a message indicating why the action was denied, that message is displayed to the user.
Key |
|---|
1. The Client Infrastructure calls the validation service, passing an action (represented by a validation key) corresponding to the page being rendered, and the context data (represented by a validation criteria instance). 2. The validation service checks to see if there is a validator associated with the "Next" or "OK" action. If so, it calls the validator to get the validation status (permitted or denied) for the action. 3. The validation service passes the validation status (wrapped in a validation result) from the validator to the client infrastructure, which either allows the user to proceed to the next step in the wizard or submit the entire wizard, or brings the user back to the wizard step where the action was invoked. |