Mapping the Common Classification Binding Attributes in MPMLink
To classify an object, an administrator must first define a classification binding attribute. This reusable attribute is defined on a classifiable object type or its subtype as a string attribute with a classification constraint. For more information, see Classification Binding Attributes.
In certain instances, some classification binding attributes in the eBOM (present in the upstream view) and mBOM (present in the downstream view) are not the same. Some classification binding attributes are specific to eBOM, and some classification binding attributes are specific to mBOM. However, certain classification binding attributes are common between eBOM and mBOM. The system allows you to map (carry forward) the common classification attributes from eBOM to mBOM. Mapping common classification attributes from eBOM to mBOM helps in maintaining consistent values across different views and across different part types.
Use the com.ptc.windchill.associativity.classification.mapping property to map the common classification binding attributes when parts with different part types are present in the upstream and downstream views.
You must add this property along with appropriate part types and values to the custom.site.xconf file. For more information, see Setting Property Values and Propagating Your Changes.
For example, you can configure and add the property in the following formats:
<AddToProperty name="com.ptc.windchill.associativity.classification.mapping" value="org.rnd.DesignPart:Binding1::org.rnd.ManufacturingPart:Binding2"/>
In this case, org.rnd.DesignPart and org.rnd.ManufacturingPart are the internal names of the part types. Binding1 and Binding2 are the internal names of the classification binding attributes assigned to part types org.rnd.DesignPart and org.rnd.ManufacturingPart respectively. The classification binding attributes ensure that the upstream and downstream classification nodes are bound.
Key Points
• When you create an equivalent link, the "com.ptc.windchill.mpml.copyOver.create.wt.part.WTPart" value="WCTYPE|wt.part.WTPart~SCA|ALL_CLASSIFICATION_IBAS"/> property must already exist in the custom.site.xconf file for the mapping to be successful.
When you update an equivalent link, the "com.ptc.windchill.mpml.copyOver.update.wt.part.WTPart" value="WCTYPE|wt.part.WTPart~SCA|ALL_CLASSIFICATION_IBAS"/> property must already exist in the custom.site.xconf file for the mapping to be successful.
Similarly, the properties with ALL_CLASSIFICATION_IBAS values for different BOM processes and actions must already exist in the custom.site.xconf file for the mapping to be successful.
• When the part types of the parts present in the upstream and downstream views are the same, the system maps the common classification binding attributes from the upstream to the downstream irrespective of whether the property com.ptc.windchill.associativity.classification.mapping is specified.
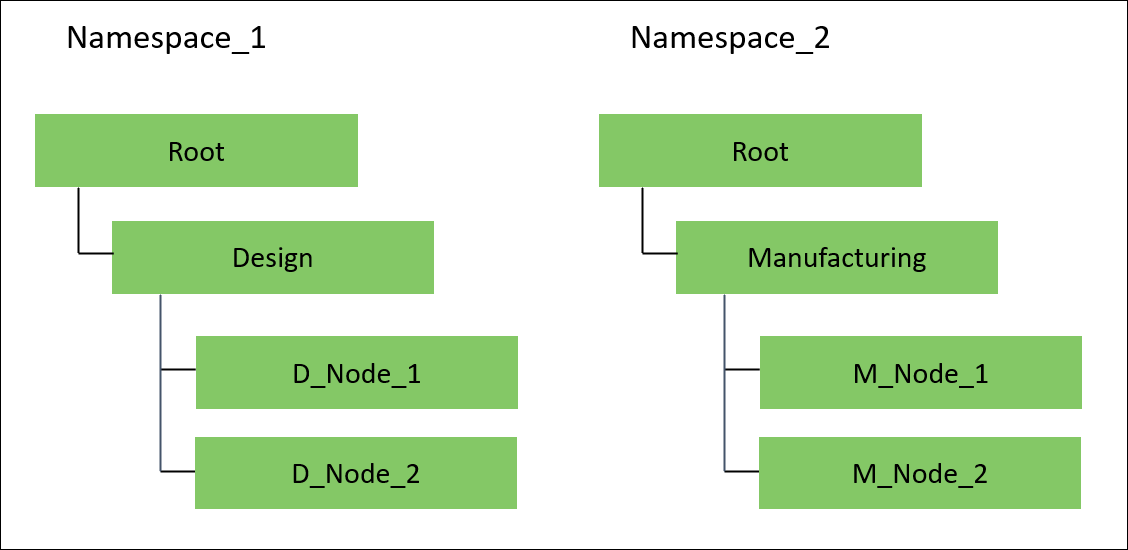
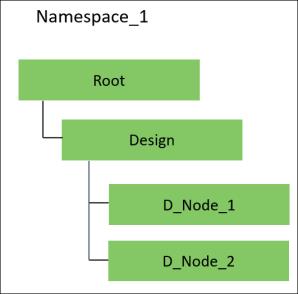
Example 1 — Specify Namespaces Details
Consider that NameSpace_1 and NameSpace_2 are present. The following classification nodes are present under NameSpace_1 and NameSpace_2, respectively:

1. The part type DesignPart is added under the type Part in the Type and Attribute Management utility. A classification binding attribute Binding_1 is added to the part type DesignPart. The Classification constraint is added to the attribute Binding_1.
You can use the Enter namespace field to enter the namespace that you have created for the classifiable type that you have selected. Optionally, you can use the Enter node name field to enter the internal name of a branch node. This restricts the node selection to child nodes of that branch. For more information, see the Use a Binding Attribute to Restrict Node Selection section in Classification Binding Attributes. 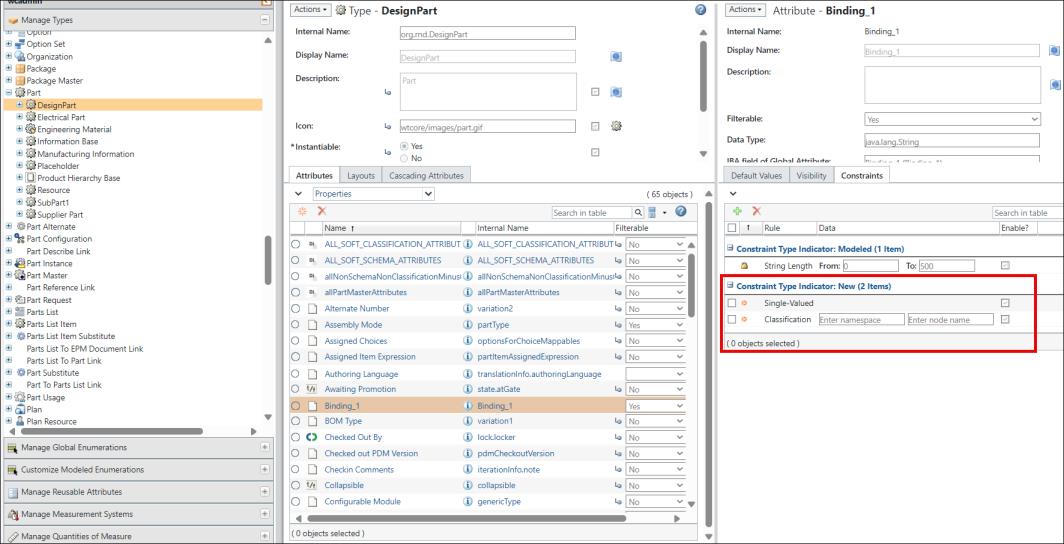 |
2. Add the value NameSpace_1 in the Enter namespace field for the binding attribute Binding_1.
3. Add the part type ManufacturingPart under the type Part in the Type and Attribute Management utility.
4. A binding attribute Binding_2 is added to the part type ManufacturingPart. The Classification constraint is added to the attribute Binding_2.
5. Add the value Namespace_2 in the Enter namespace field for the binding attribute Binding_2.
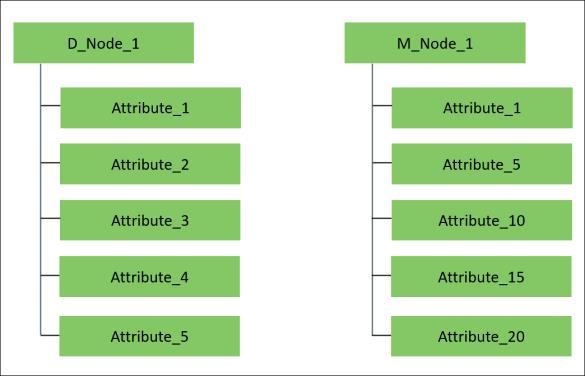
6. The following attributes are present under the nodes D_Node_1 and M_Node_1.

7. Specify the following property in the custom.site.xconf file:
<AddToProperty name="com.ptc.windchill.associativity.classification.mapping" value="org.rnd.DesignPart:Binding_1::org.rnd.ManufacturingPart:Binding_2"/>
8. Create a new part, Part_1, with part type DesignPart. When creating this part, enter the value for the binding attribute Binding_1 as D_Node_1.
9. Open Part_1 in the BOM Transformer using the Open in BOM Transformer action.
You can view the binding attributes in the Attributes tab when you select Part_1. |
10. Select Part 1 and initiate the New Downstream Part action. The New Downstream Part dialog box opens.
11. In the New Downstream Part dialog box, add the name as Part 2, select the Type as ManufacturingPart. Also, set the value of binding attribute Binding_1 as M_Node_1.
12. Once Part_2 is created, the common attributes between D_Node_1 and M_Node_1 are mapped. The mapped or forwarded attributes are Attribute_1 and Attribute_5.
Example 2— Specify Namespaces and Nodes Details
Consider that NameSpace_1 and NameSpace_2 are present. The following classification nodes are present under NameSpace_1 and NameSpace_2, respectively:
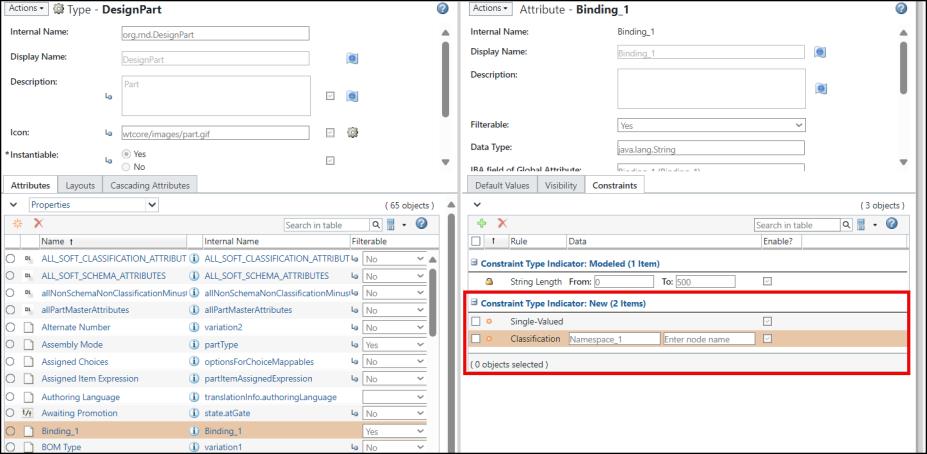
1. The part type DesignPart is added under the type Part in the Type and Attribute Management utility. A binding attribute Binding_1 is added to the part type DesignPart. The Classification constraint is added to the attribute Binding_1.
2. Add the value Namespace_1 in the Enter namespace field for the binding attribute Binding_1.
3. Add the value D_Node_1 in the Enter node name field for the binding attribute Binding_1.
5. Add the part type ManufacturingPart under the type Part in the Type and Attribute Management utility.
6. A binding attribute Binding_2 is added to the part type ManufacturingPart. The Classification constraint is added to the attribute Binding_2.
7. Add the value Namespace_2 in the Enter namespace field for the binding attribute Binding_2.
8. Add the value M_Node_1 in the Enter node name field for the binding attribute Binding_2.
9. The following attributes are present under the nodes D_Node_1 and M Node 1.
10. Specify the following property in the custom.site.xconf file:
<AddToProperty name="com.ptc.windchill.associativity.classification.mapping" value="org.rnd.DesignPart:Binding_1::org.rnd.ManufacturingPart:Binding_2"/>
11. Create a new part, Part_1, with part type DesignPart. When creating this part, you can see that the value of the binding attribute Binding_1 is already set to D_Node_1.
12. Open Part_1 in the BOM Transformer using the Open in BOM Transformer action.
You can view the binding attributes in the Attributes tab when you select Part_1. |
13. Select Part_1 and initiate the New Downstream Part action. The New Downstream Part dialog box opens.
14. In the New Downstream Part dialog box, add the name as Part_2 and select the Type as ManufacturingPart. When creating this part, you can see that the value of the binding attribute Binding_2 is already set to M_Node_1.
15. Once Part_2 is created, the common attributes between D_Node_1 and M_Node_1 are mapped. The mapped or forwarded attributes are Attribute_1 and Attribute_5.
Example 3 — One Namespace and Multiple Nodes
Consider that NameSpace_1 is present. The following classification nodes are present under NameSpace_1:
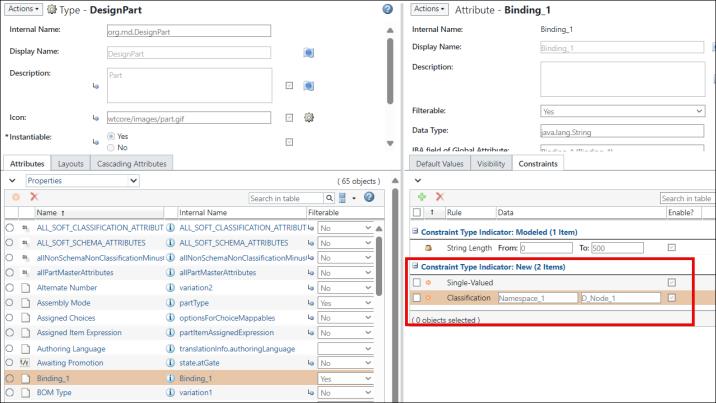
1. The part type DesignPart1 is added under the type Part in the Type and Attribute Management utility. A binding attribute Binding_1 is added to the part type DesignPart. The Classification constraint is added to the attribute Binding_1.
2. Add the value Namespace_1 in the Enter namespace field for the binding attribute Binding_1.
3. Add the value D_Node_1 in the Enter node name field for the binding attribute Binding_1.
4. Add the part type DesignPart2 under the type Part in the Type and Attribute Management utility.
5. A binding attribute Binding_2 is added to the part type DesignPart2. The Classification constraint is added to the attribute Binding_2.
6. Add the value Namespace_1 in the Enter namespace field for the binding attribute Binding_2.
7. Add the value D_Node_2 in the Enter node name field for the binding attribute Binding_2.
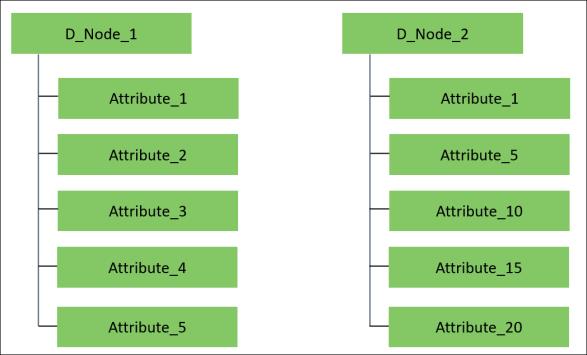
8. The following attributes are present under the nodes D_Node_1 and D_Node_2.
9. Specify the following property in the custom.site.xconf file:
<AddToProperty name="com.ptc.windchill.associativity.classification.mapping" value="org.rnd.DesignPart1:Binding_1::org.rnd.DesignPart2:Binding_2"/>
10. Create a new part, Part_1, with part type DesignPart1. When creating this part, you can see that the value of the binding attribute Binding_1 is already set to D_Node_1.
11. Open Part_1 in the BOM Transformer using the Open in BOM Transformer action.
You can view the binding attributes in the Attributes tab when you select Part_1. |
12. Select Part_1 and initiate the New Downstream Part action. The New Downstream Part dialog box opens.
13. In the New Downstream Part dialog box, add the name as Part_2 and select the Type as DesignPart2. When creating this part, you can see that the value of the binding attribute Binding_2 is already set to D_Node_2.
14. Once Part_2 is created, the common attributes between D_Node_1 and D_Node_2 are mapped. The mapped or carry forwarded attributes are: Attribute_1 and Attribute_5.
Additional Information
• It is not necessary to add the com.ptc.windchill.associativity.classification.mapping property for every action. You can add it once, and it works for all the scenarios.
For example, add the following properties in the custom.site.xconf file:
◦ <AddToProperty name="com.ptc.windchill.associativity.classification.mapping" value="org.rnd.DesignPart:Binding1::org.rnd.ManufacturingPart:Binding2"/>
◦ <AddToProperty name="com.ptc.windchill.associativity.classification.mapping" value="org.rnd.DesignPart:Binding3::org.rnd.ManufacturingPart:Binding4"/>
The system considers these properties for all actions such as New Downstream Part,  Detect Discrepancies,
  Synchronize Structures, and so on.
Detect Discrepancies, Synchronize Structures, and so on.• When you specify the mapping property, the system maps only the common classification binding attributes. The system does not modify any other non-common classification binding attributes.
• The mapping property is available by default in the custom.site.xconf file. It is commented out. Remove the comment to use the property and to specify the binding attribute values and part types according to your business requirements.
• Consider the following scenario:
You added the com.ptc.windchill.associativity.classification.mapping property with values and part types in the custom.site.xconf file.
You edited the values of common classification binding attributes and non-common classification binding attributes. You used the Detect Discrepancies or Synchronize Structures action. In such a scenario, the system displays the discrepant common classification binding attributes in the respective dialog box. The status of the common classification binding attributes is Auto.
Detect Discrepancies or Synchronize Structures action. In such a scenario, the system displays the discrepant common classification binding attributes in the respective dialog box. The status of the common classification binding attributes is Auto.Related Topics