「Acme 部品を編集」操作
目的
Acme 部品の情報ページの「操作」メニューで「Acme 部品を編集」操作を設定します。
ソリューション
1. AcmePartEdit.jsp を <カスタマイズのルートディレクトリ>\<Acme ウィザードモジュール>\main\src_web\netmarkets\jsp\<カスタム>\<カスタム部品> に作成し、次のコードを追加します。
<%@ page import="com.ptc.windchill.enterprise.attachments.server.AttachmentsHelper" %>
<%@ taglib prefix="jca" uri="http://www.ptc.com/windchill/taglib/components"%>
<%@ taglib prefix="wip" uri="http://www.ptc.com/windchill/taglib/workinprogress"%>
<%@ taglib uri="http://www.ptc.com/windchill/taglib/fmt" prefix="fmt"%>
<%@ taglib prefix="wctags" tagdir="/WEB-INF/tags" %>
<%@ taglib uri="http://java.sun.com/jsp/jstl/core" prefix="c"%>
<%@ page import="com.ptc.windchill.enterprise.part.PartConstants" %>
<%@ include file="/netmarkets/jsp/components/beginWizard.jspf"%>
<%@ include file="/netmarkets/jsp/components/includeWizBean.jspf"%>
<wip:autoCheckOutItem />
<fmt:setBundle basename="com.ptc.windchill.enterprise.part.partResource"/>
<%--> Reuse the same labels as for create part <--%>
<fmt:message var="editAttributesWizStepLabel" key="part.createPartWizard.SET_ATTRIBUTES_WIZ_STEP_LABEL" />
<jca:initializeItem operation="${createBean.edit}" objectHandle="custompart"/>
<c:set var="buttonSet" value="EditWizardButtons"/>
<jca:wizard buttonList="${buttonSet}" helpSelectorKey="PartEdit_help">
<jca:wizardStep action="editAttributesWizStep" label="${editAttributesWizStepLabel}" type="object" objectHandle="custompart"/>
<jca:wizardStep action="attachments_step" type="attachments" />
<jca:wizardStep action="moreCustomAttributesWizStep1" objectHandle="custompart" type="custompart"/>
</jca:wizard>
<script lang="Javascript">
PTC.onReady(onloadEditPartWizard);
</script>
<%@include file="/netmarkets/jsp/util/end.jspf"%>
2. AcmePartClient-actions.xml で Acme 部品を編集する操作を定義します。
<action name="exampleAcmePartEdit" ajax="row">
<command class="com.ptc.core.components.forms.EditWorkableFormProcessor"
method="execute" url="/ptc1/custom/custompart/exampleAcmePartEdit"
windowType="popup"/>
</action>
<command class="com.ptc.core.components.forms.EditWorkableFormProcessor"
method="execute" url="/ptc1/custom/custompart/exampleAcmePartEdit"
windowType="popup"/>
</action>
|
|
この例は、既存のフォームプロセッサ EditWorkableFormProcessor を設定する方法を示しています。カスタムロジックを作成する必要はありません。カスタムフォームプロセッサを設定および記述することでカスタムロジックを実現できます。
|
3. 「Acme 部品を編集」操作を操作モデルファイルで既存の操作モデル more parts actions に段階的に追加することによって情報ページで使用できるようにします。
<model name="more parts actions" incremental="">
<action name="exampleAcmePartEdit" type="custompart" insertAt="1" />
</model>
<action name="exampleAcmePartEdit" type="custompart" insertAt="1" />
</model>
4. CustomPartResource.java の編集操作に対して以下のリソースバンドルエントリを追加します。
@RBEntry("Edit Acme Part")
public static final String PRIVATE_CONSTANT_100 = "custompart.exampleAcmePartEdit.description";
@RBEntry("Edit Acme Part")
public static final String PRIVATE_CONSTANT_101 = "custompart.exampleAcmePartEdit.title";
@RBEntry("Edit Acme Part")
public static final String PRIVATE_CONSTANT_102 = "custompart.exampleAcmePartEdit.tooltip";
@RBEntry("part_variant_new.png")
public static final String PRIVATE_CONSTANT_103 = "custompart.exampleAcmePartEdit.icon";
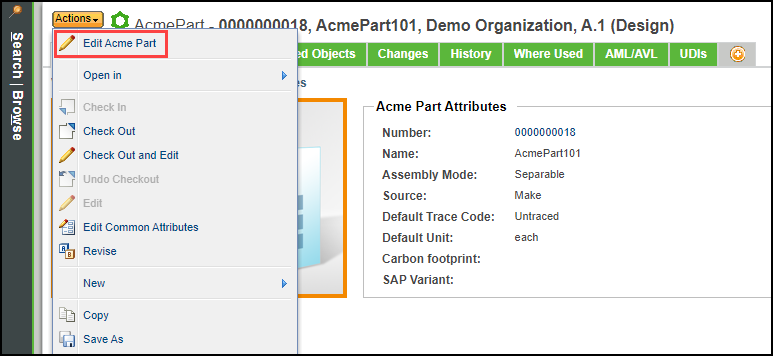
5. Windchill を再起動して、Acme 部品の情報ページの「操作」メニューで「Acme 部品を編集」操作を使用できるかどうかを確認します。
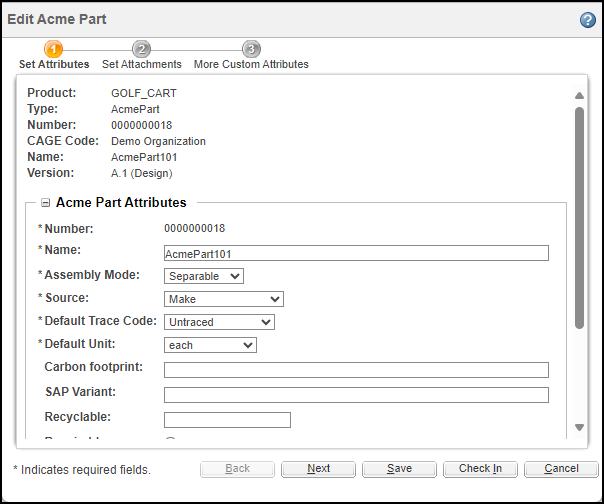
6. この操作をクリックして、「Acme 部品を編集」ダイアログボックスが開き、部品を編集できることを確認します。