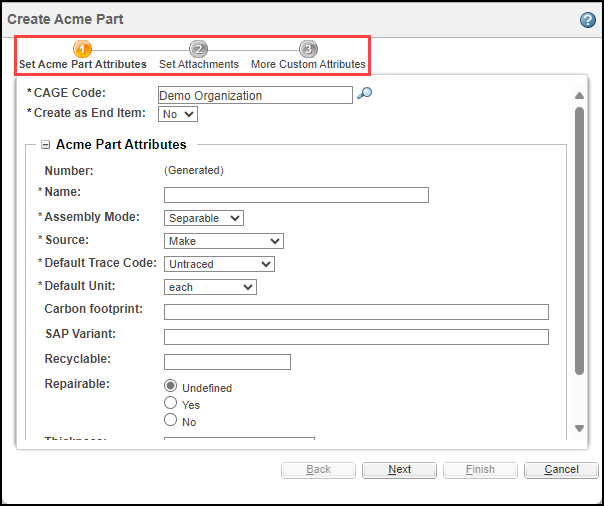
Acme Part ウィザードの作成
以前は、タイプ Part の新しいサブタイプ AcmePart を作成していました。この例では、Acme 部品の特定の詳細を取り込む新しいウィザードを作成します。このウィザードは、「Acme 部品属性を設定」、「添付資料を設定」、「その他のカスタム属性」の 3 つのステップで構成されます。
|
|
デフォルトでは、「添付資料を設定」ステップはウィザードに表示されません。このステップを表示するには、「部品の添付資料」プリファレンスを「はい」に設定します。
|
ウィザードの作成については、Windchill クライアントアーキテクチャウィザードを参照してください。
著作者ウィザード JSP (Acme 部品属性を設定)
1. <カスタマイズのルートディレクトリ>\<Acme ウィザードモジュール>\main\src_web\netmarkets\jsp\<カスタム>\<カスタム部品> にあるウィザードファイル createCustomPart.jsp でウィザードのステップを指定します。
<jca:wizard helpSelectorKey="${helpKey}" buttonList="${buttonList}" title="${wizardTitle}"
formProcessorController="com.ptc.windchill.enterprise.part.forms.CreatePartAndCADDocFormProcessorController" >
<jca:wizardStep action="defineCustomItemAttributesWizStep" objectHandle="<%=PartConstants.ObjectHandles.PART%>" type="custompart"/>
<jca:wizardStep action="attachments_step" type="attachments" />
<jca:wizardStep action="moreCustomAttributesWizStep1" objectHandle="<%=PartConstants.ObjectHandles.PART%>" type="custompart"/>
</jca:wizard>
2. AcmePartclient-actions.xml で、1 つ目のステップ「Acme 部品属性を設定」の操作 defineCustomItemAttributesWizStep を定義します。
<action name="defineCustomItemAttributesWizStep"
afterVK="setAttributesWizStep"
id="defineCustomItemAttributesWizStep"
preloadWizardPage="false" required="true"
resourceBundle="com.acme.custompart.CustomPartResource">
<component name="defineCustomItemAttributesWizStep"
typeBased="true" windowType="wizard_step" />
</action>
afterVK="setAttributesWizStep"
id="defineCustomItemAttributesWizStep"
preloadWizardPage="false" required="true"
resourceBundle="com.acme.custompart.CustomPartResource">
<component name="defineCustomItemAttributesWizStep"
typeBased="true" windowType="wizard_step" />
</action>
3. CustomPartResource.java で defineCustomItemAttributesWizStep のリソースバンドルを定義します。
@RBEntry("Set Acme Part Attributes")
public static final String PRIVATE_CONSTANT_46 = "custompart.defineCustomItemAttributesWizStep.description";
@RBEntry("Set Acme Part Attributes")
public static final String PRIVATE_CONSTANT_47 = "custompart.defineCustomItemAttributesWizStep.title";
@RBEntry("Set Acme Part Attributes")
public static final String PRIVATE_CONSTANT_48 = "custompart.defineCustomItemAttributesWizStep.tooltip";
4. 指定されているとおりにコンポーネント defineCustomItemAttributesWizStep を定義します。
@ComponentBuilder(value = "defineCustomItemAttributesWizStep")
@TypeBased(value = "WCTYPE|wt.part.WTPart|com.acme.AcmePartType")
public class CustomPartDefineItemAttributesWizStepBuilder extends AbstractComponentBuilder {
@Override
public final Object buildComponentData(ComponentConfig config, ComponentParams params) throws Exception {
return Collections.EMPTY_LIST;
}
@Override
public final ComponentConfig buildComponentConfig(ComponentParams params) throws WTException {
// set the mode to CREATE
params.setAttribute(ComponentMode.class.getName(), ComponentMode.CREATE.toString());
ComponentConfigFactory factory = getComponentConfigFactory();
TableConfig table = factory.newTableConfig();
table.setView("/custom/newwizard/custompart/defineCustomItemAttributesWizStep.jsp");
return table;
}
}
5. 所定のコードスニペットを使用して、<カスタマイズのルートディレクトリ>\<Acme ウィザードモジュール>\main\src_web\WEB-INF\jsp\<カスタム>\<新規ウィザード>\<カスタム部品> でファイル defineCustomItemAttributesWizStep.jsp を作成します。
<%@ taglib uri="http://www.ptc.com/windchill/taglib/jcaMvc" prefix="mvc"%>
<%@ taglib prefix="c" uri="http://java.sun.com/jsp/jstl/core" %>
<%@ taglib prefix="p" uri="http://www.ptc.com/windchill/taglib/picker"%>
<%@ taglib prefix="wctags" tagdir="/WEB-INF/tags" %>
<%@ taglib prefix="s" uri="http://www.ptc.com/windchill/taglib/subscription"%>
<%@ taglib uri="http://www.ptc.com/windchill/taglib/components"
prefix="jca"%>
<%@page import="com.ptc.core.components.rendering.guicomponents.TextBox"%>
<%@ include file="/netmarkets/jsp/components/beginWizard.jspf"%>
<%@ include file="/netmarkets/jsp/components/createEditUIText.jspf"%>
<%@ include file="/netmarkets/jsp/components/includeWizBean.jspf"%>
<input id="objectIdentifierInput" type="hidden" disabled="true"
value="There will be provided object identifier..."
style="width: 260px" />
<div id='<%=wt.util.HTMLEncoder.encodeForHTMLAttribute(createBean.getCurrentObjectHandle())%>driverAttributesPane'>
<%@ include file="/netmarkets/jsp/components/defineItemReadOnlyPropertyPanel.jspf"%>
<%@ include file="/netmarkets/jsp/custom/custompart/customDefineItem.jspf"%>
</div>
<mvc:attributesTableWizComponent/>
<%@ include file="/netmarkets/jsp/util/end.jspf"%>
これは、「Acme 部品属性を設定」ステップで属性パネル Acme Part Attributes をレンダリングし、「タイプおよび属性の管理」ユーティリティで定義されている属性をリストします。
6. <カスタマイズのルートディレクトリ>\<Acme ウィザードモジュール>\main\src_web\netmarkets\jsp\<カスタム>\<カスタム部品> でファイル customDefineItem.jspf を作成し、Acme Part Attributes パネルの上でパネルを追加または修正します。
<%@ taglib uri="http://www.ptc.com/windchill/taglib/components" prefix="jca"%>
<%@ taglib uri="http://java.sun.com/jsp/jstl/core" prefix="c"%>
<%@page import="com.ptc.core.components.rendering.guicomponents.ComboBox,
com.ptc.core.meta.common.TypeIdentifier,
com.ptc.core.meta.common.TypeInstanceIdentifier,
wt.util.HTMLEncoder"%><%
String urlForDriverAttributes = "/servlet/TypeBasedIncludeServlet?contextAction=defineItemAttributesPanel";
String encodedObjHandleForJS = "";
if(!"".equals(createBean.getCurrentObjectHandle())) {
encodedObjHandleForJS = HTMLEncoder.encodeForJavascript(createBean.getCurrentObjectHandle());
urlForDriverAttributes += "¤tObjectHandle="+encodedObjHandleForJS;
}
String comboBoxId = createBean.getCurrentObjectHandle() + "createType";
%>
<jca:renderPropertyPanel>
<jca:addPlaceHolder id="${createBean.currentObjectHandle}driverAttributes" />
<c:if test="${createBean.propagationBean != null}">
<jca:propagateComponent preferenceKey="${createBean.propagationBean.preferenceKey}"
label="${createBean.propagationBean.label}"
tooltip="${createBean.propagationBean.tooltip}"/>
</c:if>
</jca:renderPropertyPanel>
<input type="hidden" id="<%=HTMLEncoder.encodeForHTMLAttribute(createBean.getCurrentObjectHandle())%>typeFromTypePicker" value="<%=HTMLEncoder.encodeForHTMLAttribute(createBean.getTypeInstanceIdStringForNewItem("wt.part.WTPart|com.acme.AcmePartType")) %>"/>
<script type="text/javascript">
PTC.onReady(function() {
// load the attributes panel if there is a default value defined for the 'Type' property and the attributes panel has not already been requested
PTC.wizard.loadAttributesPanel("<%=encodedObjHandleForJS%>", "<%=urlForDriverAttributes%>");
});
</script>
既存のステップの追加 (添付資料を設定)
この例は、2 つ目のステップ「添付資料を設定」を追加する方法を示しています。
<jca:wizardStep action="attachments_step" type="attachments" />
カスタムステップの追加 (その他のカスタム属性)
この例は、カスタムステップ「その他のカスタム属性」を追加する方法を示しています。
1. MVC Java ビルダークラスに基づいてカスタムレイアウトを作成します。
2. サブタイプ AcmePart に対して作成されたレイアウト定義からパネルコンフィギュレーションを構築する MVC Java ビルダークラスを作成します。
このレイアウトは、すでにサブタイプ AcmePart で定義されています。
package com.acme.wizard.mvc.builders.custompart;
import com.ptc.core.lwc.common.ScreenDefinitionName;
import com.ptc.core.ui.resources.ComponentMode;
import com.ptc.jca.mvc.builders.TypedAttributesPanelBuilder;
import com.ptc.mvc.components.AttributePanelConfig;
import com.ptc.mvc.components.ComponentBuilder;
import com.ptc.mvc.components.ComponentParams;
import com.ptc.mvc.components.TypedAttrLayOutFactory;
import wt.util.WTException;
/**
* This builder builds the attribute panel on the custom step.
*/
@ComponentBuilder("Acme.CustomAttributes")
public class AcmeCustomAttributesBuilder extends TypedAttributesPanelBuilder{
/** The tfactory. */
TypedAttrLayOutFactory tfactory;
/*
* Builds attribute panel to render on custom step of new Acme Part Wizard.
*/
@Override
protected AttributePanelConfig buildAttributePanelConfig(
ComponentParams arg0) throws WTException {
AttributePanelConfig table;
ScreenDefinitionName layout = null;
ComponentMode mode = getComponentMode(arg0);
if (mode.equals(ComponentMode.CREATE)) {
layout = ScreenDefinitionName.CREATE2;
} else if (mode.equals(ComponentMode.EDIT)) {
layout = ScreenDefinitionName.UPDATE2;
}
table = (AttributePanelConfig) tfactory.getAttributePanelConfig(getComponentConfigFactory(), arg0, layout);
table.setComponentMode(mode);
return table;
}
public void setTypedAttrLayOutFactory(TypedAttrLayOutFactory factory) {
this.tfactory = factory;
}
}
3. 所定のコンフィギュレーションを持つ actions.xml の操作として上記のビルダーコンポーネントを設定します。
<action name="moreCustomAttributesWizStep1" id="moreCustomAttributesWizStep1"
preloadWizardPage="false" required="true" resourceBundle="com.acme.custompart.CustomPartResource">
<component name="Acme.CustomAttributes" windowType="wizard_step" />
</action>
preloadWizardPage="false" required="true" resourceBundle="com.acme.custompart.CustomPartResource">
<component name="Acme.CustomAttributes" windowType="wizard_step" />
</action>
4. 上記の操作を、新しいウィザードの新しいカスタムステップとして設定します。
<jca:wizard helpSelectorKey="${helpKey}" buttonList="${buttonList}" .. >
.
.
<jca:wizardStep action="moreCustomAttributesWizStep1"
objectHandle="<%=PartConstants.ObjectHandles.PART%>"
type="custompart"/>
</jca:wizard>
.
.
<jca:wizardStep action="moreCustomAttributesWizStep1"
objectHandle="<%=PartConstants.ObjectHandles.PART%>"
type="custompart"/>
</jca:wizard>
カスタムステップ「その他のカスタム属性」がウィザードに追加されます。
5. MVC ビルダーが作成された後、これらのビルダーを登録します。
a. custom.site.xconf ファイルがまだ作成されていない場合は、<カスタマイズのルートディレクトリ>/xconf フォルダに作成します。
b. custom.mvc.builders.base-packages プロパティを custom.site.xconf ファイルに追加します。このプロパティの値をベースパッケージの名前に設定します。
<AddToProperty name="custom.mvc.builders.base-packages" value="com.acme.wizard.mvc.builders.custompart"/>
著作者フォームプロセッサ
1. カスタムフォームプロセッサ、またはカスタムフォームプロセッサデータに対して実行する必要があるサーバー側検証にカスタムロジックを追加します。
public class CreateCustomPartFormProcessor extends CreatePartFormProcessor {
@Override
public FormResult doOperation(NmCommandBean clientData, List<ObjectBean> objectBeans) throws WTException {
FormResult formResult = new FormResult(FormProcessingStatus.SUCCESS);
List<ObjectBean> partObjectBeanList = objectBeans.stream()
.filter(objectBean -> objectBean.getObjectHandle().equals(PartConstants.ObjectHandles.PART))
.collect(Collectors.toList());
if (!partObjectBeanList.isEmpty()) {
formResult = super.doOperation(clientData, partObjectBeanList);
}
return formResult;
}
}
2. Acme 部品を保存するためにフォームプロセッサを呼び出すには、AcmePartClient-actions.xml で作成操作のカスタムフォームプロセッサを設定します。
<action name="createCustomPartWizard" ajax="row"
resourceBundle="com.acme.custompart.CustomPartResource">
<command class="com.acme.custompart.forms.CreateCustomPartFormProcessor" method="execute"
url="/ptc1/custom/custompart/createCustomPartWizard?revisionMode=create&showNewCADDocStep=true&hideAssociatePart=true"
onClick="validateCreateLocation(event)"
windowType="popup" />
</action>
著作者バリデータ
1. 「Acme 部品を作成」操作の表示を制御するための条件を指定します。
この例に示すロジックに従って、操作は PDMLink コンテナでのみレンダリングされます。
public class AcmePartActionValidator extends DefaultUIComponentValidator {
@Override
public UIValidationResultSet performFullPreValidation(UIValidationKey validationKey,
UIValidationCriteria validationCriteria, Locale locale)
throws WTException {
UIValidationResultSet resultSet = UIValidationResultSet.newInstance();
UIValidationStatus status = UIValidationStatus.HIDDEN;
WTContainerRef containerRef = validationCriteria.getParentContainer();
Class containerClass = null;
if (null != containerRef) {
containerClass = containerRef.getReferencedClass();
}
if (null != containerClass && PDMLinkProduct.class.isAssignableFrom(containerClass)) {
status = UIValidationStatus.ENABLED;
}
UIValidationResult result = UIValidationResult.newInstance(validationKey, status);
resultSet.addResult(result);
return resultSet;
}
}
2. <カスタマイズのルートディレクトリ>\<Acme ウィザードモジュール>\main\xconf にあるカスタムファイル NewWizard-service.properties.xconf でバリデータを設定します。
<Service context="default" name="com.ptc.core.ui.validation.UIComponentValidator">
<Option serviceClass="com.acme.custompart.validators.AcmePartActionValidator"
requestor="null" selector="createCustomPartWizard" cardinality="duplicate" />
</Service>
<Option serviceClass="com.acme.custompart.validators.AcmePartActionValidator"
requestor="null" selector="createCustomPartWizard" cardinality="duplicate" />
</Service>
開発環境でのカスタマイズの展開
CCD の展開のプロセスについては、開発環境でのカスタマイズの展開を参照してください
プロモーション用 CCD パッケージの準備
CCD のプロモーションのプロセスについては、コードとコンフィギュレーションのパッケージの展開を参照してください。