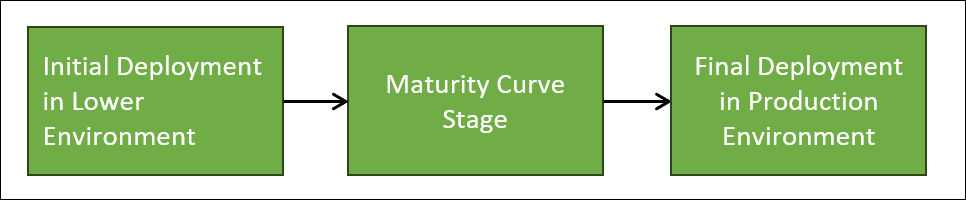
Deployment Process for a Windchill Navigate Build
The deployment process involves submitting and promoting packages through various environments. The goal is to ensure that the package is thoroughly tested and validated at each stage before reaching the final deployment environment.
The deployment process for Navigate includes the following steps:
1. The initial deployment in a lower environment
2. Maturity curve stage
3. The final deployment in the production environment
Consider the following scenario: Your team selects a use case based on the current requirements, and then integrates the use case in the sprint cycle. The process involves submitting and promoting your package through various stages. Initially, you deploy your package in a lower environment by submitting it. Your package is promoted in the maturity curve stage. The final promotion happens in the final deployment stage.
Detailed Process Description
1. First/Initial Build Deployment—The initial build deployment that PTC receives from the customer undergoes a thorough review by the PTC team. The required artifacts for this review include:
◦ Completed Questionnaire: A detailed questionnaire filled out by the customer.
◦ Build Package: A zipped package submitted by customers/system integrators.
The initial build advances to the next step only if the PTC team approves it, ensuring it meets the required guidelines. |
2. Maturity Curve stage—This stage does not require approval from the PTC team. During this stage, the build goes through a maturity curve, which includes the following tasks:
◦ Bug Fixes: Identifying and resolving issues.
◦ Logic Changes: Refining the build's functionality.
◦ User Acceptance Testing (UAT): Ensuring the build meets user requirements.
◦ Cosmetic Changes: Adjusting the user interface and experience.
The initial deployment happens in a non-production environment. A customer or system integrator is responsible for maintaining thorough documentation of all changes made to the build.
It is crucial that the requirements addressed by the build package and the build dependencies (on third-party libraries) remain unchanged during this process. If any changes occur, you must restart the deployment process. |
3. Final Build Deployment in the Production Environment—The final deployment on the product server undergoes a thorough and comprehensive review by the PTC team. This review ensures that all aspects of the build meet the highest standards of quality, functionality, and compliance before it is released into the production environment. The artifacts needed for this review include:
◦ Completed Questionnaire: A detailed questionnaire filled out by the customer.
◦ Build Package: A zipped package submitted by the customers/system integrators.
◦ Detailed Documentation: Comprehensive documentation of all changes made to the build during the maturity stage. For more information, see the Creating Complete Documentation: Key Guidelines section.
This stage needs approval from the PTC team. |
Guidelines for Customers
• Consistency in requirements — The initial build that you upload must have all the significant content. It is crucial for the system integrator to avoid introducing significant changes in requirements or dependencies (especially on third-party libraries) during the two deployment stages — first stage and third stage..
• Thorough documentation — You must maintain comprehensive documentation of all modifications made to the build.
• PTC Team review — The PTC team reviews all your changes before the build is promoted for final deployment on the production environment.
By adhering to these guidelines, you can ensure a secure and stable deployment process for your Windchill Navigate build.
How Often Should You Repeat the Deployment Process?
When considering a customization, you have a specific use case in mind and a development team working in sprint cycles. Your team picks up a use case, which could be one requirement or a set of requirements, and starts developing it in sprint cycles. Sometimes multiple sprint cycles may be needed to prepare the build.
For example, in a six-month release cycle with five sprints, requirements are selected and developed within these sprints. You might have different timelines, such as 20-day sprints with development, QA, and deployment phases. If requirements change significantly during the cycle, the process must restart, and approvals are required.
The frequency of the deployment process depends on the number of use cases and sprint cycles. For instance, if developing 10 use cases in 10 sprint cycles, the process is followed 10 times. If you are developing 5 use cases in one sprint cycle, the process is followed twice.
Additional Examples:
1. Example 1: Shorter Sprint Cycles
◦ You have a 2-week sprint cycle. You select a requirement, develop it for 10 days, spend 2 days on QA, and then deploy. If you have 6 requirements, you will follow the process 6 times in 12 weeks.
2. Example 2: Overlapping Requirements
◦ You have overlapping requirements that span multiple sprints. For instance, a requirement that takes 3 sprints to complete will follow the process once for each sprint, ensuring continuous integration and testing.
3. Example 3: Major Changes Mid-Cycle
◦ If you make a significant change to a requirement mid-cycle, such as altering the data model, you must restart the process. This ensures all dependencies are re-evaluated, and approvals are obtained.
4. Example 4: Frequent Deployments
◦ You prefer frequent deployments and have a 1-week sprint cycle. You develop for 4 days, QA for 1 day, and deploy on the last day. With 8 requirements, you follow the process 8 times in 8 weeks.
5. Example 5: Custom Timelines
◦ You set custom timelines based on your project needs. For example, you might have a 30-day sprint cycle with 20 days of development, 5 days of QA, and 5 days of deployment. You adjust the process frequency based on the number of requirements and their complexity.
What Information is Included in the Questionnaire?
You must complete two questionnaires during the deployment process:
1. Initial Deployment Questionnaire — This questionnaire is required for the first deployment in a lower environment. It ensures that all preliminary checks and configurations are in place before moving forward.
2. Final Deployment Questionnaire — This questionnaire is required for the final deployment in the production environment. It verifies that all critical aspects have been reviewed and approved, ensuring smooth and successful deployment.
An example of a questionnaire is as follows:
Question | Answer | |
|---|---|---|
General Details | Your Customer Account Name | |
Your Windchill Version | ||
Your Windchill Navigate Version | ||
Your Planned Deployment Date | ||
Your Planned Deployment Environment | ||
Package Details | Have you tested this package in lower environments? (If yes, name the environment) | |
What type of customizations have you implemented? | ||
Are any third-party libraries used in this package? | ||
Are you using the default authentication method, or does this package rely on app keys? | ||
What is the business case or objective that this customization aims to address? | ||
Have you ensured that no part of the customization violates the guardrails? | ||
What are the differences between the old package and the new package (if any)? |
In this questionnaire, you need to describe any differences between the old and new packages. For example, you might explain if there are new features added, any bugs fixed, or changes in the version number. These differences are important because they help ensure that everyone involved in the deployment process understands what has changed. This can prevent issues, ensure compatibility, and make sure that the new package meets all requirements. |
Creating Complete Documentation: Key Guidelines
When you submit the final build for deployment in the production environment, it's crucial to include comprehensive documentation of all changes made during the maturity stage. This documentation should detail every update, feature addition, bug fix, and revision that occurred throughout the development process.
By providing thorough documentation, you ensure that all stakeholders are aware of the changes, which helps in troubleshooting, maintaining consistency, and verifying that the build meets all requirements. This step is essential for smooth and successful deployment, minimizing the risk of errors and ensuring that the production environment is fully prepared for the new build.
Consider the following scenario:
Typically, you start a build cycle with version 1.0. As you revise the build in subsequent stages, you might update it to versions like 1.1, 1.2, and so on. By the time the build is ready for deployment on the production server, it might have been revised multiple times, reaching a final version like 1.7.
You should maintain a detailed record of changes made during each revision. For example, if you change 5 items, document these changes clearly. This documentation can be in the form of release notes, which vary in size depending on the product.
For example, the documentation can include:
• Version 1.4.6: Added a fix to handle a specific issue.
• Version 1.4.5: Implemented a new feature.
• Version 1.4.4: Improved performance for a particular function.
This type of documentation helps track the journey of the build from version 1.0 to 1.7. You can use screenshots or any format that best conveys the relevant information. The key is to ensure comprehensive change tracking. You devise the format to suit your needs, whether it's a Word document, Excel sheet, or any other method.
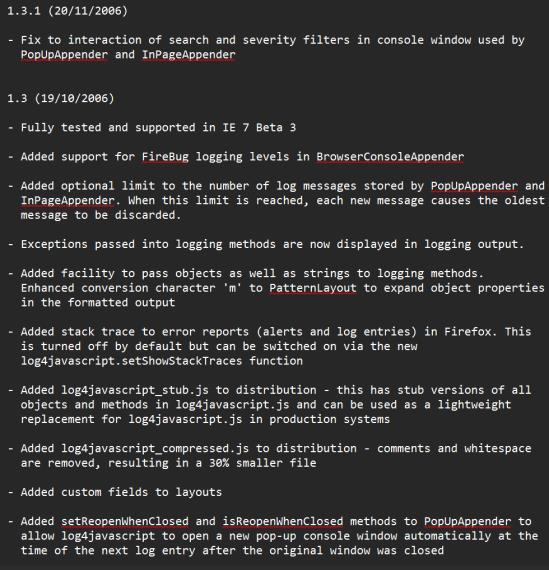
Examples of a change log are as follows:
Example 1 — Concise Change Log: One-Line Summary for Quick Reference
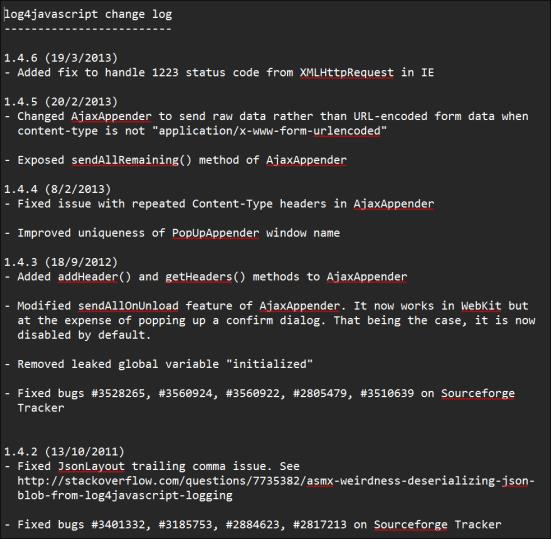
Example 2 — Detailed Change Log: Comprehensive List of Updates
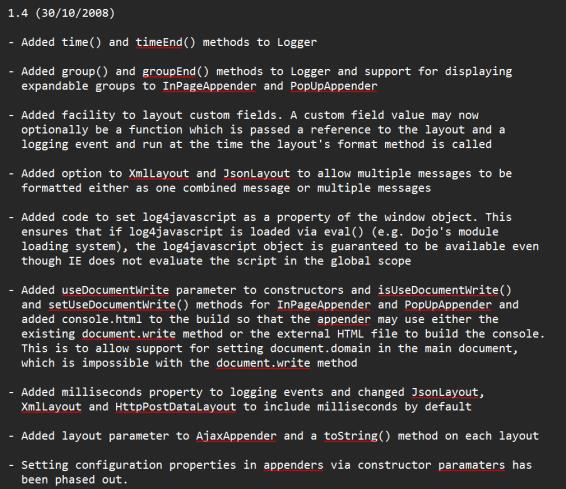
Example 3 — Comprehensive Change Log: An Exhaustive Compilation of Updates, Fixes, and Improvements