Automated Build Deployment Process
The automated build deployment process helps simplify the promotion of changes from the development environment to the production environment. The Simple Change Framework (SCF), based on Ant scripts, is developed by PTC to support this automation. SCF helps package the changes necessary to update Windchill environment using the automated deployment process which is required for Windchill+. It also helps standardize the packaging and installation process, as well as reuse existing deployment and installation features. The SCF provides support for file deployment, XCONF and property management, RBInfo and Java compilation, wtSafeArea support, and additional customizations (for example, LoadFiles, LoadFileset, and LCSLoadFiles).
Downloading the Simple Change Framework Artifacts
On the PTC Cloud Server, use the following command to download the SCF artifacts:
go scf.latest
The SCF artifact located at /appl/ptc/scripts/SimpleChangeFramework contains the following:
• Structured package template– A zip file with a predefined folder structure.
• Installation guide templates for four different types of installations– All, Load, Copy, and Deploy.
• Sample of Delivery Note– A document listing the package contents and status of installation steps.
• Samples of build packages illustrating individual use cases.
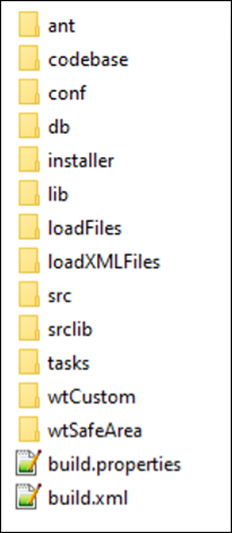
SCF Directory Structure
The SCF directory contains the following files and folders:
• build.properties and build.xml files are used to configure the deployment operations.
• ant folder containing the scripts necessary to orchestrate the operations.
• Other folders as placeholders for developers’ reference to copy the content at the right place.
Creating and Deploying a Build Package
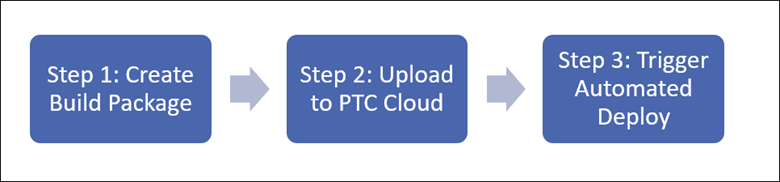
You can create and deploy build packages automatically. There are three main steps to deploy configuration changes on PTC cloud:
1. Create a build package
2. Upload to PTC cloud
3. Trigger automated deployment
Step 1. Create a Build Package
Step 1. Create a Build Package
You can create a build package using one of the following methods:
• Using a package template
• From a PTC cloud integration environment
• Using a configuration management system
Create a Build Package Using a Package Template
To create and deploy build package using a package template, perform the following steps:
1. Create the package structure by unzipping the package template.
2. Move the files corresponding to the expected changes to their respective locations in the folder structure.
3. Declare the Load files sequence and specific property changes in the build.xml file.
4. Modify the build.properties file to change the version number, component name, and installation type.
5. Zip all the files into a deliverable package.
For detailed instructions on each of the above steps, refer to the video
here.
Create a Build Package from a PTC Cloud Integration Environment
The steps to build a package from a PTC Cloud integration environment are given below:
| The Ant tools used for this method are available only on the PTC cloud environment. |
1. Create an empty package structure using the command– go package.prepare.
2. Use the definition exporter to export either Types or Global enumerations– go exporter.type or go exporter.enum.
3. Make manual changes– include Java source files, rbInfo files, load files, or any other required files in the Package structure.
4. Declare the Load files sequence and specific property changes in the build.xml file.
5. Modify the build.properties file to change the version number, component name, and installation type.
6. Zip all changes together using the command– go package.gen.zip.
Create a Build Package Using a Configuration Management System
This method is specific to your configuration management plan and is equivalent to the first method of creating a build package using a package template.
| • The SCM branch must follow the SCF folder structure. • The ant folder and the build.properties and build.xml properties files must be managed in your source control management system. • SCF version update must be managed in this SCM tool. |
To generate a package out of an SCM tool. perform the following steps:
1. Use the SCM history mechanism to define the specific content of the build.xml file.
2. Increment the version by modifying the build.properties file.
3. Commit the changes.
| At this stage, it is recommended to create a separate tag to properly identify the delivered package in the SCM tool since a tag can be reused later as a reference to create a hotfix. |
4. Zip either the branch or the tag.
Step 2. Upload to PTC Cloud
The generated ZIP file can be uploaded to Azure Blob storage or AWS S3 bucket. This section explains the procedure for uploading the package to Azure Blob storage.
Prerequisite:
An Azure Blob storage should be set up and authorization details should be obtained from PTC Cloud.
| You must enter the Azure Blob Storage name in the following format : ptccustomerxxxxrrr Here, xxxx is the short name of the customer. (Example: acme). rrr is the region where the blob storage has been provisioned. (Example: euw). Based on our example, the Blob Storage is: ptccustomeracmeeuw. |
Upload Package to Azure Blob
You can upload the build either from a cloud instance or from your local computer.
Upload Build from Cloud Instance
To upload the build to Azure Blob from a cloud instance, execute the following commands:
cd /<path>
azcopy login --identity
azcopy cp <build>.zip https://ptccustomerxxxxrrr.blob.core.windows.net/data/builds/
Upload Build from Local Computer
You can upload the build to Azure Blob from your local computer using Unix Shell, Windows CMD, PowerShell, or Microsoft Azure Storage Explorer. To upload the build to Azure Blob from Linux Shell, execute the following commands:
cd /<path>
azcopy login
azcopy cp <build>.zip https://ptccustomerxxxxrrr.blob.core.windows.net/data/builds/
To upload from Windows CMD or PowerShell, execute the following commands:
cd \<path>
azcopy login
azcopy cp <build>.zip https://ptccustomerxxxxrrr.blob.core.windows.net/data/builds/
To upload using Microsoft Azure Storage Explorer, follow the steps given below:
1. Locate the build file locally and the target folder (data/builds) in the Blob Container.
2. Either drag the build file or upload it to the target folder.
| If you are prompted for Storage Access Policy, click ok. |
3. After the transaction is complete, verify that the transfer status is ok.
Step 3. Trigger Automated Deploy
To trigger package deployment, you need a manifest file. The manifest file is a YML file that describes where and when a specific build should be deployed. The steps to create a manifest file are given below.
Pre-requisites
• Configure the environment that defines the deployment pipeline on PTC cloud.
• Obtain the corresponding environment identifiers from the PTC team before proceeding to the next steps.
| • Use any text editor to create the manifest file. • The filename can be any, but the extension must be .yml. • You can reuse the filename if required, or use a new name for each package being deployed. |
Details of the attributes in manifest file are given below:
Attribute | Description | Possible values |
deploy_pipe | Defines the pipeline where the build package should be installed. The deploy_pipe attribute lists the environments to deploy the build. Usually, intN describes a single integration environment and pipelineN describes both QA and Production environments. | intN / pipelineN / intN,pipelineN examples: deploy_pipe: pipeline1 deploy_pipe: int1 deploy_pipe: int2, pipeline1 There cannot be more than one intN or pipelineN per manifest file. |
package_description | Brief description of the build package contents or its purpose. | Free text |
package_name | File name of the build package with the extension .zip | <Build>.zip Case must be respected. |
duration | Expected duration for deployment in hours. | Number |
date_time_int | Date on which the build is expected to be deployed on. | Time is in 24H format in Eastern Time. |
| YYYY/MM/DD hh:mm:ss 2021/01/30 14:00:00 |
date_time_qa | Date on which the build is expected to be deployed on the QA environment. | Time is in 24H format in Eastern Time. |
| YYYY/MM/DD hh:mm:ss 2021/01/30 14:00:00 |
date_time_prod | Date on which the build is expected to be deployed on the Production environment. | Time is in 24H format in Eastern Time. |
| YYYY/MM/DD hh:mm:ss 2021/01/30 14:00:00 |
notify | Comma-separated list of email addresses to be notified during the deployment process. | |
An example of the manifest file is given below:
Generate the manifest file from the PTC cloud environment using the following commands:
go package.gen.manifest
You can also generate the manifest file and create ZIP together:
go package.gen.zip.and.manifest
After the manifest.yml file is created, upload it to the shared location using any of the methods described in the next section.
Upload Manifest to Azure Blob
You can upload the manifest either from a cloud instance or from your local computer.
Upload Manifest from Cloud Instance
To upload the manifest using Linux Tools, execute the following commands:
cd /<path>
azcopy login --identity
azcopy cp <manifest>.yml https://ptccustomerxxxxrrr.blob.core.windows.net/data/builds/deploy/
Upload Manifest from Local Computer
To upload the manifest using Linux shell, execute the following commands:
cd /<path>
azcopy login
azcopy cp <manifest>.yml https://ptccustomerxxxxrrr.blob.core.windows.net/data/builds/deploy/
To upload it using Windows CMD/PowerShell, execute the following commands:
cd \<path>
azcopy login
azcopy cp <manifest>.yml https://ptccustomerxxxxrrr.blob.core.windows.net/data/builds/deploy/
To upload it using Microsoft Azure Storage Explorer, follow the steps given below:
1. Locate the manifest file locally and the target folder (data/builds/deploy) in the Blob Container.
2. Either drag the manifest file or upload it to the target folder.
| If you are prompted for Storage Access Policy, click ok. |
3. After the transaction is complete, verify the transfer status is ok.