Create Color Configurations
In the last section, you learned how the model application parameter can be used to change the configuration of the model within your experience. Now, you’ll create an application parameter named color that works similarly. However, some scripting must be created to enable it.
In this section, an object that contains RGBA colors will be created that Vuforia Studio will access. Once a color has been fetched from the object, it will then be passed to the setColor function. The setColor function will then change the appearance of the model to whatever color is specified for the color application parameter.
1. Click on Home.js and enter the following:
//
// object to hold color possibilities
var colorPalette = {
'red' : 'rgba(255,0,0,1);',
'green' : 'rgba(0,255,0,1);',
'blue' : 'rgba(0,0,255,1);',
'yellow' : 'rgba(255,255,0,1);',
'purple' : 'rgba(255,0,255,1);',
'cyan' : 'rgba(0,255,255,1);',
'white' : 'rgba(245,245,245,1);',
'black' : 'rgba(10,10,10,1);'
}
The colorPalette object will be used to hold all possible colors that your model can be configured to. A list of basic colors has been added to this experience, but since Studio understands RGBA color codes, you can add any additional colors to the experience that you want.
2. Next, you’ll create the setColor function that be used to set the desired color for the quadcopter. If a color is defined in the color application parameter, then the code inside the if statement will be activated.
a. Based on the value that you enter into the color application parameter, a RGBA value will be selected from the colorPalette object and set as a variable named paintColor.
b. If the color that you entered is a valid value in colorPalette, the PTC Metadata API promise will be triggered. In order to determine if the promise is fulfilled, a variable named toPaint is created that becomes a list of the parts that have the painted attribute with a value of true. Then, if there are parts that meet that criteria, the TML 3D renderer changes the color of those specific parts so that they reflect the value in paintColor.
c. If the promise is rejected, an error statement will be logged to the console.
d. Enter the following code in Home.js:
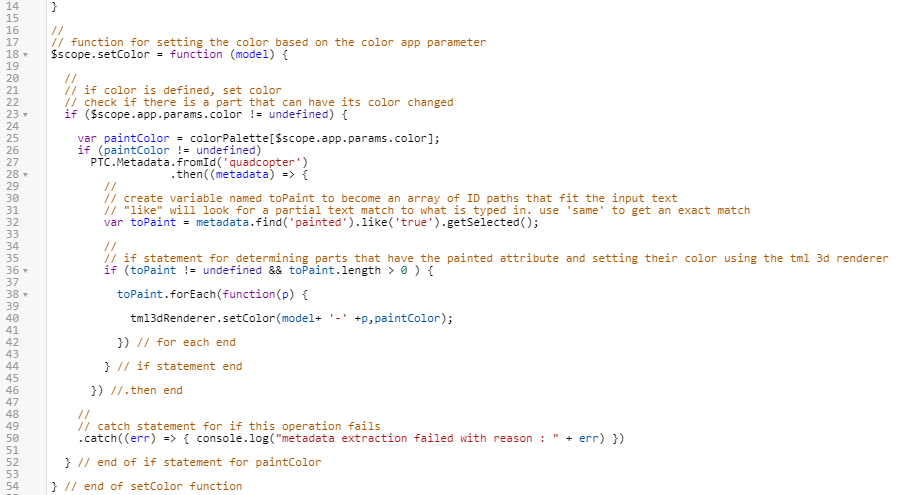
//
// function for setting the color based on the color app parameter
$scope.setColor = function (model) {
//
// if color is defined, set color
// check if there is a part that can have its color changed
if ($scope.app.params.color != undefined) {
var paintColor = colorPalette[$scope.app.params.color];
if (paintColor != undefined)
PTC.Metadata.fromId('quadcopter')
.then((metadata) => {
//
// create variable named toPaint to become an array of ID paths that fit the input text
// "like" will look for a partial text match to what is typed in. use 'same' to get an exact match
var toPaint = metadata.find('painted').like('true').getSelected();
//
// if statement for determining parts that have the painted attribute and setting their color using the tml 3d renderer
if (toPaint != undefined && toPaint.length > 0 ) {
toPaint.forEach(function(p) {
tml3dRenderer.setColor(model+ '-' +p,paintColor);
}) // for each end
} // if statement end
}) //.then end
//
// catch statement for if this operation fails
.catch((err) => { console.log("metadata extraction failed with reason : " + err) })
} // end of if statement for paintColor
} // end of setColor function
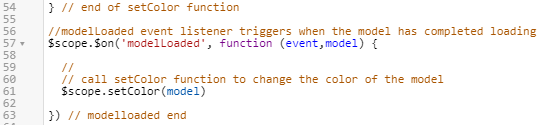
3. Now that you’ve create the functions that change the color of the model, but they have not been called yet. To have this function occur as soon as you load Studio, a modelLoaded event listener function needs to be created. Like its name suggests, when the model is loaded by Studio, the body of this function is run. In this case, when the model is loaded, the setColor function is triggered for the given models to set their color based on the configuration.
//modelLoaded event listener triggers when the model has completed loading
$scope.$on('modelLoaded', function (event,model) {
//
// call setColor function to change the color of the model
$scope.setColor(model)
}) // modelloaded end
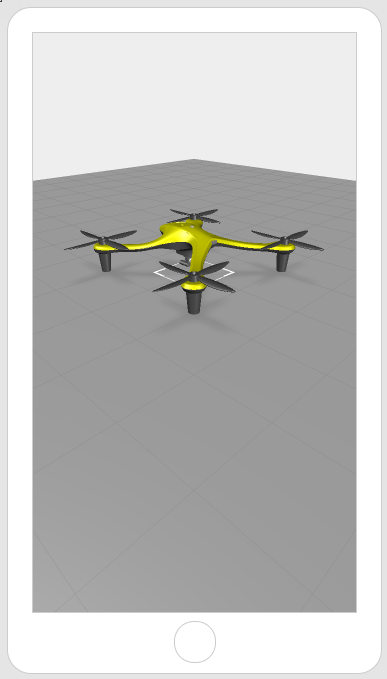
4. This completes all the scripting necessary for this section. To test your code, enter one of the colors that you created inside the colorPalette object as the value for the color application parameter. Click Preview and see how the color of your model has changed. For our example, we used yellow. If you see the color of your model changing, you’ve completed this section successfully!
| This method will work on a small scale, but in a case where you have many models with multiple configurations, it will not work due to the limit of models that can be added to Vuforia Studio. Continue along with this Digital Twin use case to find out how to use the Identity Resolution Service and ThingWorx to create scalable experiences. |
Next, you’ll start working with the
Identity Resolution Service (IRS).