Use Case: Building a Workflow with a Loop in ThingWorx Workflow Builder
Complete the following steps to build a workflow with a loop in ThingWorx Workflow Management using the MRI demonstration data that you have installed.
1. From the ThingWorx Utilities Console, click the Workflow Builder tile.
2. Drag one User Task activity, two Receive Task activities, one Service Task activity, and one Exclusive Gateway activity onto the canvas. Place them between the Start and End nodes.
3. Rename the activities as follows:
◦ User task 1— User Task
◦ Receive task 1— Confirm Helium Level
◦ Receive task 2— Confirm Helium 2
◦ Service task 1— Locate Distributor
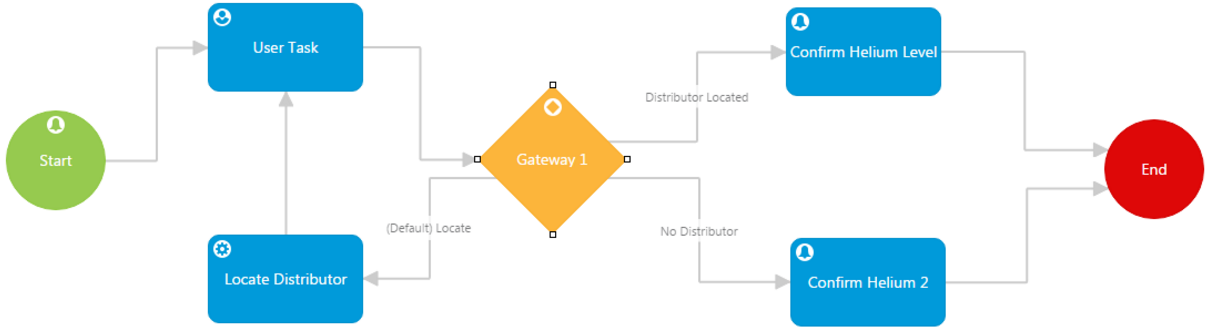
4. Connect the activities as shown below.
5. Click the Events tab for the Start node. Select the following options:
◦ Entity Type—ThingTemplate
◦ Entity—PTC.Demo.Assets.MRIMachineTemplate
◦ Event—Alert
6. In the Event Configuration panel, set the Property and Alert fields.
◦ Property—HeliumLevel
◦ Alert—Low
7. Click the User Task node and select the User Interface tab. Select the PTC.BPE.UserTaskWithDetails mashup, and then select the following options:
◦ ThingName—initiator
◦ Label
◦ Subject
◦ Message
8. Select the Performers tab. Find your user account in the Available Users list and add it to the Selected Users list.
9. Click the Locate Distributor node and select the Services tab. In the Select Service panel, select the following options:
◦ Entity Type—Thing
◦ Entity—DistributorNotifier
◦ Service—Distributor_Locate_Nearest
10. In the Service Configuration panel, select the following options:
◦ > —initiator
◦ > —Distributor
| Type Distributor in the search box and then press Enter. |
11. Click the Confirm Helium Level node and select the Events tab. Select the following options:
◦ Entity Type—ThingTemplate
◦ Entity—PTC.Demo.Assets.MRIMachineTemplate
◦ Event—Alert
12. In the Event Configuration panel, set the Property and Alert fields.
◦ Property—HeliumLevel
◦ Alert—Full
13. Click the Confirm Helium 2 node. Set the options in the Events tab to match the Confirm Helium Level node.
14. Click the Gateway 1 node and select the Conditions tab. In the To: Locate Distributor row, select the Default checkbox.
15. Enter the following values:
◦ To: Locate Distributor—
▪ Label—Locate
▪ Expression—Leave this field blank.
Locate
◦ To: Confirm Helium Level
▪ Label—Distributor Located
▪ Expression—context.Distributor != null
◦ To: Confirm Helium 2—
▪ Label—No Distributor
▪ Expression—false
16. Click Validate on the toolbar above the canvas. A message appears notifying you that the workflow was successfully validated.
17. Click Save. Enter UserTaskLoop in the Workflow Name field and select the Activate Now checkbox. Click Save.
| The Description field is optional. |