Use Case: Managing a Workflow in ThingWorx Workflow Management
Complete the following steps to manage the workflow you created in
Use Case: Building a Workflow in ThingWorx Workflow Builder.
1. From the ThingWorx Utilities Console, click the Workflow Management tile.
2. In the Workflows list, select the workflow named Replenish.Helium workflow.
3. Review the details for the workflow in the panels.
◦ Properties
◦ Audit Log
◦ Asset Location
◦ Workflow
4. Hover over the steps in the Workflow panel to verify that the associated descriptions for the steps are correct.
5. From the App Switcher, select ThingWorx Console. From the Console, click the MRI Demo Simulator tile.
6. On the MRI demo data page, click Refill All MRI Machines and then click Refresh Table Now.
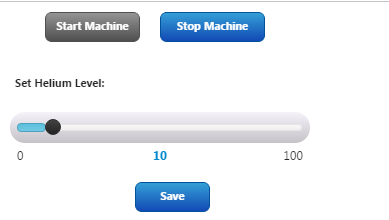
7. Select PTC.Demo.Assets.MRI_1 in the table and set the helium level to 10. Click Save.
8. Navigate back to the ThingWorx Workflow Management.
9. A new line item appears in the table showing an Alert - Low alert for PTC.Demo.Assets.MRI_1.
| The new line item may take a few moments to appear. If it does not, refresh the browser. |
10. Navigate back to the MRI demo simulator page and set the helium level back to 100 for PTC.Demo.Assets.MRI_1.
11. In the ThingWorx Workflow Management, another new line item appears in the table showing that the Replenish.Helium workflow is complete.
| The new line item may take a few moments to appear. If it does not, refresh the browser. |