Uninstalling
Select one of the uninstall methods below and follow the steps to uninstall either the ThingWorx Analytics Server or Descriptive Analytics.
|
|
In the case of the ThingWorx Analytics Server, these procedures uninstall only the installed components of the Analytics Server itself. If you also want to remove the auto-generated Things created in the ThingWorx Platform, open ThingWorx Composer, find your AnalyticsServer Thing, and use the RetrieveAnalyticsServers service to find and manually delete the connected Things. |
Uninstall from Programs and Features
1. Navigate to the Programs and Features list on your computer. The path to this list will vary based on your version of Windows. (Example: > > )
2. Scroll through the list to find either the ThingWorx Analytics Server or Descriptive Analytics.
3. Right click on it and select the Uninstall/Change option.
A Question window opens asking you to confirm that you want to uninstall the selected program and all its modules.
4. Click Yes.
You might be asked to confirm a second time. Then the Uninstalling screen opens. When the process finishes, another window opens to let you know the uninstall is complete.
5. Click OK to close the window.
The ThingWorx Analytics Server or Descriptive Analytics is uninstalled from your system.
6. To ensure that all related files are removed, open the Windows Explorer, navigate to the ThingWorxAnalytics installation directory, and delete the entire directory.
| If your ThingWorx Analytics Server and Descriptive Analytics installations are in separate directories, for example because you’ve upgraded from a previous release, delete both directories. For more information, see Upgrade from an Earlier Version. |
Uninstall from the Installation Directory
1. Open the Windows Explorer and navigate to the ThingWorxAnalytics installation directory.
2. Right click on one of the following uninstall files and select the option to Run As Administrator:
◦ Thingworx_Analytics_Server/thingworx_analytics_server_uninstall.exe
◦ DescriptiveAnalytics/DescriptiveAnalytics_uninstall.exe
A Question window opens asking you to confirm that you want to uninstall the selected program and all its modules.
3. Click Yes.
You might be asked to confirm a second time. Then the Uninstalling screen opens. When the process finishes, another window opens to let you know the uninstall is complete.
4. Click OK to close the window.
The ThingWorx Analytics Server or Descriptive Analytics is uninstalled from your system.
5. To ensure that all related files are removed, in the Windows Explorer, navigate to the ThingWorxAnalytics installation directory, and delete the entire directory.
| If your ThingWorx Analytics Server and Descriptive Analytics installations are in separate directories, for example because you’ve upgraded from a previous release, delete both directories. For more information, see Upgrade from an Earlier Version. |
Uninstall from a Start Menu Shortcut
| This method is not available in all versions of Windows. |
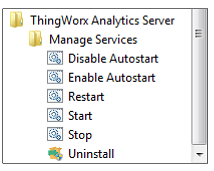
1. In the Windows start menu, navigate to ThingWorx Analytics Server or Descriptive Analytics and expand it. Several options are displayed. (See the example in the image below.)
2. Right click the Uninstall option and select Run As Administrator.
A Question window opens asking you to confirm that you want to uninstall the selected program and all its modules.
3. Click Yes.
You might be asked to confirm a second time. Then the Uninstalling screen opens. When the process finishes, another window opens to let you know the uninstall is complete.
4. Click OK to close the window.
The ThingWorx Analytics Server or Descriptive Analytics is uninstalled from your system.
5. To ensure that all related files are removed, open the Windows Explorer, navigate to the ThingWorxAnalytics installation directory, and delete the entire directory.
| If your ThingWorx Analytics Server and Descriptive Analytics installations are in separate directories, for example because you’ve upgraded from a previous release, delete both directories. For more information, see Upgrade from an Earlier Version. |