Graphical Mode Installation
|
|
This procedure represents the graphical installation mode, typically used in a Windows environment. For launch information using the Silent installation mode, see Silent Mode Installation |
Installation requires the following steps:
3. Extract the downloaded files to a location on your host system.
4. Navigate to the extracted Windows installer file, ThingWorxAnalytics-<n.n.n>-windows-installer.exe, right click the file, and select the Run as Administrator option.
5. Follow the on-screen installation instructions. After each step, click Next to advance to the next step. You’ll be asked to:
◦ Accept the license agreement.
◦ Select the ThingWorx Analytics components you want to install: ThingWorx Analytics Server, Descriptive Analytics Microservice, or both.
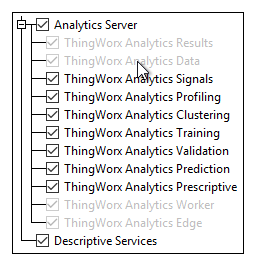
◦ If installing ThingWorx Analytics Server, decide whether you want to customize the subset of components that will be installed. Click the + icon to expand the Analytics Server option and view the available components. Select the components you want to install and clear the others. The following components are mandatory and are greyed out so they cannot be cleared (see the image below):
▪ ThingWorx Analytics Results
▪ ThingWorx Analytics Data
▪ ThingWorx Analytics Worker
▪ ThingWorx Analytics Edge
All of the other listed components are optional and can be selected or cleared. However, if you select the Training component, the Validation component must also be selected. During the installation, three Workers will be installed but the number of Workers can be scaled up or down when the installation is complete. For information, see
Scale the Number of Workers.
◦ Specify an installation directory. You can accept the default or provide a different location.
| If the installer detected a previous version of the ThingWorx Analytics Server, and you opted to upgrade, the old installation directory is preselected and you will not be able to change it. For more information, see Upgrade from an Earlier Version. |
◦ Enter connection information, including the following:
▪ ThingWorx IP Address or Host Name – Enter the IP address or host name of your ThingWorx Foundation server, which must already be installed and running.
▪ ThingWorx Port – Enter the port for communicating with your ThingWorx Foundation server.
▪ ThingWorx AppKey – Enter the value from the Key ID field of the application key you created in ThingWorx Foundation.
▪ Analytics Server Thing Name – Enter a name for the AnalyticsServer Thing that will be created in ThingWorx Foundation during the Analytics Server installation. This full name will be attached as a prefix to each microservice name. This Thing name must be unique within the server deployment.
▪ Use SSL? – Set to true in order to require the use of SSL when connecting to ThingWorx Foundation. The default value is false.
When you complete the last step, the installation begins. Depending on your operating system, several windows may open and then close while the process unpacks and installs the necessary libraries and settings.
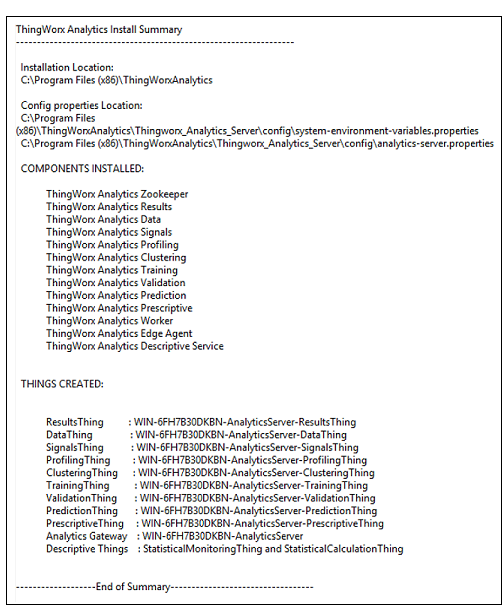
6. When the installation process is complete, a final page is displayed. Click Finish. An Installation Summary page is displayed with a list of the components that were installed.
7. Review the Installation Summary page and then click OK to close it.
8. To test the product installations, see: