Upload Different Types of Models
Upload model files that refer to multiple models or files of the same or different type:
• If the parent model references files of the same type, then complete the following steps before you upload the model:
1. Create a zip file with the same name as that of the main model.
2. Add all the referenced files including the model file to the zip file.
For example, if calculator.mcdx includes addition.mcdx and subtraction.mcdx, then create a zip folder, calculator.zip that contains addition.mcdx and subtraction.mcdx.
3. Upload the zip as a model.
• If the parent model references files of different types, then complete the following steps before you upload the model:
1. Create a zip file with the same name as that of the main model.
2. Add all the referenced files including the model file to the zip file.
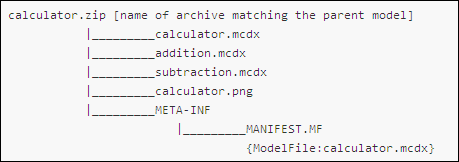
3. Add a META-INF folder to the zip file.
4. Create a MANIFEST.MF file inside the META-INF directory.
5. Add the string ModelFile:[name of the model file] to the MANIFEST.MF file.
For example, if calculator.mcdx includes addition.mcdx, subtraction.mcdx, and calculator.png, then create a zip folder calculator.zip that contains addition.mcdx, subtraction.mcdx, and calculator.png.
6. Upload the zip file as a model.
Upload models with file inputs:
If a model accepts a .txt file as an input, you must direct the model to accept inputs from the .txt file after you upload the model.
| Specify the base type field for the file input as HYPERLINK in the model input data structure. |
To upload the .txt file to the ThingWorx repository, complete the following steps:
1. On the Analysis Models page, select the model for which you want to add an input file, and click View.
2. In the left pane, click Test.
3. Under the Inputs for the Analysis Job section, click Upload Input Files.
4. In the Upload Input Data Files window, click Choose File and browse to the file that you want to upload.
5. Click Upload to upload the file. The URL of the uploaded file is automatically displayed in the Upload File URL field.
6. Copy the URL and click OK.
7. Paste the copied URL in the URL field.
After you upload the files, you can verify whether the model performs computations correctly. For more information, see
Test an Analysis Model.


