Adding Smart Tools
1. Click + Add to begin creating a new smart tool.
Step One: General Information
1. Add the following fields. All fields are mandatory unless otherwise indicated:
a. Name: A unique identifier for thesmart tool.
b. Display Name: Shown within the apps.
c. Smart Tool Type: Type/category of the smart tool.
d. Industrial Connection: Smart tool IoT connection.
e. Default Station: An optional setting.
f. Parallel Execution: If the smart tool will be used for parallel execution, set Parallel Execution toTrue
g. Enabled: When set to false, the created smart tool will not be available to use by operators.
2. Click Save to create the smart tool or click Next to create the tool and navigate to Step Two: Attributes.
a. Click Cancel at any time to return to the smart tools list. Any unsaved changes will be lost.
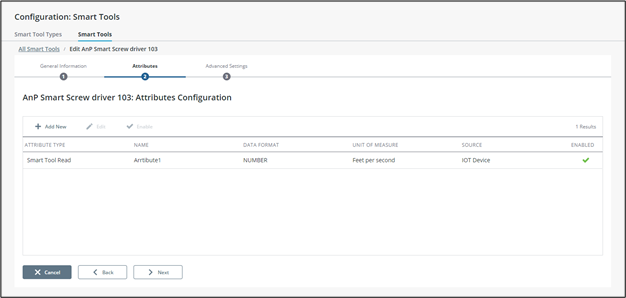
Step Two: Attributes (Non-Parallel Execution Tools)
If the smart tool has Parallel Execution set to false, follow these steps to set up attributes:
1. Click + Add New to launch the Add New Attribute popup.
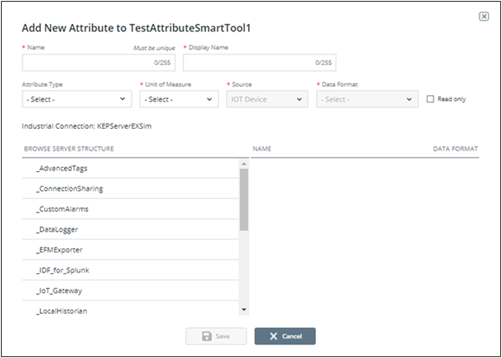
2. Add the following fields. All fields are mandatory unless otherwise indicated:
a. Name: A unique identifier for the attribute.
b. Display Name: Display name is shown on displays within the ThingWorx Apps
c. Attribute Type: A smart tool should have at least one attribute with either the Smart tool Write or Smart Tool Read attribute type.
d. Unit of Measure: Unit of measure of the attribute
e. Source: Source of the attribute.
a. The value will be automatically marked as IOT Device and cannot be changed.
b. (Required) An IoT tag address will need to be selected from the bottom tree/grid navigator.
f. Data Format: This is the data format of the attribute. This will be automatically assigned based on the IoT tag’s data format.
3. Click Save to return to the attributes list.
4. Repeat to add more attributes as needed.
5. Click Cancel to returnto the smart tools list or click Next to navigate to Step Three: Advanced Settings.
Step Two: Attributes (Parallel Execution Tools)
If the smart tool has Parallel Execution set to true, follow these steps to set up attributes:
1. Click+ Add New to launch the Add New Attribute popup.
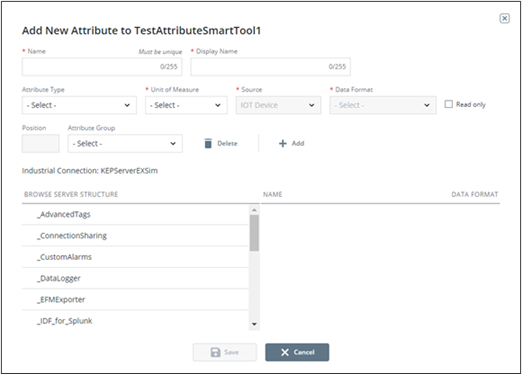
2. Add the following fields. All fields are mandatory unless otherwise indicated:
a. Name: A unique identifier for the attribute
b. Display Name: Display name is shown on displays within the ThingWorx Apps.
c. Attribute Type: Type of the attribute. A smart tool should have at least one attribute with either the Smart tool Write or Smart Tool Read attribute type.
d. Unit of Measure: Unit of measure of the attribute
e. Source: Source of the attribute.
a. The value will be automatically marked as IOT Device and cannot be changed.
b. (Required) An IoT tag address will need to be selected from the bottom tree/grid navigator.
f. Data Format: This is the data format of the attribute. This will be automatically assigned based on the IoT tag’s data format.
g. Position:Position within the attribute group. This will automatically increment when selecting a group.
h. Attribute Group:Attribute groups are used to organize attributes executed at the same time during parallel execution.
a. Click + Add to create a new attribute group. A new section is added to the popup:
b. Enter theAttribute Group Name.
c. Click  to save the group. It will become selected in the Attribute Group dropdown. Or clickXto cancel.
d. Click Delete todeletethe selectedattribute group.
3. ClickSaveto return to the attributes list.
4. Repeat to add more attributes as needed. You will need an attribute for each parallel execution position on each attribute group.
5. ClickCancelto returnto the smart tools list or click Next to navigateto Step Three: Advanced Settings.
Step Three: Advanced Settings
This screen allows for more smart tool details.
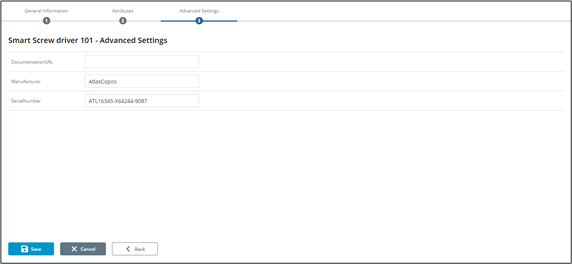
1. Add the following fields (if applicable):
a. DocumentationURL: A link to all relevant information on this smart tool
https:// must be included as part of the URL. |
b. Manufacturer: Name of the smart tool manufacturer
c. SerialNumber: Serial number of the smart tool
2. Click Save. If updatesare made to any field, clicking Back will save changes before returning to Step Two.
3. Click Cancel to return to the smart tools list.