Adding Data Tokens
Adding Data Tokens Individually
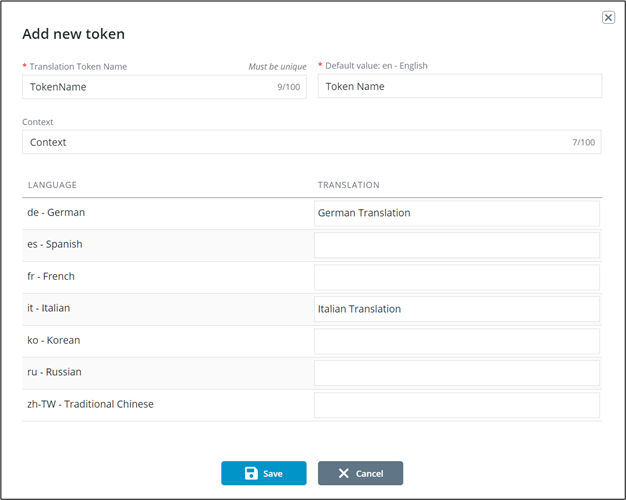
1. From the Data Translation tab click + Add. The Add New Token window will display
2. Enter the Translation Token Name and The default Value.
3. Optionally, enter the Context and the appropriate translations for each applicable language.
4. Click Save.
Importing in Bulk
1. From the Data Translation Tab of the Translation Management screen, click Download Template to open the Download Template window. Select Data Tokens, Data Translations or both and click Download to download the .xlsx file needed to bulk import.
Click Import if a template is already complete and skip to step 8. |
2. Open the template.
3. For the Data Tokens template, four columns will display.
Column | Requirements | Description |
Selected | X or blank | All rows marked with an X will be imported. |
Token | Text, no spaces, - or _ allowed (255 char) | Name of Token |
Default Value (en — English) | Text (255 char) | The English verbiage for the Token. |
Context | Text | Context of the token |
4. For the Data Translations template, four columns will display.
Column | Requirements | Description |
Selected | X or blank | All rows marked with an X will be imported. |
Token | AlphaNumeric | Name of Token |
Language Code | Text — List | de, es, fr, it, ko, ru, zh-TW |
Value | Text | Translation text to be associated with the Language Code. |
5. Save the file.
6. Return to the Data Translation screen.
7. Click Import. The Import from Excel window will open.
8. Click Choose File and select the saved template from the directory.
9. Click Upload. If upload was successful “Ready to Import # rows” with # corresponding to the number of rows in your completed template will display.
10. Click Import File.
11. Successful imports
a. Imports without errors will look like the image below.

12. Unsuccessful imports
a. If the import was successful, but errors are found in the Excel data the window will display the following. Click the Download Import Results button to download a file that details errors found by row.
