Route Actions
Release Route
Releasing a route makes it available to be scheduled for execution. You can release a route from the Add New Route or Edit Route displays.
1. Click Release at the top of the screen.
a. The button will be disabled when configuration for the route is not complete.
b. When editing a released route, a green Released will appear to the top right, otherwise a Gray Unreleased will display.
Edit Route
From the main Route Manager display, select a route in the left list pane and click  in the list’s action toolbar to edit the route.

From the main Route Manager display, you can also edit a route from the Details pane. With a route selected in the left list pane, click Edit in the right Details pane action toolbar.
In edit mode, the layout and options will be the same as adding a new route. The top navigation will indicate missing configuration with the orange warning state.
View Route
Routes cannot be edited when currently in use but can be viewed in a read-only sense.
1. Select the appropriate route from the list within the Route Manager.
2. In the right panel click Details.
Delete Route
Routes that are not in use can be deleted from the left list pane.
1. Select the route from the list.
2. Click  in the toolbar.
3. Click Delete in the confirmation pop-up.
If the route is in use, you will see a warning message and the route will not be deleted.
Clone Route
Routes can be cloned. The clone functionality will duplicate the route with a new name and assigned products.
1. Select a route in the left list pane and click  to launch the Clone pop-up.
2. Complete Step One: Rename and Assign Products:

a. Enter a unique Name for your cloned route.
b. Select one or more products by adding them to the selection list on the right side of the pop-up.
c. Click Next.
3. Complete Step Two: Clone:
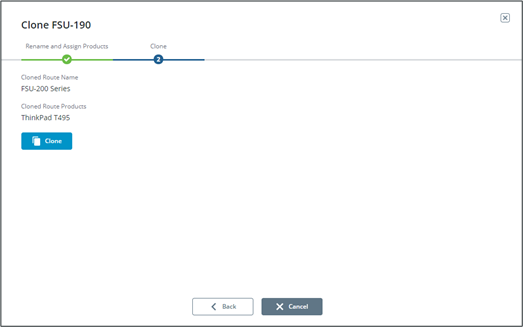
a. Click Clone. The status and any additional configuration messages will appear below.
4. Click Back to clone the route again with a new name and products. Or click Close to close the pop-up.
Cloned routes will not automatically be released.
Parts validation steps may need to be configured on the cloned route if the product/bill of materials has changed. |
Bulk Update
Routes are not automatically updated with the latest version of a work instruction. You can run the bulk update feature to select routes and update their work instructions, allowing you to have control over the work instruction version shown to the operator.
Routes that contain one or more work instructions pending update are indicated by  .
.
Routes in use cannot be updated. |
Follow the steps below to bulk update:
1. Click Bulk Update in the left list action toolbar to launch the Bulk Update Work Instructions pop-up.
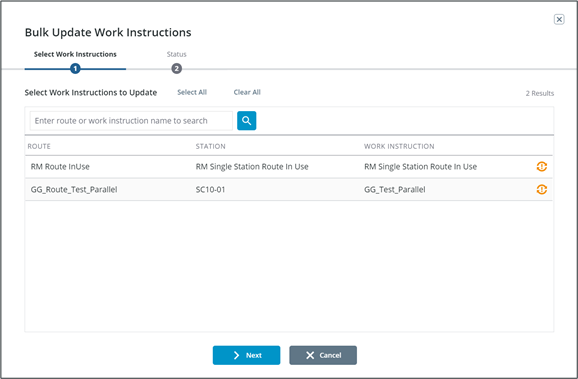
2. Complete Step One: Select Work Instructions:
a. Search for and select one or more routes and the associated work instructions in the grid.
b. You can click Select All to select the current page of the grid. Or Clear All to select none.
c. Click Next.
3. Complete Step Two: Status:
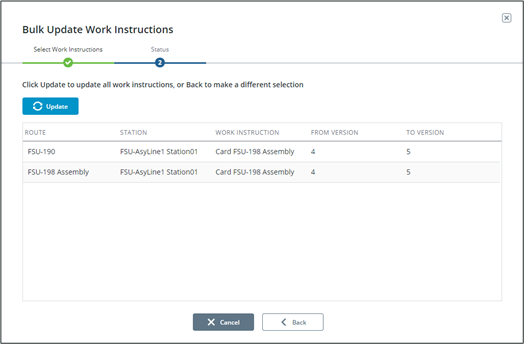
a. The grid below the Update button shows information on the routes that will be updated, including the work instruction version.
b. Click Update.
c. The display will show the update status. Any routes with steps that require new configuration will be listed below in a grid.

4. Click Back to select more routes/work instructions for bulk update or lick Close to close the pop-up.
Route Details
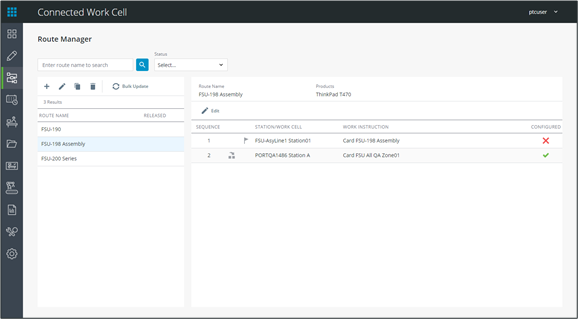
Select a route within the left list pane to load its details on the right pane.
You will see the route name, assigned products, and a grid showing the route sequence.
• The production point is indicated by  .
.
• Auto-advance stations are indicated by  .
.
• If the work instruction requires additional setup, the CONFIGURED column will contain  . Otherwise, configured work instructions are indicated by
  .
.
. Otherwise, configured work instructions are indicated by Click Edit to edit the route.