Document Sets
Header

The top left area of the display will show the current station, running product, and current lot number (if applicable.) If the set includes expired or disabled documents, a warning will also be shown in this area.

The application header in the top right will show the work station dropdown and the button to return to the station selection display ( ).
).
Click the work station dropdown to change to a different station. If the system does not find a running product for that station a document set cannot be loaded and you will be redirected to the station selection display.
KPI Header
Only visible if RTPPM is installed. |
The KPIs that will display are OEE, Availability, Performance, and Quality. This information is gathered by the selected Station and Product with the time frame set as This Shift.

Navigation

The navigation row shows all documents and log sheets within the set. If there are more items than fit on screen, you can click  or
or  to load more. Users can also click
  to access a list of all the documents and log sheets in a dropdown.
or to load more. Users can also click When the document set initially loads, the first item will be automatically selected.
Unlike assembly work instructions, it is not required to complete all documents and log sheets and they do not have to be viewed in order.
Items with  next to the name are recently updated. This notification visibility is determined by the Update Notification Timeout setting on document families in Authoring.
The area below the navigation will display the document or log sheet.
Viewing a Document
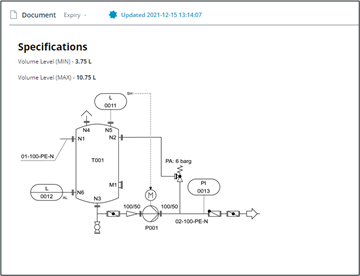
The left area of the document view displays rich content for the document. The header shows the document icon and label, expiry date if applicable, and last update date/time if applicable.
Any dynamic placeholders in the document content will be replaced with the limits assigned by the author. If the limit is not found, the text will indicate the missing control characteristic and limit name.
Printing
A print icon can be found at the top right of each document, to the left of the file attachments pane. Users can click this button to open the system print window and make appropriate settings. Only what is within the document will print.

File Attachments
By default, the right file attachments panel is collapsed below its header to allow more room to view the document. The header will show the file attachment count e.g. File Attachments (3).
Click  to expand the file attachments or
  to collapse it.
to expand the file attachments or to collapse it.Click a file in the list to download it in a new web browser tab.
Working on a Log Sheet
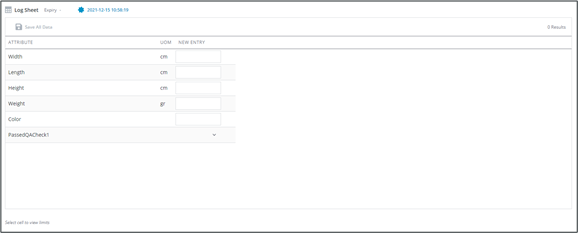
The header shows the log sheet icon and label, expiry date if applicable, and last update date/time if applicable.
The operator can add and view entered data in an interactive grid below.
Adding Measurements
1. Select a cell in the New Entry column for an attribute.
a. If limits are available for this attribute, they will be displayed in the log sheet footer.
2. Enter a value for the attribute. This value will be evaluated against the limits, if available. Rejected values are indicated by  , warn by
  , and accepted by
  .
.
, warn by .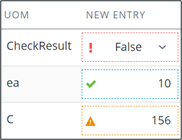
Values can still be saved, regardless of limits validation. |
3. Repeat as needed for other attribute rows. It is not required to enter values for all attributes.
4. Click Save All Data. A new column with these values display to the right with the timestamp as the header.
5. Additional new entries will continue to populate the grid, with the most recent from left to right.
Editing Measurements
Only the New Entry and the most recent column of saved information can be edited.
1. Click a cell to be edited.
2. Modify entries as needed. The update will be evaluated against available limits.
3. Click Save All Data.
Data is only saved when the Save All Data button is clicked. Any new entry or modified values will be lost if the user navigates to another document or log sheet without saving. |
Log sheet data is reset when the running product or lot number changes, or station changes, even if the document set remains the same.