移轉升級 ThingWorx Utilities
|
|
從 9.4.x 版開始,不再支援 ThingWorx Utilities 的移轉升級。
|
欲確定升級路徑,請參閱升級表。
欲升級至新版 ThingWorx Utilities,請執行下列步驟:
1. 匯出 ThingWorx Utilities 資料。
|
|
建議您在匯出資料之前執行下列操作:
• 清除所有舊有與不需要的部署記錄。這會減少資料量以及將資料傳輸至新版本所花費的時間。
• 在開始升級至新版本前,請確保無使用中部署。這可減少升級期間發生超時或部署失敗的可能。
|
a. 登入 ThingWorx Composer。
b. 在左側導覽窗格中,按一下  ,然後選取「匯出」。
c. 從「匯出選項」清單中選取「至 Thingworx Storage」。
d. 選取 Include Data 核取方塊,然後按一下 Export。
e. 匯出成功完成後,會在 /ThingworxStorage/exports 中建立一個目錄。請建立 exports 目錄的壓縮檔。
2. 確保已安裝 ThingWorx <n.n.n> 平台。
3. 匯入 ThingWorx Utilities Core <n.n.n> 延伸功能與 ThingWorx Software Content Management <n.n.n> 延伸功能。如需詳細資訊,請參閱匯入 ThingWorx Utilities 延伸功能。
匯入 ThingWorx Utilities 9.0.0 的 ThingWorx Utilities Core 延伸功能時,您可能會看到此警告: Import requires platform restart. One or more warnings occurred. 可以繼續升級。 |
4. 匯入 ThingWorx Utilities 資料︰
a. 導覽至您在步驟 1 中建立的壓縮檔,並將檔案內容解壓縮至新安裝的 ThingWorx Utilities <n.n.n> /ThingworxStorage/exports 目錄。
b. 登入 ThingWorx Composer。
c. 在左側導覽窗格中,按一下  ,然後選取「匯入」。
d. 匯入 ThingWorx Utilities <n.n.n> /ThingworxStorage/exports 目錄中的解壓縮檔案。
5. 針對非 HA 環境,成功完成匯入後,請重新啟動 ThingWorx 伺服器。
如果您已在高可用叢集 ThingWorx Utilities 平台中升級 ThingWorx,必須重新啟動所有節點。如需詳細資訊,請參閱「ThingWorx Platform 說明中心」的管理 ThingWorx HA 中的 ThingWorx 延伸功能。
如此可使 ThingWorx Software Content Management 正常運作。
6. 如果針對 PostgreSQL 從 9.2.x 及更新版本升級 ThingWorx Utilities,或針對 MSSQL 從 9.4.x 及更新版本升級 ThingWorx Utilities,以及針對 AzureSQL 從 9.5.x 升級 ThingWorx Utilities,并希望將資料從 TW.RSM.SFW.SoftwareManager.Campaign 或 DeliveryTarget 移轉至隔離的資料庫表格,請執行下列步驟:
a. 按一下 ThingWorx Composer 中的 TW.SCM.SFW.SCMUtilities 資源。
b. 搜尋 MigrateDataToIsolatedDB 服務。可使用類別 Migration。
c. 按一下「執行」。
7. 此服務會在背景中異步執行。檢查資訊層級記錄檔是否已完成。
8. 為避免成功執行后重複出現現有移轉項目,如果 forceMigration 未設定為 true,則將中止服務的連續執行。forceMigration 預設為 false。
9. 成功執行后,請核對資料在 SCM 追蹤部署頁上是否可見,以及是否從 TW.RSM.SFW.SoftwareManager.Campaign/DeliveryTarget 中清除了舊資料。
建議針對 PostgreSQL 從 9.2.x 及更新版本執行 ThingWorx Utilities 的「就地」升級,並針對 MSSQL 從 9.4.x 及更新版本進行就地升級,因為移轉升級之後不會移轉 ThingWorx Software Content Management 資料庫中的資料。 |
手動新增索引
手動新增索引的步驟適用於 ThingWorx Utilities 9.3.16 與 9.3.19。 |
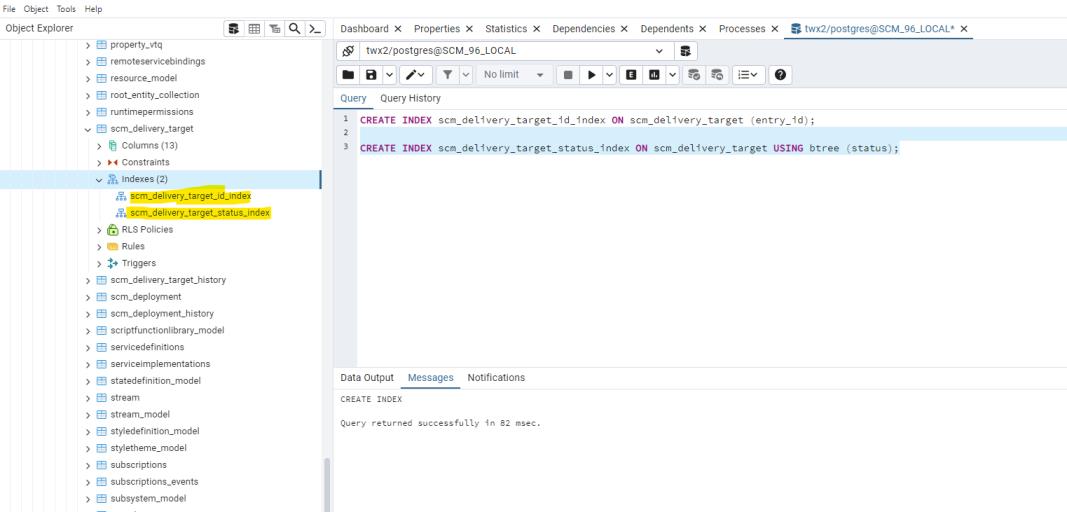
欲在 PostgreSQL 中建立索引,請執行下列步驟:
1. 執行下列指令集:
CREATE INDEX scm_delivery_target_id_index ON scm_delivery_target (entry_id);
CREATE INDEX scm_delivery_target_status_index ON scm_delivery_target USING btree (status);
2. 成功執行指令集後,會產生索引,如下所示:

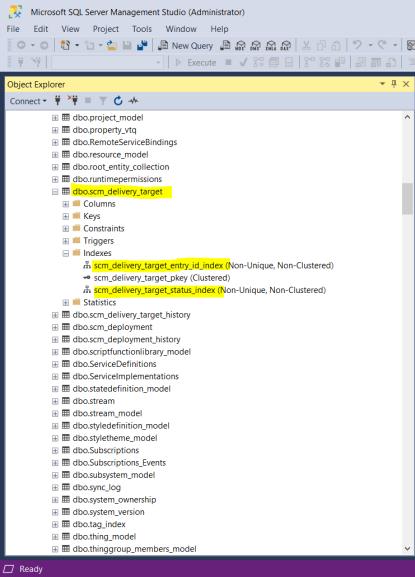
如果資料庫是 MSSQL,請執行下列步驟:
1. 執行下列指令集
CREATE NONCLUSTERED INDEX [scm_delivery_target_id_index] ON [scm_delivery_target]
(
[entry_id] ASC
) WITH (PAD_INDEX = OFF, STATISTICS_NORECOMPUTE = OFF, SORT_IN_TEMPDB = OFF, DROP_EXISTING = OFF, ONLINE = OFF, ALLOW_ROW_LOCKS = ON, ALLOW_PAGE_LOCKS = ON) ON [PRIMARY]
CREATE NONCLUSTERED INDEX [scm_delivery_target_status_index] ON [scm_delivery_target]
(
[status] ASC
) WITH (PAD_INDEX = OFF, STATISTICS_NORECOMPUTE = OFF, SORT_IN_TEMPDB = OFF, DROP_EXISTING = OFF, ONLINE = OFF, ALLOW_ROW_LOCKS = ON, ALLOW_PAGE_LOCKS = ON) ON [PRIMARY]
(
[entry_id] ASC
) WITH (PAD_INDEX = OFF, STATISTICS_NORECOMPUTE = OFF, SORT_IN_TEMPDB = OFF, DROP_EXISTING = OFF, ONLINE = OFF, ALLOW_ROW_LOCKS = ON, ALLOW_PAGE_LOCKS = ON) ON [PRIMARY]
CREATE NONCLUSTERED INDEX [scm_delivery_target_status_index] ON [scm_delivery_target]
(
[status] ASC
) WITH (PAD_INDEX = OFF, STATISTICS_NORECOMPUTE = OFF, SORT_IN_TEMPDB = OFF, DROP_EXISTING = OFF, ONLINE = OFF, ALLOW_ROW_LOCKS = ON, ALLOW_PAGE_LOCKS = ON) ON [PRIMARY]
2. 成功執行指令集後,會產生索引,如下所示:
