建立驗證
ThingWorx Flow 可以處理任何驗證配置。針對 OAuth,它有一個比較簡單的處理機制,可透過組態設定。其他任何驗證都屬於連線分類,在透過「連線」物件與服務連線時,必須由連接器開發者編碼。
大多數服務都需要某種形式的驗證。您可以使用 add connection 與 add OAuth 指令新增驗證機制。ThingWorx Flow CLI 與 ThingWorx Flow 伺服器支援 OAuth 2.0 及 OAuth 1.0 驗證。
常用驗證方法如下列清單中所述:
• 基本驗證 - 這是內建在 HTTP 通訊協定中的一種簡單的驗證配置。在進行請求時,您需要提供使用者名稱與密碼。
• API 金鑰驗證 - 可讓您存取資料。例如,此機制牽涉將金鑰值對作為查詢字串參數或標題傳送。
• 以 OAuth 為基礎的驗證 - 這是以權杖為基礎的一種驗證方法,此方法允許任何外部服務使用您的帳戶資訊,而不暴露密碼。例如,您可以登入帳戶來存取服務資源。
例如,Windchill 使用「基本」及以 OAuth 為基礎的驗證。
建立 OAuth
欲建立 OAuth,請執行下列操作:
1. 從指令提示中,執行下列指令:
a. cd <user project root directory>
b. flow add oauth <oauth name>
OAuth 名稱不得包含除連字號 (-) 以外的特殊字元。例如,您 OAuth 名稱可以是 connector name-oauth name。 |
OAuth 指令有下列選項可用:
選項 | 描述 | 資料類型 |
|---|---|---|
--version | 顯示版本編號。 | [布林值] |
--help | 顯示說明。 | [布林值] |
--parentDir, -d | 專案的父目錄。 | [預設:"."] |
--logLevel, -1 | 設定記錄層級。 | [預設:"info"] |
--useV1 | 指示使用的是 oauth 版本 1 組態。 | [預設:false] |
會在 <projectDir>/auth/oauth/ 中建立一個新資料夾,<connector name-oauth name>,其中包含 config.json 檔案。
例如,如果您在工作流程中使用與 Gmail 相關的動作,您則需要先登入 Gmail 帳戶,然後再授權 ThingWorx Flow 工作流程代表您執行特定任務,如下圖所示。
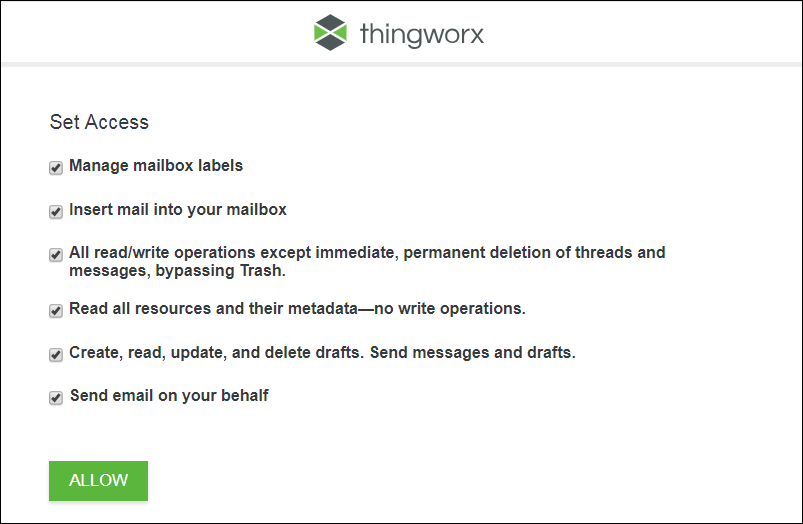
如上圖所示的存取參數在 config.json 檔案中設定。完成的 config.json 檔案如下所示:
{
"_id": "56a0df8552199d8d51e0280d",
"created_at": "2017-04-11T14:08:59.858Z",
"updated_at": "2017-04-11T14:08:59.858Z",
"uid": "oau652869757c50d1cfbd1061",
"category": "Google",
"name": "google_gmail",
"title": "Gmail",
"icon": "google-mail",
"__v": 0,
"version": "v1",
"oauth2_params_other": [
"{\"access_type\":\"offline\"}"
],
"oauth2_params_scope": [
"{\"https://www.googleapis.com/auth/gmail.labels\":\"Manage mailbox labels\"}",
"{\"https://www.googleapis.com/auth/gmail.insert\":\"Insert mail into your mailbox\"}",
"{\"https://www.googleapis.com/auth/gmail.modify\":\"All read/write operations except immediate, permanent deletion of threads and messages, bypassing Trash.\"}",
"{\"https://www.googleapis.com/auth/gmail.readonly\":\"Read all resources and their metadata—no write operations.\"}",
"{\"https://www.googleapis.com/auth/gmail.compose\":\"Create, read, update, and delete drafts. Send messages and drafts.\"}",
"{\"https://www.googleapis.com/auth/gmail.send\":\"Send email on your behalf\"}"
],
"oauth2_validate_method": "GET",
"oauth2_validate_headers": [
"{\"Authorization\":\"Bearer {access_token}\"}",
"{\"Content-Type\":\"application/json\"}"
],
"oauth2_validate_url": "https://www.googleapis.com/gmail/v1/users/me/labels",
"oauth2_refresh_data": [
"{\"grant_type\":\"refresh_token\"}",
"{\"refresh_token\":\"{refresh_token}\"}"
],
"oauth2_refresh_url": "/token",
"oauth2_token_data": [
"{\"grant_type\":\"authorization_code\"}"
],
"oauth2_token_url": "/token",
"oauth2_auth_query": [
"{\"response_type\":\"code\"}",
"{\"approval_prompt\":\"force\"}",
"{\"access_type\":\"{access_type}\"}"
],
"oauth2_auth_url": "/auth",
"oauth2_no_state": false,
"env_production_params": [
"{\"redirect_uri\":\"{OAUTH_ENDPOINT_OAUTH_RETURN}\"}",
"{\"client_id\":\"{{{production.CLIENT_ID}}}\"}",
"{\"client_secret\":\"{{{production.CLIENT_SECRET}}}\"}"
],
"env_pre_prod_params": [
"{\"client_id\":\"{{{pre_prod.CLIENT_ID}}}\"}",
"{\"client_secret\":\"{{{pre_prod.CLIENT_SECRET}}}\"}",
"{\"redirect_uri\":\"{OAUTH_ENDPOINT_OAUTH_RETURN}\"}"
],
"env_staging_params": [
"{\"redirect_uri\":\"{OAUTH_ENDPOINT_OAUTH_RETURN}\"}",
"{\"client_id\":\"{{{staging.CLIENT_ID}}}\"}",
"{\"client_secret\":\"{{{staging.CLIENT_SECRET}}}\"}"
],
"env_development_params": [
"{\"client_id\":\"{{{development.CLIENT_ID}}}\"}",
"{\"client_secret\":\"{{{development.CLIENT_SECRET}}}\"}",
"{\"redirect_uri\":\"{OAUTH_ENDPOINT_OAUTH_RETURN}\"}"
],
"env_local_params": [
"{\"client_id\":\"{{{local.CLIENT_ID}}}\"}",
"{\"client_secret\":\"{{{local.CLIENT_SECRET}}}\"}",
"{\"redirect_uri\":\"{OAUTH_ENDPOINT_OAUTH_RETURN}\"}"
],
"base_url": "https://accounts.google.com/o/oauth2",
"oauth_type": "OAuth2",
"development_phase": "gold",
"advanced_enabled": true,
"express_enabled": true,
"deleted_at": null,
"published": true
}
OAUTH_ENDPOINT_OAUTH_RETURN 將由流程伺服器根據 deploymentConfig.json 檔案中的值自動填入。 |
下表列出了 config.json 檔案的各重要欄位及其含意。
內容 | 描述 |
|---|---|
base_url | 基礎 URL。如需詳細資訊,請參閱識別提供者 (IdP) 文件集。 |
oauth_type | 請勿編輯此內容。 依預設,CLI 會產生 OAuth2 組態。欲產生 OAuth1 組態,請使用 –useV1 選項。 |
oauth2_params_scope | 這是由應用程式定義的範圍,其可決定可在系統上執行的操作。權杖將會擁有使用者授與應用程式存取權限的範圍。 |
oauth2_auth_url | 可為應用程式產生使用者名稱與密碼提示畫面。 此值可以是絕對 URL 或基礎 URL 的相對 URL。 |
oauth2_auth_query | 向 auth url 發出請求時,IdP 所需的參數。 |
oauth2_token_url | 可用來請求存取權杖或重新整理權杖。此值可以是絕對 URL 或基礎 URL 的相對 URL。 |
oauth2_token_data | 包含需要傳送至 oauth2_token_url 的資料。 |
oauth2_refresh_url | 可產生重新整理權杖。某些 IdP 會使用與權杖 URL 相同的 URL 來請求重新整理權杖。 |
oauth2_refresh_data | 包含需要傳送至 oauth2_refresh_url 的資料。 |
oauth2_validate_url | 可驗證權杖 |
oauth2_validate_headers | 在請求中傳送至 oauth2_validate_url 的標題。 |
oauth2_validate_method | HTTP 方法可用來發出驗證請求。 |
組態檔案包含 ThingWorx Flow 用來執行各種 OAuth2 操作的資訊。
內容值是字串的陣列,因此需要逸出。值可以是常數值,您也可以用文字取代。env_local_params、env_staging_params 與 env_production_params 允許各參數的值根據部署而變更。
config.json 檔案中的重要資訊為 client_id 與 client_secret。
如需有關部署連接器的資訊,請參閱部署一節。
OAuth 組態不應包含機密資訊或租戶特定資訊。其包括 client_id 與 client_secret。請依照下列方式指定資訊:
"env_pre_prod_params": [
"{\"client_id\":\"{{pre_prod.CLIENT_ID}}\"}",
"{\"client_secret\":\"{{pre_prod.CLIENT_SECRET}}\"}",
"{\"redirect_uri\":\"{OAUTH_ENDPOINT_OAUTH_RETURN}\"}"
],
"env_staging_params": [],
"env_development_params": [
"{\"client_id\":\"{{development.CLIENT_ID}}\"}",
"{\"client_secret\":\"{{development.CLIENT_SECRET}}\"}",
"{\"redirect_uri\":\"{OAUTH_ENDPOINT_OAUTH_RETURN}\"}"
],
"env_local_params": [
"{\"client_id\":\"{{local.CLIENT_ID}}\"}",
"{\"client_secret\":\"{{local.CLIENT_SECRET}}\"}",
"{\"redirect_uri\":\"{OAUTH_ENDPOINT_OAUTH_RETURN}\"}"
],
如果資訊並非部署特定資訊,則不應在前面加上部署名稱,例如 local 或 development。
如需有關使用 google API 建立應用程式的說明,請參閱 API 控制台說明。關於其他任何應用程式,請參閱 IdP 或系統文件集。
如需有關建立 OAuth 組態的詳細資訊,請參閱教學專區 B。
針對現成連接器配置 OAuth
ThingWorx Flow 隨附一些連接器,需要 OAuth 才能執行授權。第一步是建立 OAuth 載入檔案。您可以選擇啟用全部或部份 OAuth 組態。OAuth 載入檔案的格式如下:
{
"onedrive": {
"OneDrive": {
"CLIENT_ID": "<client-id-here>"
"CLIENT_SECRET": "<client-secret-here>"
}
}
"trello": {
"Trello": {
"CONSUMER_KEY":"<consumer-key-here>",
"CONSUMER_SECRET":"<consumer-secret-here>"
}
}
}
"onedrive": {
"OneDrive": {
"CLIENT_ID": "<client-id-here>"
"CLIENT_SECRET": "<client-secret-here>"
}
}
"trello": {
"Trello": {
"CONSUMER_KEY":"<consumer-key-here>",
"CONSUMER_SECRET":"<consumer-secret-here>"
}
}
}
在上述檔案中,最上層金鑰是連接器的名稱。OAuth2 組態與 OAuth1 組態的範例為 OneDrive。
請參閱文件以取得每個連接器的 client-id 與 client-secret。OAuth 組態的顯示名稱位於下一層級。此文字會在 OAuth2 下拉選單中以「新增 <顯示名稱> 登入」的形式顯示。

使用 flow-deploy 工具可將 OAuth 載入至系統。如果相符組態以連接器與 displayName 為基礎,其會更新或建立一個新組態。
如需有關針對其他現成連接器配置 OAuth 的資訊,請參閱 ThingWorx 說明中心
如需詳細資訊,請參閱部署連接器主題。
工具成功完成部署後,新 OAuth 即可用。