Creating a Collection Mashup Layout and Binding Data
To use the Collection widget, you must create two mashups:
• A collection mashup that contains the Collection widget. This mashup also retrieves the collection data from a service.
• A cell mashup that is repeated for each cell in the collection. It defines the layout and the widgets within each cell, such as charts, dials, or text fields. This mashup is dynamic and it contains mashup parameters to pass data from the collection. Its content changes based on the data that is provided from the collection.
The following sections describe how to create these two mashups and how to bind the collection data.
Creating a Mashup for the Collection Cells
1. In Composer, click New, and then choose Mashup or Master. The New Mashup window opens.
2. Select Responsive, then click OK.
3. Type a name for the mashup, then click Save.
4. Click the Design tab to open the Mashup Builder interface. A blank mashup with one container is displayed on the canvas.
5. Add any widgets, services, and functions that you want to display in the mashup.
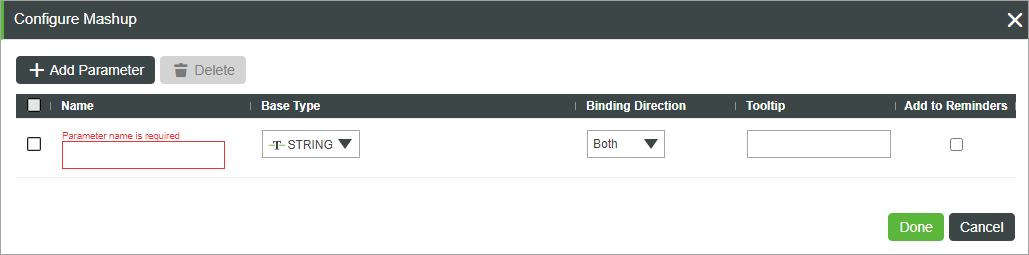
6. Define mashup parameters to pass data from the Collection widget to the mashup.
a. Select the mashup using the Explorer panel, then on the Properties panel, click  .
.
.b. In the Mashup Parameters dialog box, define any parameters that you want to pass to the cell mashup from the collection widget.
c. Click Done, then Save.
7. Bind the parameters that you defined in the previous step as input for widgets, services or functions that are using data from the collection.
8. Save the mashup.
Optionally, repeat this procedure to create unique mashups for empty or selected cells.
Creating a Collection Mashup
1. In Composer, click New, and then choose Mashup or Master. The New Mashup window opens.
2. Select Responsive, then click OK.
3. Type a name for the mashup, then click Save.
4. Click the Design tab to open the Mashup Builder interface. A blank mashup with one container is displayed on the canvas.
5. Define the mashup layout using the Layout panel, then add the Collection widget to the canvas.
6. Save the mashup.
Binding Data to the Collection Widget
To display data in the collection, you must use a service that returns an infotable and bind it to a Collection widget.
1. Open the Collection mashup in Mashup Builder.
2. Drag a Collection widget onto the canvas (if not already added).
3. In the Data panel, add a service that returns the infotable containing the collection data.
4. In the Properties panel, locate Data, and drag the service output to the Data property of the Collection widget to bind the data.
5. In the Properties panel, locate UIDField, and select the unique identifier field that uniquely identifies each item in the data source.
6. Bind an event, such as the mashup Loaded property, to execute the service at runtime.
7. Select the Collection widget on the canvas or using the Explorer panel, then open the Properties panel.
8. In the Mashup property, select the cell mashup that you created for the collection.
Optionally, select a mashup to display for empty or selected cells using the EmptyMashup and SelectedCellMashup properties.
9. In the MashupPropertyBinding property, bind the mashup properties that you defined in the cell mashup to the infotable columns for the collection.
|
|
The JSON structure uses Infotable field names as keys and cell mashup parameters as values. This matches the Mashup Builder tooltip and runtime behavior.
|
a. Click Add to edit the JSON value of the property.
b. Map each mashup parameter of the cell mashup to the infotable column name of the collection data. For example:
{
  "Column1": "Parameter1",
  "Column2": "Parameter2"
}
c. Click Done.
At design time, a preview of the data for each cell is displayed in the collection. At runtime, the data from the collection service is within the content of each cell mashup.