将 ThingWorx 服务更新为使用 Java 11
如果计划在安装或升级到 ThingWorx Navigate 9.1.0 后升级到 Java 11,请执行以下步骤。
步骤 1:更新 ThingWorx-Foundation 服务
步骤 2:更新 ThingWorx-IntegrationRuntime 服务
要更新 ThingWorx-IntegrationRuntime 服务,请根据您的操作系统执行以下步骤:
Windows
事前准备
在开始之前,请确保以下各项安装到位或设置正确:
• 已安装 Java 11。
• 已在 PATH 系统变量中设置了 /bin 目录。
• 将 JAVA_HOME 环境变量设置为使用 Java 11 安装目录。
• java.exe 文件位于 Java 11 安装目录下。例如,C:\Program Files\Java\jdk-11.0.8\bin\java.exe。
步骤 1:确定所用的 Java 版本
使用环境中的进程资源管理器确定 nssm.exe 进程所使用的 Java 版本。您可以从此处下载进程资源管理器。
1. 以管理员身份打开命令提示符。
2. 通过命令提示符打开进程资源管理器。例如,
> C:\Users\Vagrant\Desktop\procexp64.exe
3. 在进程资源管理器窗口中,找到 nssm.exe 进程并双击 java.exe。
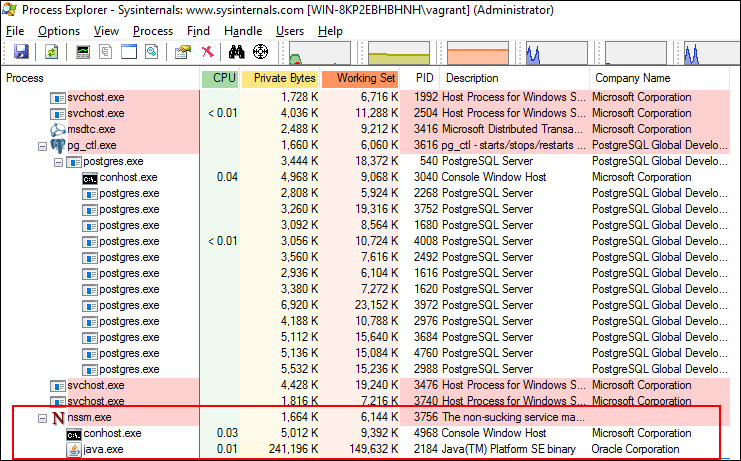
随即打开一个新的属性窗口,其中列出有关运行 nssm.exe 进程时所要用到的 java.exe 的详细信息。
4. 在属性窗口中,单击“映像”选项卡以标识所用的 Java 版本。
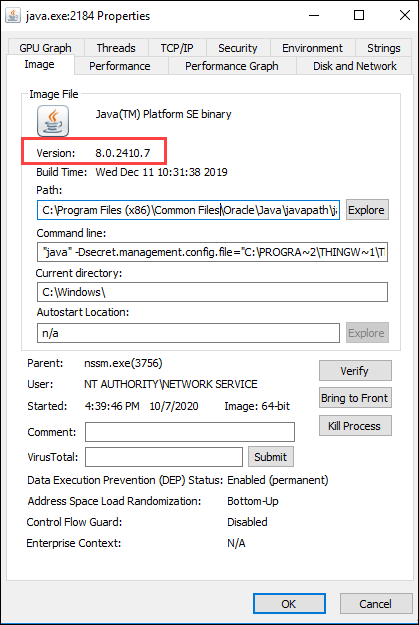
如果使用的是 Java 11,则可以继续。无需执行任何其他步骤。如果使用的是任何其他版本的 Java,请继续下一部分“步骤 2:更新 ThingWorx-IntegrationRuntime 服务”。
步骤 2:更新 ThingWorx-IntegrationRuntime 服务
1. 停止 Thingworx-IntegrationRuntime 服务。
2. 以管理员身份打开命令提示符。
3. 浏览至 ThingWorx Integration Runtime 安装目录下的 third-party 目录中。例如,
> cd C:\Program Files (x86)\ThingWorxIntegrationRuntime\third-party
4. 执行以下操作来编辑 Thingworx-IntegrationRuntime 服务配置:
> nssm.exe edit Thingworx-IntegrationRuntime
Apache Tomcat Properties 窗口随即打开。
5. 打开 Application 选项卡并编辑 Path,以将 java.exe 用于 Java 11。例如,C:\Program Files\Java\jdk-11.0.8\bin\java.exe
6. 单击 Edit service 保存您所做的更改。弹窗中随即显示编辑成功的通知。
7. 启动 Thingworx-IntegrationRuntime 服务。
8. 验证在 ThingWorx Integration Runtime 安装目录内 /IRLogs 文件夹下创建的日志文件是否列出已建立的连接。
日志文件位置示例:C:\Program Files (x86)\ThingWorxIntegrationRuntime\IRLogs\IntegrationRuntime-012144ff23af.log
日志示例:
[vert.x-worker-thread-1] INFO c.t.i.ThingworxEdgeVerticle - #########
[vert.x-worker-thread-1] INFO c.t.i.ThingworxEdgeVerticle - Connection Established
[vert.x-worker-thread-1] INFO c.t.i.ThingworxEdgeVerticle - #########
[vert.x-worker-thread-1] INFO c.t.i.ThingworxEdgeVerticle - Connection Established
[vert.x-worker-thread-1] INFO c.t.i.ThingworxEdgeVerticle - #########
9. 完成此更新后,您可以使用进程资源管理器验证 Java 版本。详细说明可在“步骤 1:确定所用的 Java 版本”部分中找到。
Linux
事前准备
在开始之前,请确保以下各项安装到位或设置正确:
• 已安装 Java 11。
• 您已复制 Java 可执行文件所在的 Java 11 安装目录的路径。
您可以执行 alternatives --display java | grep 'family java-11' | cut -d' ' -f1。输出应显示 Java 可执行文件的位置,例如:/usr/lib/jvm/java-11-openjdk-11.0.8.10-0.el8_2.x86_64/bin/java。在此,您已复制 /usr/lib/jvm/java-11-openjdk-11.0.8.10-0.el8_2.x86_64,以用于配置 ThingWorx-IntegrationRuntime 服务。
更新 ThingWorx-IntegrationRuntime 服务
1. 停止 Thingworx-IntegrationRuntime 服务。
systemctl stop ThingWorx-Foundation.service
2. 备份位于 ThingWorx Integration Runtime 安装目录中 /scripts 文件夹下的 startup.sh 脚本。例如:
/opt/ThingWorxIntegrationRuntime/scripts/startup.sh.backup
3. 编辑 startup.sh 脚本,使其指向在“事前准备”章节中复制的 Java 11 安装目录。在此示例中,该安装目录路径已从 JAVA_HOME=/usr/lib/jvm/java-1.8.0-openjdk-1.8.0.265.b01-0.el8_2.x86_64/jre 更新为 JAVA_HOME=/usr/lib/jvm/java-11-openjdk-11.0.8.10-0.el8_2.x86_64。
4. 执行下列命令:
# systemctl daemon-reload
5. 启动 Thingworx-IntegrationRuntime 服务:
systemctl start Thingworx-IntegrationRuntime
6. 验证 Thingworx-IntegrationRuntime 服务是否正在使用 Java 11:
# systemctl status Thingworx-IntegrationRuntime
Thingworx-IntegrationRuntime.service - Thingworx-IntegrationRuntime
Loaded: loaded (/etc/systemd/system/Thingworx-IntegrationRuntime.service; enabled; vendor preset: disabled)
Active: active (running) since Wed 2020-10-07 16:08:43 UTC; 4s ago
Process: 11310 ExecStop=/bin/bash /opt/ThingWorxIntegrationRuntime/scripts/shutdown.sh (code=exited, status=0/SUCCE>
Process: 11336 ExecStart=/bin/bash /opt/ThingWorxIntegrationRuntime/scripts/startup.sh (code=exited, status=0/SUCCE>
Main PID: 11337 (java)
Tasks: 31 (limit: 17467)
Memory: 166.2M
CGroup: /system.slice/Thingworx-IntegrationRuntime.service
└─11337 /usr/lib/jvm/java-11-openjdk-11.0.8.10-0.el8_2.x86_64/bin/java -Dsecret.management.config.file=/op>
Oct 07 16:08:41 pg-foundation-rhel8.vagrantup.com systemd[1]: Starting Thingworx-IntegrationRuntime...
Oct 07 16:08:41 pg-foundation-rhel8.vagrantup.com bash[11336]: Starting Thingworx-IntegrationRuntime service ...
Oct 07 16:08:43 pg-foundation-rhel8.vagrantup.com bash[11336]: Thingworx-IntegrationRuntime service started
Oct 07 16:08:43 pg-foundation-rhel8.vagrantup.com systemd[1]: Started Thingworx-IntegrationRuntime.
7. 移除备份的 startup.sh.backup 脚本。
8. 验证在 ThingWorx Integration Runtime 安装目录内 /IRLogs 文件夹下创建的日志文件是否列出已建立的连接。
日志文件位置示例:/opt/ThingWorxIntegrationRuntime/IRLogs/IntegrationRuntime-a268-012144ff23af.log
日志示例:
[vert.x-worker-thread-1] INFO c.t.i.ThingworxEdgeVerticle - #########
[vert.x-worker-thread-1] INFO c.t.i.ThingworxEdgeVerticle - Connection Established
[vert.x-worker-thread-1] INFO c.t.i.ThingworxEdgeVerticle - #########
[vert.x-worker-thread-1] INFO c.t.i.ThingworxEdgeVerticle - Connection Established
[vert.x-worker-thread-1] INFO c.t.i.ThingworxEdgeVerticle - #########