Java 11 を使用するための ThingWorx サービスのアップデート
ThingWorx Navigate 9.1.0 をインストールした後、または 9.1.0 にアップグレードした後で、Java 11 にアップグレードする場合は、以下の手順を実行します。
手順 1: ThingWorx-Foundation サービスの更新
ThingWorx-Foundation サービスを更新する方法は、ThingWorx ヘルプセンターの「Java 11 での ThingWorx Foundation インストーラの使用」のトピックに記載されています。
手順 2: ThingWorx-IntegrationRuntime サービスの更新
ThingWorx-IntegrationRuntime サービスを更新するには、お使いのオペレーティングシステムに応じて、以下の手順に従います。
Windows
開始する前に
開始する前に、以下の準備ができていることを確認します。
• Java 11 がインストールされている。
• PATH システム変数に /bin ディレクトリが設定されている。
• JAVA_HOME 環境変数が、Java 11 インストールディレクトリを使用するよう設定されている。
• Java 11 インストールディレクトリに java.exe ファイルが置かれている。たとえば、C:\Program Files\Java\jdk-11.0.8\bin\java.exe などです。
手順 1: 使用中の Java のバージョンの確認
お使いの環境で Process Explorer を使用して、nssm.exe プロセスで使用されている Java のバージョンを確認します。Process Explorer はここからダウンロードできます。
1. コマンドプロンプトを管理者として開きます。
2. コマンドプロンプトから Process Explorer を開きます。たとえば、以下のようになります。
> C:\Users\Vagrant\Desktop\procexp64.exe
3. Process Explorer ウィンドウで nssm.exe プロセスを見つけ、java.exe をダブルクリックします。

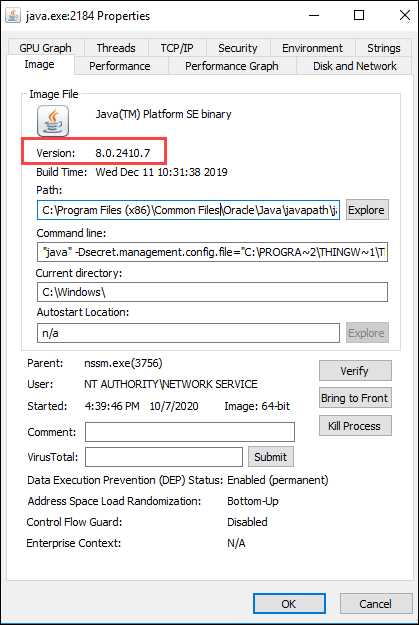
すると、新しいプロパティウィンドウが開き、nssm.exe プロセスの実行に使用される java.exe の詳細がリスト表示されます。
4. プロパティウィンドウで「Image」タブをクリックし、使用されている Java のバージョンを特定します。

Java 11 が使用されている場合は準備ができています。追加のステップを行う必要はありません。それ以外のバージョンの Java が使用されている場合は、次のセクション「手順 2: ThingWorx-IntegrationRuntime サービスの更新」に進んでください。
手順 2: ThingWorx-IntegrationRuntime サービスの更新
1. Thingworx-IntegrationRuntime サービスを停止します。
2. コマンドプロンプトを管理者として開きます。
3. ThingWorx Integration Runtime インストールディレクトリ内の third-party ディレクトリに移動します。たとえば、以下のようになります。
> cd C:\Program Files (x86)\ThingWorxIntegrationRuntime\third-party
4. 以下を実行し、Thingworx-IntegrationRuntime サービスのコンフィギュレーションを編集します。
> nssm.exe edit Thingworx-IntegrationRuntime
「Apache Tomcat Properties」ウィンドウが開きます。
5. 「Application」タブを開き、Java 11 の java.exe を使用するように「Path」を編集します。たとえば、C:\Program Files\Java\jdk-11.0.8\bin\java.exe などです。
6. 「Edit service」をクリックし、変更を保存します。編集が成功したことを示すポップアップウィンドウが表示されます。
7. Thingworx-IntegrationRuntime サービスを開始します。
8. ThingWorx Integration Runtime インストールディレクトリ内の /IRLogs フォルダに作成されたログファイルに、接続が確立されたことを示すログがリストされていることを確認します。
ログファイルの場所の例: C:\Program Files (x86)\ThingWorxIntegrationRuntime\IRLogs\IntegrationRuntime-012144ff23af.log
ログの例:
[vert.x-worker-thread-1] INFO c.t.i.ThingworxEdgeVerticle - #########
[vert.x-worker-thread-1] INFO c.t.i.ThingworxEdgeVerticle - Connection Established
[vert.x-worker-thread-1] INFO c.t.i.ThingworxEdgeVerticle - #########
[vert.x-worker-thread-1] INFO c.t.i.ThingworxEdgeVerticle - Connection Established
[vert.x-worker-thread-1] INFO c.t.i.ThingworxEdgeVerticle - #########
9. この更新を行った後、Process Explorer を使用して Java のバージョンを確認できます。詳細な手順については、「手順 1: 使用中の Java のバージョンの確認」のセクションを参照してください。
Linux
開始する前に
開始する前に、以下の準備ができていることを確認します。
• Java 11 がインストールされている。
• Java 実行ファイルが配置されている Java 11 インストールディレクトリのパスをコピーした。
alternatives --display java | grep 'family java-11' | cut -d' ' -f1 を実行できます。出力に、Java 実行ファイルの場所 (/usr/lib/jvm/java-11-openjdk-11.0.8.10-0.el8_2.x86_64/bin/java など) が示されます。ここで、/usr/lib/jvm/java-11-openjdk-11.0.8.10-0.el8_2.x86_64 をコピーしておきます。これは ThingWorx-IntegrationRuntime サービスを設定する際に使用されます。
ThingWorx-IntegrationRuntime サービスの更新
1. Thingworx-IntegrationRuntime サービスを停止します。
systemctl stop ThingWorx-Foundation.service
2. ThingWorx Integration Runtime インストールディレクトリの /scripts フォルダにある startup.sh スクリプトをバックアップします。例:
/opt/ThingWorxIntegrationRuntime/scripts/startup.sh.backup
3. startup.sh スクリプトを編集して、「開始する前に」セクションでコピーした Java 11 のインストールディレクトリを指すようにします。この例では、パスが JAVA_HOME=/usr/lib/jvm/java-1.8.0-openjdk-1.8.0.265.b01-0.el8_2.x86_64/jre から JAVA_HOME=/usr/lib/jvm/java-11-openjdk-11.0.8.10-0.el8_2.x86_64 に更新されました。
4. 以下のコマンドを実行します。
# systemctl daemon-reload
5. Thingworx-IntegrationRuntime サービスを開始します。
systemctl start Thingworx-IntegrationRuntime
6. Thingworx-IntegrationRuntime サービスが Java 11 を使用していることを確認します。
# systemctl status Thingworx-IntegrationRuntime
Thingworx-IntegrationRuntime.service - Thingworx-IntegrationRuntime
Loaded: loaded (/etc/systemd/system/Thingworx-IntegrationRuntime.service; enabled; vendor preset: disabled)
Active: active (running) since Wed 2020-10-07 16:08:43 UTC; 4s ago
Process: 11310 ExecStop=/bin/bash /opt/ThingWorxIntegrationRuntime/scripts/shutdown.sh (code=exited, status=0/SUCCE>
Process: 11336 ExecStart=/bin/bash /opt/ThingWorxIntegrationRuntime/scripts/startup.sh (code=exited, status=0/SUCCE>
Main PID: 11337 (java)
Tasks: 31 (limit: 17467)
Memory: 166.2M
CGroup: /system.slice/Thingworx-IntegrationRuntime.service
└─11337 /usr/lib/jvm/java-11-openjdk-11.0.8.10-0.el8_2.x86_64/bin/java -Dsecret.management.config.file=/op>
Oct 07 16:08:41 pg-foundation-rhel8.vagrantup.com systemd[1]: Starting Thingworx-IntegrationRuntime...
Oct 07 16:08:41 pg-foundation-rhel8.vagrantup.com bash[11336]: Starting Thingworx-IntegrationRuntime service ...
Oct 07 16:08:43 pg-foundation-rhel8.vagrantup.com bash[11336]: Thingworx-IntegrationRuntime service started
Oct 07 16:08:43 pg-foundation-rhel8.vagrantup.com systemd[1]: Started Thingworx-IntegrationRuntime.
7. バックアップした startup.sh.backup スクリプトを除去します。
8. ThingWorx Integration Runtime インストールディレクトリ内の /IRLogs フォルダに作成されたログファイルに、接続が確立されたことを示すログがリストされていることを確認します。
ログファイルの場所の例: /opt/ThingWorxIntegrationRuntime/IRLogs/IntegrationRuntime-a268-012144ff23af.log
ログの例:
[vert.x-worker-thread-1] INFO c.t.i.ThingworxEdgeVerticle - #########
[vert.x-worker-thread-1] INFO c.t.i.ThingworxEdgeVerticle - Connection Established
[vert.x-worker-thread-1] INFO c.t.i.ThingworxEdgeVerticle - #########
[vert.x-worker-thread-1] INFO c.t.i.ThingworxEdgeVerticle - Connection Established
[vert.x-worker-thread-1] INFO c.t.i.ThingworxEdgeVerticle - #########