Create a Custom Task
Creating a custom task requires the prerequisite knowledge mentioned in the topic Customize ThingWorx Navigate.
Building Blocks of a Task
A ThingWorx Navigate task is made up of several basic parts:
• Mashup—The user interface of the task.
• ThingWorx Navigate Services—Java or JavaScript that performs the actions. There are a number of services available on the ptc-windchill-OData-connector Integration Connector.
• Windchill—The source of your data.
• Windchill REST Services, also known as WRS.
|
|
This example uses Windchill REST Services (WRS) to access data from Windchill. WRS is based on OData and is the recommended approach for ThingWorx Navigate customization. RestEasy services will be deprecated in a future release. For information on how to use and extend WRS, please refer the customization section of your Windchill installation.
|
ThingWorx Navigate 9.0 introduces reusable components. While these components are available for building mashups and for use in custom tasks, they are not covered in this topic.
• For detailed information on these components, see Use ThingWorx Navigate Components in a Custom Task.
• For a tutorial showing how to use these components to build a mashup, see the Configuration Tutorial.
Overview
We’ll use an example to show how to combine the building blocks of a task into a working mashup. This example displays a list of Windchill parts and their attributes. Here’s how it will look when we’re done:
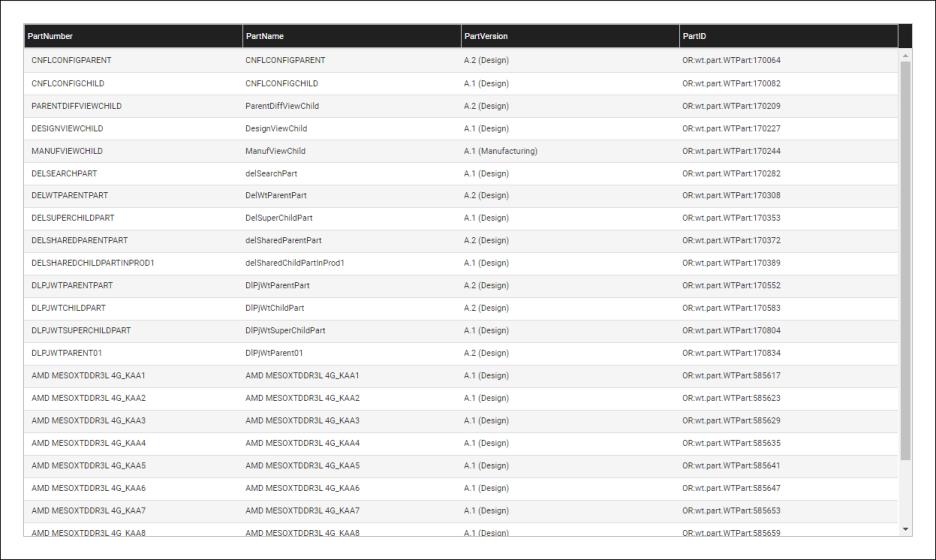
It’s helpful to plan the functionality and layout of your task before you start. Then you’ll know how the data should be presented in the user interface, the panels you’ll need for presenting this data, and the services that will be used with the panels.
Many endpoints such as getPart (/ProdMgmt/Parts GET) and createPartinParts (/ProdMgmt/Parts POST) are already available in WRS domains. We will use these services in the example below. For more information on creating your own services, start with the topic Thing Services in the Help Center. You can also find steps for some commonly used services in the Windchill REST Services Help Center.
To create this custom task, follow these steps in ThingWorx Composer:
1. Create the Project
Create a project to organize all the entities that will be part of the custom task.
1. Create a new project and enter a name for the project.
2. Save the project.
2. Create the Data Shape
Create a Data Shape to represent your data.
For more information on Data Shapes, see the topic Data Shapes in the Help Center.
1. Create a new Data Shape. Enter a name and under Project, add the name of the project created in the previous step.
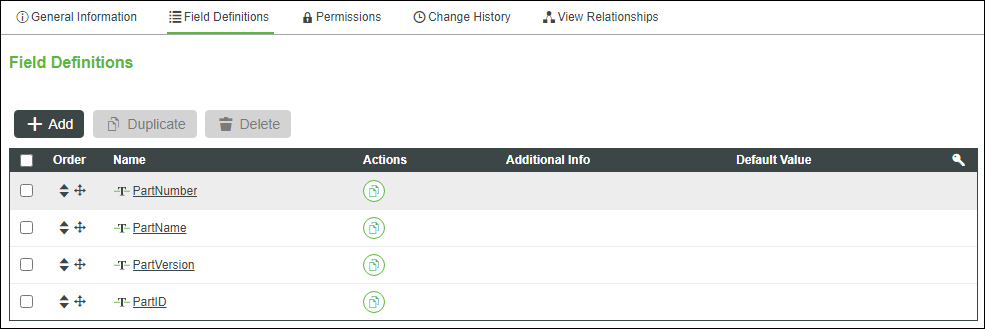
2. Navigate to the Field Definitions tab.
3. Add the following field definitions, each with a Base Type of STRING:
◦ PartNumber
◦ PartName
◦ PartVersion
◦ PartID
These field definitions correspond to the data that the custom task will display.
4. Save the Data Shape.
3. Configure the OData Connector
Set up an instance of the OData connector to provide the source of the data to be displayed in the task.
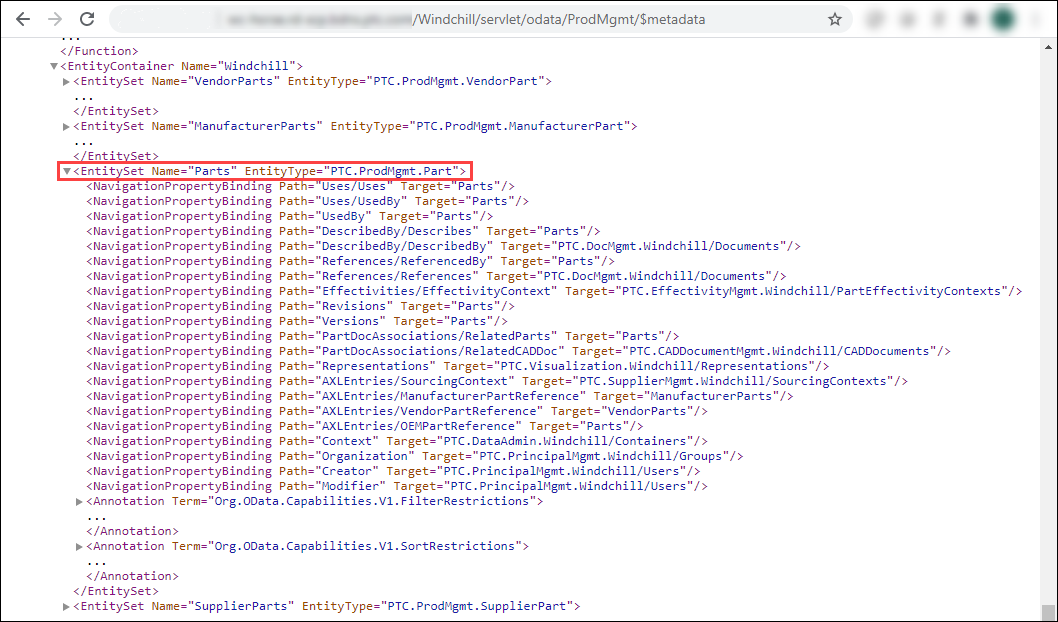
In this step, we will configure the OData connector, and in the next step, we will create the API map and the route service for the data. Before selecting the endpoint in ThingWorx Composer, it is advisable to understand the relationships exposed by the service in the Entity Data Model. Below is a sample of the description of the types, properties, and relationships exposed by the service in the Product Management Domain. As shown in the figure, we have the entity set Parts whose entity type is Part. We can access all the properties of Parts by accessing this entity set through the path defined in OData services. See the Windchill REST Services Help Center for more information.
1. Create a new Integration Connector in ThingWorx Composer. In the Choose Template window, select ODataConnector and click OK. Enter a name and under Project, add the name of the project created earlier.
2. Click on the Configuration tab and configure the connector. Depending on your authentication type, different fields are required. Follow the configuration steps for your authentication type in the topic Configure the OData Connector. For more information, see the topic Creating Integration Connectors in the Help Center.
3. Under OData Connector Connection Settings add a Service Root Relative URL in the form /<Domain Version>/<Domain Identifier>, where /<Domain Version> is optional. In our case, the domain identifier is ProdMgmt, but make sure to use the correct domain identifier for your domain. For more information , see the topic OData Services as Domains in the Windchill REST Services Help Center.

4. Save the Integration Connector.
5. If you want, you can validate the connection to check that connection is successful. Click on the Services tab and execute the ValidateConnection service. The output shows a Status and a Message, which indicate the status of the connection.
4. Create the API Map and Route Service
Create the API map, which associates attributes from your back-end system to attributes in the Data Shape. Then, create the route service so the mashup can consume the data.
1. In the Integration Connector that you created in the previous step, navigate to the API Maps tab. Click Add.
2. Under Mapping ID, enter a name for the API map. You can use any value for this field.
3. Under Select Data Shape, select the Data Shape you created earlier. The Data Shape table populates with the field definitions created earlier.
4. Under Endpoint, select the endpoint. Here we will select getParts (/ProdMgmt/Parts GET). After selecting the endpoint, the API table populates with attributes.
5. Drag and drop attributes from the API table to their corresponding field definitions. Here, we’re using the top-level attributes Number, Name, Version, and ID.
Collapse elements in the API table to make it easier to find the attributes you’re looking for. |
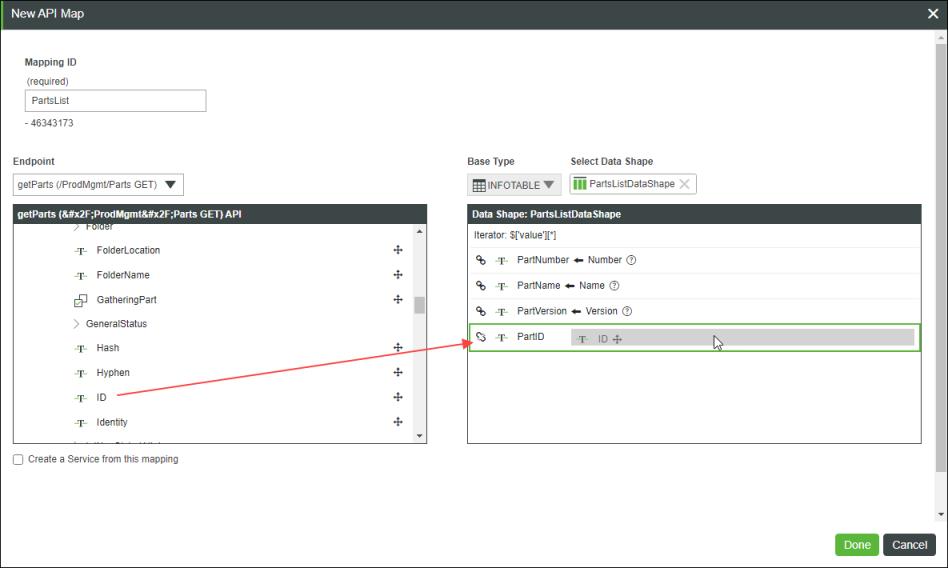
6. Select the Create a Service from this mapping checkbox to create a route service. Here the default name of the service is getParts. You can change the name of the service if you want.
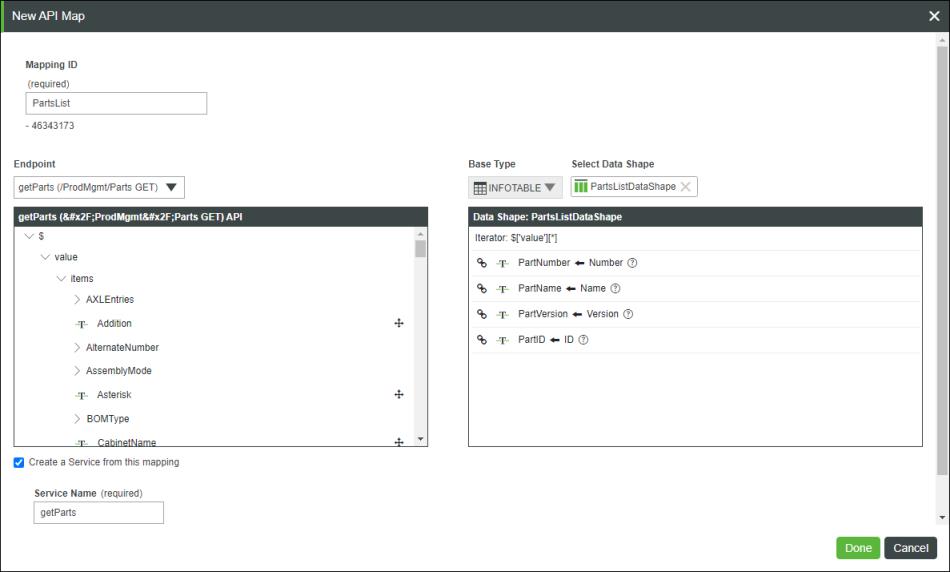
7. Click Done and then save the Integration Connector.
5. Create the Mashup
Create the mashup, which serves as the user interface for the task.
As mentioned above, to build your mashup you have the option to use either widgets or ThingWorx Navigate components, or a combination of both.
• For more information on building mashups, see the Mashup Builder section in the Help Center.
• For more information on using widgets, see the Widgets section in the Help Center.
• For more information on ThingWorx Navigate components, see the section UseThingWorx NavigateComponents in a Custom Task.
1. Create a new mashup. Enter a name and under Project, add the name of the project created earlier.
2. Add the tag TWXNavigate:AppMashup to the mashup.
3. Click on the Design tab and configure the layout of the mashup. Here we’re using five containers. Four of the containers are used to create a 30 pixel border, and one container is in the center.
4. Add the necessary widgets. Here we’re adding the Grid Advanced widget to the center container.
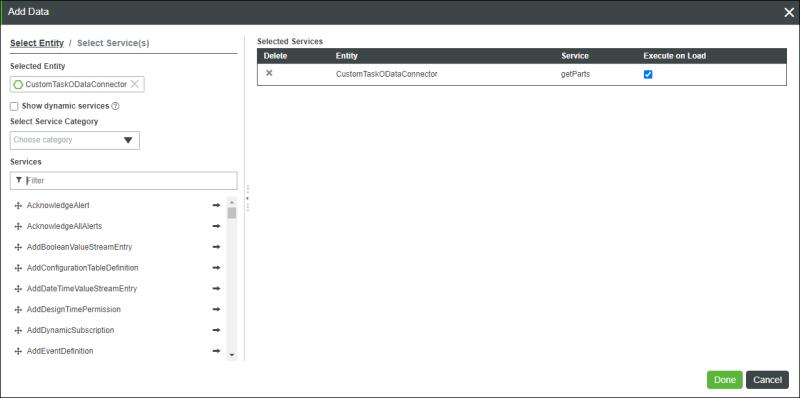
5. Add a new data source by clicking  in the Data panel.
6. Under Entity Type, select Integration Connectors. Under Entity, select the Integration Connector created earlier.
7. Select the route service created earlier. Here the name of our service is getParts. Click  or drag and drop to add the service to the Selected Services table.
8. Select the Execute on Load checkbox and click Done.
9. In the Data tab, expand getParts and expand Returned Data. Select All Data and bind it to the Data property of the Grid Advanced widget.
10. Save the mashup.
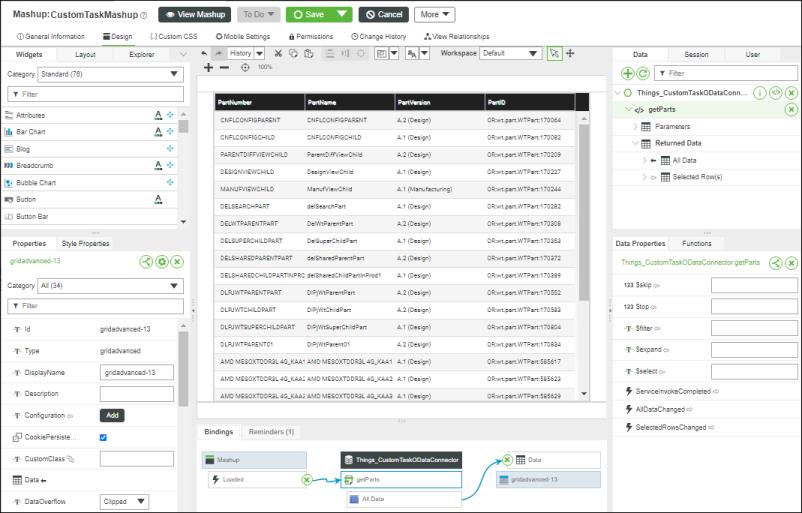
11. Click View Mashup. Your custom task opens in a new window.
You can now add your task to the ThingWorx Navigate landing page and add tailoring. See the topic Add a Custom Task to Your Homepage.