Step 2. Setting Up Application Registrations
|
|
If you are a customer of PTC Cloud Services, the work to set up the ThingWorx-Azure IIoT integration is done for you by Cloud Services. Refer to
Getting Started for Customers of PTC ThingWorx Cloud Services for information.
|
Certain Azure infrastructure must be present for the ThingWorx Azure Industrial IoT (IIoT) Solution to function. Suppose you want to provision a new OPC UA Server on the factory floor. You need to register that OPC UA Server with the larger Azure IIoT platform. The registration creates an account for your application in Azure Active Directory. It is expected that you only need to perform the provisioning steps once, when you are setting up your Azure IIoT to ThingWorx integration. After that, you can use ThingWorx Composer and ThingWorx Mashup Builder to manage your Industrial Connections.
|
|
If you have been using a ThingWorx Kepware Server with a direct connection to ThingWorx Platform, you are already familiar with the Industrial Connections user interface (UI) in ThingWorx Composer. With version 4.1.0 of the ThingWorx Azure IoT Hub Connector and the integration with Azure IIoT OPC UA, you will use this UI for any OPC UA server applications and endpoints that connect to a ThingWorx Platform through Microsoft Azure IIoT.
|
To allow for authentication on the Azure IIoT Solution, Application Registrations are required. The instructions in the following sections explain how to stand up the necessary resources for the Azure IIoT OPC UA-to-ThingWorx integration.While there are multiple ways to do this, follow these procedures.
|
|
In Windows PowerShell, if you try to run a script, such as the one that installs Azure PowerShell, and you see the error that script execution is disabled on your local machine, you need to set the Execution Policy for your local machine. Refer to
Windows PowerShell and Execution Policy. Azure PowerShell does not have execution policies.
|
As of this writing, when you deploy the Azure Industrial IoT platform, the minimal deployment script deploys the following managed Azure services into your Azure subscription:
• An Azure IoT Hub, with 4 partitions. The hub communicates with the edge and receives incoming telemetry. It also connects to ThingWorx Azure IoT Hub Connector, which forwards the OPC UA telemetry to the ThingWorx Platform.
• A Key Vault to manage secrets and certificates.
• An integration event bus (Service Bus).
• An Event Hub with 4 partitions and 2-day retention, which contains processed and contextualized OPC UA telemetry.
• A Cosmos database with Session consistency level to persist state that is not persisted in the Azure IoT Hub.
• A Blob Storage for event hub checkpointing.
Check the section, What you get when you deploy the platform, in the article,
Azure Industrial IoT Platform, in the GitHub repository for the latest information.
The
Easiest Way to Start section is for those who have a solid background in Azure Industrial IoT. For a breakdown of steps plus steps to work around potential problems, follow the instructions, starting with the second section title in the following list. Click a section title to display its content and click it again to hide the content.
Easiest Way to Start
This section compresses the longer procedures below into a single procedure to set up application registrations and to deploy the dependent Azure resources.
Only if you already have Azure PowerShell, NuGet, and Microsoft Visual Studio Code installed and have a solid working knowledge of Azure IoT, you can follow the steps below for the easiest way to set up application registrations and deploy the dependent Azure resources. Otherwise, start with the section,
Installing NuGet Provider
and Azure PowerShell.
1. From Azure Powershell, sign in to your Azure subscription. If you have more than one, sign in to the one to be used for the ThingWorx Azure Industrial IoT OPC UA integration.This sign-in sets the Azure context to your subscription.
2. Check the current context by running the command, Get-AzContext. As long as the context results show your current subscription ID and tenant ID, continue to the next step. Otherwise, run the following command to set the Azure context:
Set-AzContext -SubscriptionId "xxxxxxxx-xxxx-xxxx-xxxxxxxxxxxx" -TenantId "<your_tenant_id>"
where "xxxxxxxx-xxxx-xxxx-xxxxxxxxxxxx" is your subscription ID.
|
|
It is recommended to supply the tenantId along with the subscription ID to prevent any problems later in the deployment.
|
3. Using Windows PowerShell, clone version the latest approved version of the Azure Industrial IoT repository by running the following command,
git clone https://github.com/Azure/Industrial-IoT
|
|
To be able to clone the repository from Windows PowerShell, you must have Git installed. For example, you may have Git Bash installed.
|
4. From Azure PowerShell, change to the installation directory for the repository and check out the the latest approved version branch:
cd Industrial-IoT
git checkout release/"<supported-version>"
|
|
This version of the Azure IIoT repository will be reflected as "IoTSuiteVersion : release/the latest approved version" in the Azure ResourceGroup on the porta when you deploy the dependent Azure resources.
|
5. To deploy the dependent Azure resources, run the following command:
On Windows:
.\deploy.cmd -type minimum -"<supported-version>" -resourceGroupName <application-name> -subscriptionId "<your_subscription_id>" -tenantId "<your_tenant_id>”
On Linux:
./deploy.sh -type minimum -"<supported-version>" -resourceGroupName <application-name> -subscriptionID "<your_subscription_id>" -tenantId "<your_tenant_id>”
|
|
Make sure that you deploy the minimum type deployment. This type is important for deploying the Azure Industrial IoT (IIoT) Microservices using the public Microsoft Helm chart.
|
6. This script may take a few minutes to finish. When it finishes, go to the Azure portal to verify the deployment. Under your Resource Group name, you can see the minimal resources deployed. For example:
7. Now you can use the keyvault URL and secret from the keyvault to deploy the microservices in your Kubernetes namespace.
If a problem arises, check the
Troubleshooting the
Deployment section below.
Installing NuGet Provider and Azure PowerShell
Your first task is to check your version of Windows PowerShell and then install Azure PowerShell from Windows PowerShell:
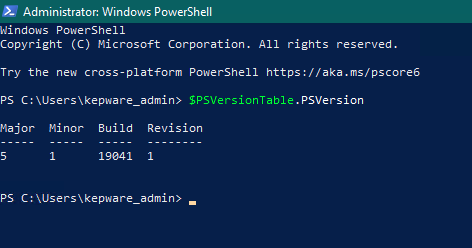
1. On a Windows computer, run Windows PowerShell as Administrator.
2. To check your version of Windows PowerShell, run the following command:
$PSVersionTable.PSVersion
As long as the version is 5.1 as shown below, continue with this procedure. Note that version 7.0 has been known to cause problems with this installation.
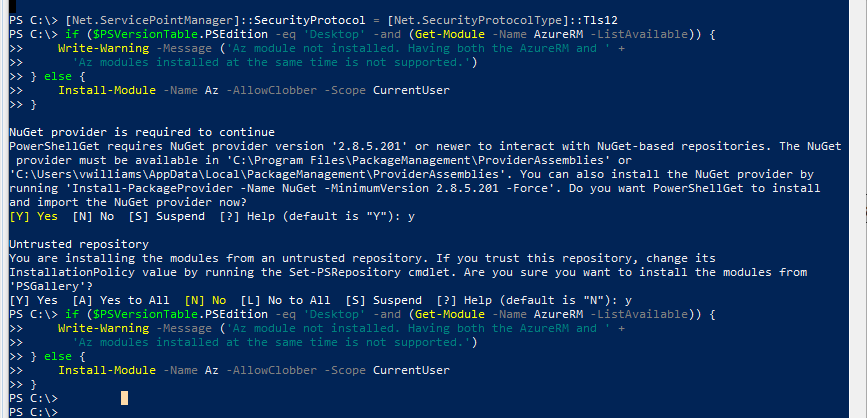
3. If you have not set Windows PowerShell to TLS 1.2, enter the following command:
[Net.ServicePointManager]::SecurityProtocol = [Net.SecurityProtocolType]::Tls12
4. Enter the command to install Azure PowerShell:
Install-Module PowershellGet -Force
If you do not have NuGet provider installed, the following message is displayed:
NuGet provider is required to continue
PowerShellGet requires NuGet provider version '1.8.5.201' or newer to interact
with NuGet-based repositories. The NuGet provider must be available in
'C:\Program Files\PackageManagement\ProviderAssemblies' or
'C:\Users\<username>\AppData\Local\PackageManagement\ProviderAssemblies'. You
can also install the NuGet provider by running
'Install-PackageProvider -Name NuGet -MinimumVersion 2.8.5.201 -Force'.
Do you want PowerShellGet to install and import the NuGet provider now?
5. To install the NuGet provider, answer Yes or Yes to All.
6. By default, the PowerShell gallery is not configured as a trusted repository for PowerShellGet. The first time you use the PSGallery, you are prompted as follows:
Untrusted repository
You are installing the modules from an untrusted repository. If you trust this repository, change
its InstallationPolicy value by running the `Set-PSRepository` cmdlet.
Are you sure you want to install the modules from 'PSGallery'?
[Y] Yes [A] Yes to All [N] No [L] No to All [S] Suspend [?] Help (default is "N"):
Answer Yes or Yes to All to complete the installation.
7. You are now ready to install the Azure PowerShell. Copy and paste the following commands in your Windows PowerShell session:
if ($PSVersionTable.PSEdition -eq 'Desktop' -and (Get-Module -Name AzureRM -ListAvailable)) {
Write-Warning -Message ('Az module not installed. Having both the AzureRM and ' +
'Az modules installed at the same time is not supported.')
} else {
Install-Module -Name Az -AllowClobber -Scope CurrentUser
}
To ensure that the Connect-AzureAD and similar commands are recognized when you run them in the section below,
Signing In to Azure and Setting
a Subscription, run the following command Install-Module -Name AzureAD -AllowClobber |
The following figure illustrates steps 2 through 6:
Cloning the Azure Industrial IoT Repository
You are ready to clone the Git repository for Azure Industrial IoT:
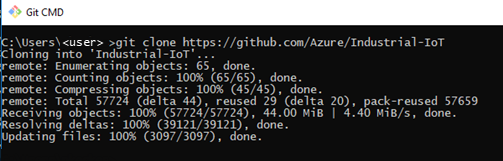
1. As long as you have Git installed on your computer, run Windows Command Prompt as Administrator.
git clone https://github.com/Azure/Industrial-IoT
2. From Azure PowerShell, change to the installation directory for the repository and check out the the latest approved version branch:
cd Industrial-IoT
git checkout release/"<supported-version>"
This version of the Azure IIoT repository will be reflected as "IoTSuiteVersion : release/the latest approved version" in the Azure ResourceGroup on the portal. |
The following messages appear to indicate that the clone operation succeeded:
If you do not have Git installed on your computer, the following error is returned when you try to clone the repository:  To resolve the error, install Git. For example, you might want to install Git Bash. You can then run the clone from an Administrator Command Prompt or from the Git console. |
Signing In to Azure and Setting a Subscription
In the next set of steps, you sign in to your Azure account from Windows PowerShell. If you are running Azure PowerShell, you are already signed in to your Azure IIoT account and can start at
Step 3 below.
1. If you are working from a remote PC in Windows PowerShell, follow these steps:
a. Start Windows PowerShell as Administrator, and connect to Azure by entering Connect-AzureAD, as shown here in yellow:

The system displays your account name, which typically is your e-mail address, the environment that you are connecting to (AzureCloud), and your Tenant ID. It also displays the Tenant Domain and type of account.
b. Run the command Import-Module AzureAD to import the Azure Active Directory module. You are going to provision your applications with an Active Directory account to use when communicating with Azure Industrial IoT.
c. Run Import-Module Az.Accounts.
d. If you see error messages, refer to
Windows PowerShell and Execution Policy and then retry entering Import-Module Az.Accounts at the PS prompt.
2. Run the command, Connect-AzAccount so that you can get/set the context.
Your login to Azure will retrieve the "default" context. If you have many subscriptions, this creates a problem. Passing in the context using the AAD -AzContext parameter as described in this step is the best workaround for this issue. |
At this point you need to set the Azure context to your Azure Subscription ID. You also need to register your application in your Azure Active Directory (AAD) tenant to support OAUTH-based authentication for your application. Start by checking the current context: and then, if needed, set the context:
a. Run the following command:
Get-AzContext
If the context returned is you Azure Subscription ID that you want to use for this integration, you can skip to the next section. Otherwise, continue to the next step to set the context.
b. If you have access to multiple Azure Subscriptions, be sure to set the correct subscription ID in your current user context, as follows:
Set-AzContext -SubscriptionId "xxxxxxxx-xxxx-xxxx-xxxxxxxxxxxx"
where "xxxxxxxx-xxxx-xxxx-xxxxxxxxxxxx" is your subscription ID. PowerShell displays the information for the subscription. For example:

Registering Applications and Deploying the Dependent Azure Resources
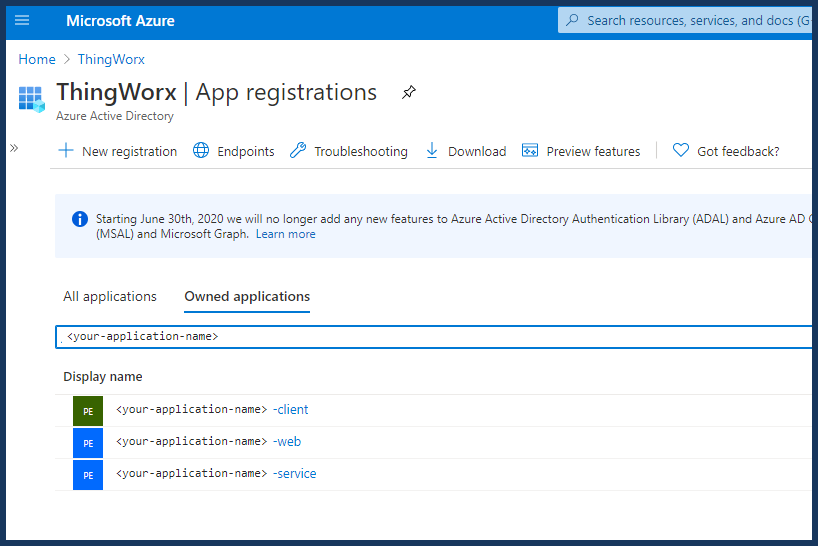
Next, you are going to create three separate application registrations, one for the service, one for the client and one for the web by running a script. Why? You need Azure Active Directory users to interact with the Azure Industrial IoT Platform. Once you run the scripts, the applications act as Azure Active Directory users with different permissions.
Choose an application name to use throughout the deployment. Make sure this application name is unique and does not contain spaces or underscores. For example, "PumpTelemetry".
In this procedure, you are running scripts on your local computer that will deploy resources onto your Azure subscription, not to your local machine. |
1. From Windows PowerShell, change to the deploy/scripts subdirectory of the Industrial-IoT directory and then create the application registrations
cd deploy/scripts
./aad-register.ps1 -Name <application-name> -Output aad.json
The aad-register script creates the application registrations described above. The output aad.json is passed into the next command, which creates the Azure standalone resources.
If you are logged in with a user name in the format first.last@someplace.com, know that the script is looking for a correct UserPrincipalName in Azure Active Directory. If your UserPrincipalName in Azure ActiveDirectory is not your e-mail address, you are prompted to log in to your Azure subscription account. If you do not know your UserPrincipalName, there is a cmdlet that can be run to retrieve it, Get-AzureADUser. If you run it without arguments, it returns all users and you need to find yourself. You can find details about the cmdlet
here. |
2. In the Azure Portal, navigate to the App registrations page and check that the registrations are there. For example:
3. From the deploy/scripts directory in Windows PowerShell, deploy the dependent Azure resources to a new resource group by running the deploy command for that other resource group:
./deploy.ps1 -type minimum -"<supported-version>" -aadConfig aad.json -resourceGroupName <application-name> -subscriptionID "<your_subscription_id>" -tenantId "<your_tenant_id>"
Make sure that you specify the minimum type deployment and the specific version of the Industrial IoT, the latest approved version. The minimum type is important for deploying the Azure IIoT Microservices using the public Microsoft Helm chart. The version parameter specifies the version of Azure Industrial IoT. The version for this integration is the latest approved version. For current version compatibility information, see the
Release Advisor. |
This deployment normally takes 15 to 20 minutes. As it runs, it prompts you to select a region for the deployment. Once you select a region, it creates the resource group in the selected region. After a moment, the message, Deployment will use 'release/<release_number>' in "https://github.com/Azure/Industrial-IoT" indicates that the deployment has begun.
When the deployment completes, parameters are shown but quickly disappear. You'll need them later, and you'll be able to retrieve them from the actual deployment.
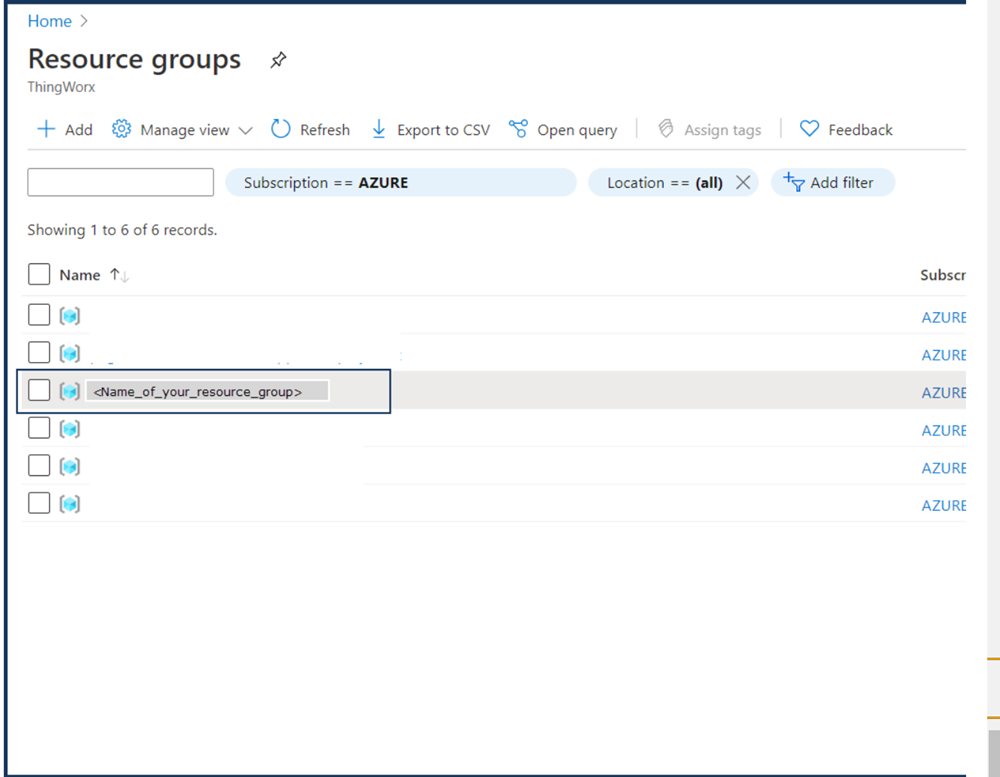
4. In the Azure Portal, navigate to the Resource groups page and check that your new resource group is shown. For example:
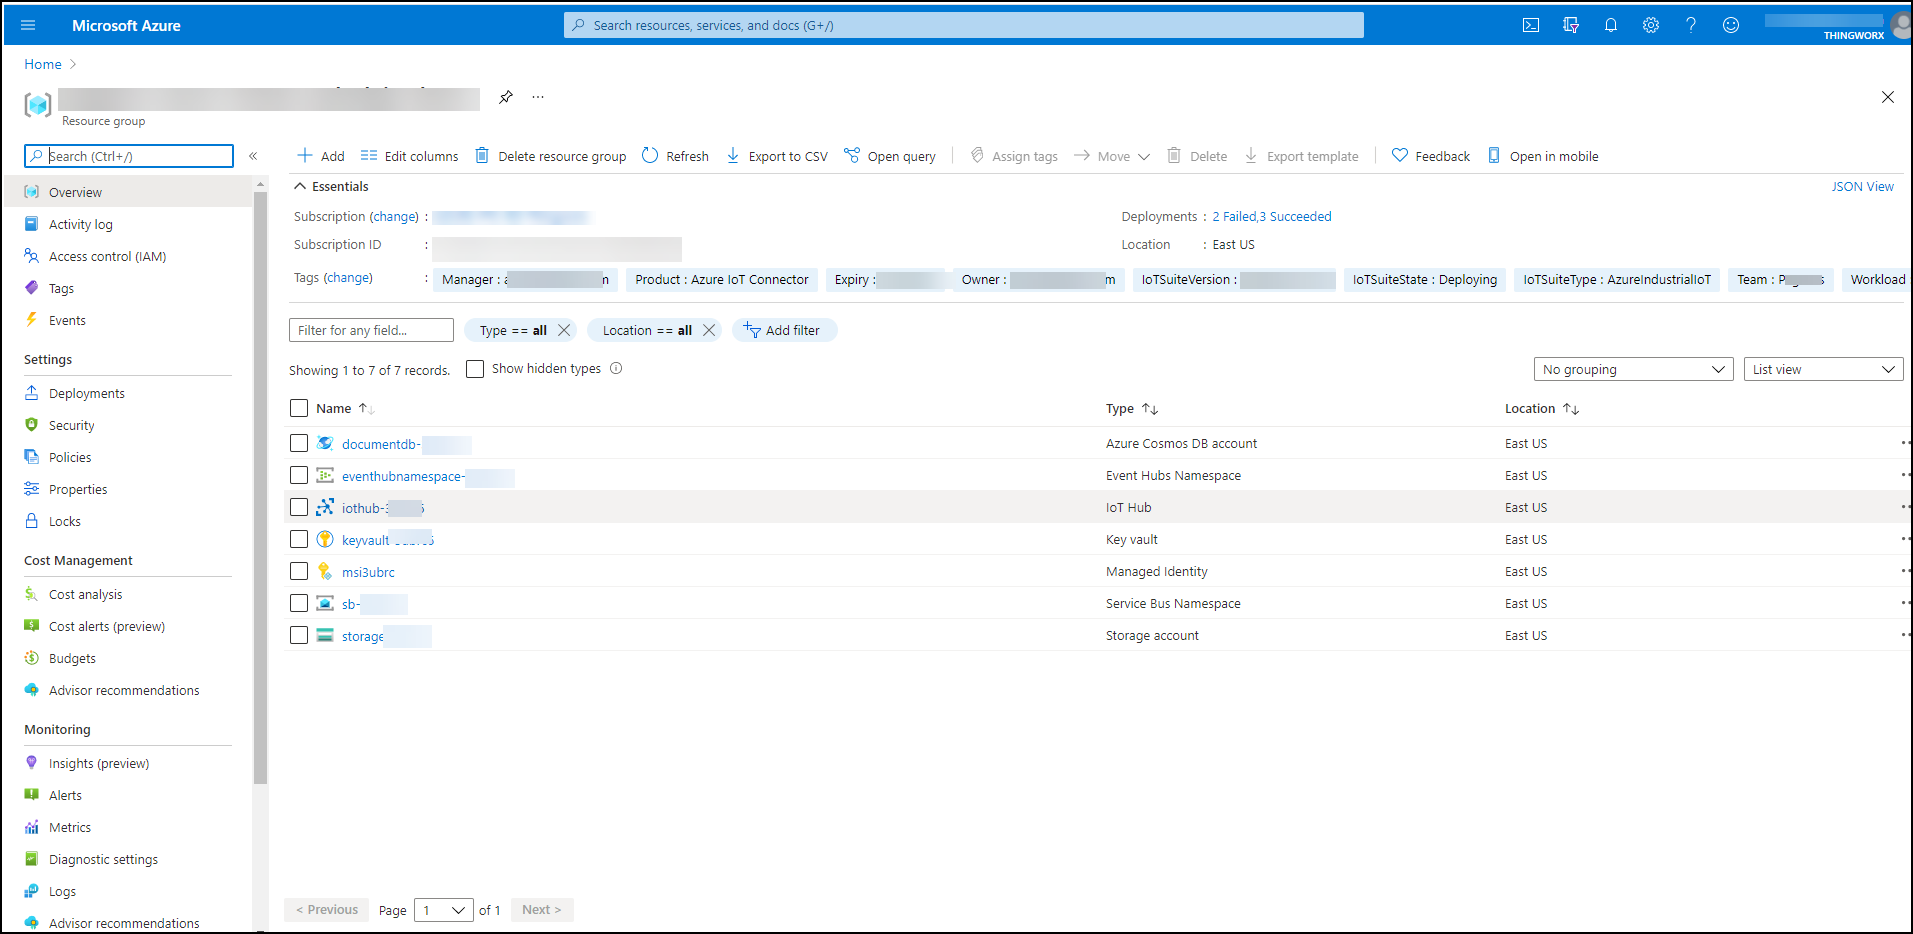
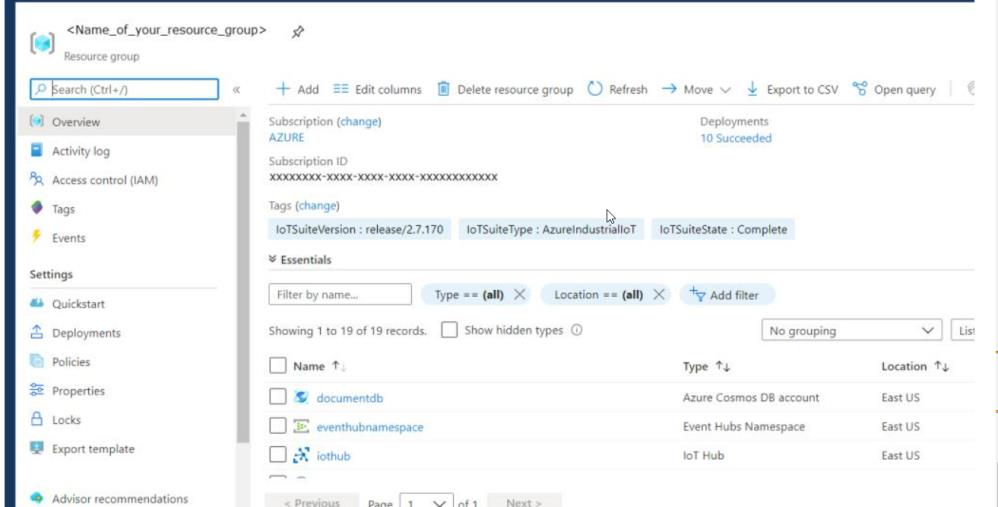
5. Click the name of the Resource Group deployment to display the standalone resources that were deployed. For example:
6. Next you are going to add a Azure Kubernetes Cluster and deploy the Azure IIoT Microservices. Keep the resource group page up when you continue to
Step 3. Deploying the Azure Industrial IoT (IIoT) Microservices
on an Azure Kubernetes Cluster.
Troubleshooting the Deployment
Permissions
Permission errors may occur when you try to run the deployment scripts. Here is an example:
Selected Tenant 'ptccloud.onmicrosoft.com' as authority.
An error occurred: Error occurred while executing NewApplication
Code: Authorization_RequestDenied
Message: Insufficient privileges to complete the operation.
RequestId: xxxxxxxx-xxxx-xxxx-xxxx-xxxxxxxxxxxx
The "Tenant" running the script must have the correct privileges. You can change the default tenant and run the script again. The user is created in the Industrial-IoT folder, not in deploy\scripts.
InvalidDeploymentParameterValue
Message: The value of deployment parameter keyVaultPrincipalId is null.
You need run the following command to create the aad.json file before running the ./deploy.ps1 script to deploy the application.
./aad-register.ps1 -Name opcuaapp -Output aad.json
What's Next?