Working with the ThingView SelectedParts Property
You can use the SelectedParts property of ThingView widget to perform a cross selection between the 3D model and an external source. To use this property along with the Grid widget, perform the following steps.
Creating a Thing
Perform the following steps to create a Thing with the name PropPathThing:
1. In the Composer, browseto > .
2. Click New to create a new Thing.
3. Specify the Name as PropPathThing.
4. Specify the Base Thing Template as GenericThing.
5. Click Save to save the Thing.
6. Click Services and Add to define a service to get the details of the part in a InfoTable.
7. Specify the following details for the service:
◦ Name—GetPropPaths
◦ Specify the InfoTable data to return when calling the service. Depending on the specified SelectedPartsSelectionMode, populate any one of the entries — idPath, propPath or propValue. This content is specific to the Creo View data being loaded:
var data = [
{
"idPath": "/",
"propPath": "0000000201",
"propValue": "0000000201"
},
{
"idPath": "/1",
"propPath": "0000000201/0000000190",
"propValue": "0000000190"
},
{
"idPath": "/1/2",
"propPath": "0000000201/0000000190/0000000182",
"propValue": "0000000182"
}
];
var result = DataShapes.Selection.CreateValues();
for(var i =0;i<data.length;i++) {
result.AddRow(data[i]);
}
{
"idPath": "/",
"propPath": "0000000201",
"propValue": "0000000201"
},
{
"idPath": "/1",
"propPath": "0000000201/0000000190",
"propValue": "0000000190"
},
{
"idPath": "/1/2",
"propPath": "0000000201/0000000190/0000000182",
"propValue": "0000000182"
}
];
var result = DataShapes.Selection.CreateValues();
for(var i =0;i<data.length;i++) {
result.AddRow(data[i]);
}
◦ Under Output, specify the following details:
▪ Output type—INFOTABLE
▪ Data Shape—Selection
▪ Infotable type—Just Infotable
8. Click Done to save the service.
9. Save the Thing.
Creating the Mashup
Perform the following steps to create a Mashup with the name SampleSelectedPartsMashup:
1. In the Composer, browseto > .
2. Click New. The New Mashup dialog box opens.
3. Select Responsive and click OK.
4. Specify the Name as SampleSelectedPartsMashup.
5. Click Save to save the Mashup.
6. Click Design.
7. Add two left containers to the Mashup from the Layouts tab.
8. Add Grid Advanced to the left pane, the ThingView widget in the middle pane, and the Grid widget to the right pane.
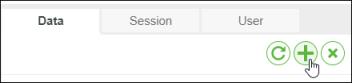
9. For Grid Advanced, set the value of the RowSelection property to Multiple.
10. In the dock, under Data, click +. The Add Data dialog box opens.
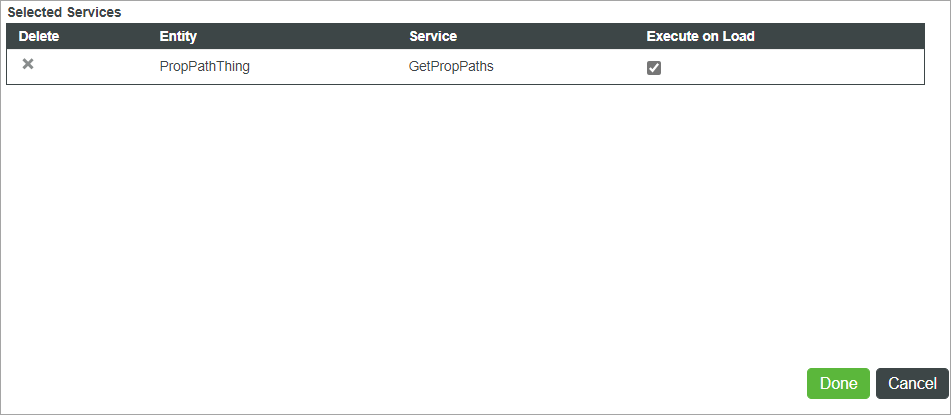
11. In the Select Entity field, search for the Thing you created. In this example, search for PropPathThing and select it. The services available with the Thing are listed.
12. In the Select Services field, search for the service created in the Thing. In this example, search for GetPropPaths.
13. Click the right pointing arrow in the GetPropPaths service to add it to the Mashup.
14. Select the Execute on Load check box and click Done.
15. In the dock, expand GetPropPaths.
16. Under Returned Data, click and drag All Data onto the Advanced Grid, where it can be bound to its Data property.
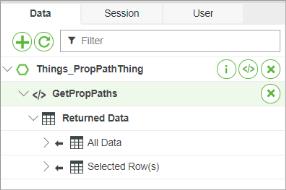
17. Under Returned Data, click and drag Selected Row(s) to the ThingView widget SelectedParts property.
18. Drag the SelectedParts property of the ThingView widget to the grid Data property.
19. If you are using the selection mode Property path or Property value, set the values for ThingView properties SelectionPropertyGroupName and SelectionPropertyName.
This is specific to the data being used where it contains selectable information such as part number or part name. |
20. In the ProductToView property, specify the URL of the Creo View structure file.
21. Click Save to save the Mashup.
22. Click View Mashup to view the Mashup In the viewed Mashup select the rows in the left-hand side Grid Advanced widget to highlight the corresponding parts in the model. Selecting parts in the model populates the right-hand side Grid rows with the corresponding IDs of the parts.