Configuring Servigistics InService to Use an External LDAP System
When deploying Servigistics InService you can use an enterprise identity management (LDAP) system to manage your users. You must configure Servigistics InService to access this external user information.
Configuring Servigistics InService to use an external LDAP system involves the following steps:
1. Adding the JNDI adapter to the list of existing adapters.
2. Setting administrative access control privileges for the directory.
Connecting to an External LDAP
Pre-requisites
To connect Servigistics InService to an external LDAP, you must have the external LDAP URL, base distinguished name (DN) context, login ID, and password for the external LDAP. For example:
LDAP URL: ldap://ppuwsv-pscqa06d.ptcnet.ptc.com:1389
Base DN Context: ou=people,cn=EnterpriseLdapForSlm04d,cn=InService,o=PTC
LDAP User Login: cn=Manager
LDAP Password: admin
|
|
To get base DN, go to EnterpriseLdap > people: |
Configuring the External LDAP
1. Optional: Install and configure the LDAP that you want to connect to. This is optional if it is already installed.
2. To create and enable the JNDI Adapter, run the following command from Windchill shell:
<InS_HOME>\InS_SW\SW\Applications\Windchill.ear\bin
◦ For Linux:
xconfmanager -s
wt.federation.org.directoryServices='$(wt.federation.org.defaultAdapter),
$(wt.federation.org.enterpriseAdapter),com.ptc.ptcnet.ldap-ext’ -t
/qa/InService103/SW/Applications/Windchill.ear/codebase.war/wt.properties –p
◦ For Windows:
xconfmanager -s
wt.federation.org.directoryServices=$(wt.federation.org.defaultAdapter),
$(wt.federation.org.enterpriseAdapter),com.ptc.ptcnet.ldap-ext
-t codebase.war\wt.properties -p
3. To set the administrative access control privileges for the directory, add the login credentials to the file. For example, if the Adapter is com.ptc.ldap-ext, the user name is cn=manager, and password is admin. If the mapcredentials.admin.adapters property is not present in the site.xconf file, add this property using the following command:
xconfmanager -s
mapcredentials.admin.adapters=
'com.ptc.Ldap^cn=Manager^encrypted.com.ptc.Ldap.cn=Manager’
-t codebase.war/wt.properties –p
Then run the following command:
xconfmanager --add
"mapcredentials.admin.adapters=com.ptc.ptcnet.ldap-ext^cn=manager^admin"
-t "codebase.war\wt.properties" -p
4. To create and enable JNDI Adapter, specify the following details:
◦ LDAP URL
◦ Base DN Context
For example,
xconfmanager -s com.ptc.ptcnet.ldap-ext.providerUrl="ldap://10.192.73.254:389" -t
codebase.war/wt.properties –p
xconfmanager -s com.ptc.ptcnet.ldap-ext .searchBase="
ou\=people,cn\=AdministrativeLdap,cn\=InService,o\=ptcrnd,o\=ptc " -t
codebase.war/wt.properties –p
5. Add password to JBOSS Vault.
a. To add the LDAP server password to Vault, run the following command:
vault.bat --keystore
<InS_HOME>\InS_SW\SW\System\WildFly\standalone\configuration\vault.keystore
--keystore-password wcadmin --alias PTC --iteration=10
--sec-attr <Actual_Password> --vault-block ldap1 --attribute password
--enc-dir <InS_HOME>\InS_SW\SW \System\WildFly\standalone\configuration\
The <Actual_Password> is what you must pass for the external LDAP, and ldap is the key for standalone-full-<database-name>.xml file that you have to modify while copying with ldap2 as per this command. For example,
vault.bat –keystore D:\ptc\InService\InS_SW\SW\System\WildFly\standalone\
configuration\vault.keystore --keystore-password wcadmin
--alias PTC --iteration=10 --sec-attr
W1ndch1ll --vault-block ldap2 --attribute password
--enc-dir D:\ptc\InService\InS_SW\SW\System\WildFly\standalone\configuration\
b. Edit the standalone-full-<database-name>.xml file to add Vault information. This file is located at <InS_Installation_Dir>\InS_SW\SW\System\WildFly\standalone\configuration\standalone-full-<database-name>.xml
6. Update JBOSS configuration.
a. Go to <InS_HOME>\SW\System\WildFly\standalone\configuration
b. Edit standalone-full-<database-name>.xml file, where the <database-name> is the name of the backend database that is used while installation. For example, if the database used during installation is Oracle, then modify standalone-full-oracle.xml.
c. Search for org.jboss.security.auth.spi.LdapExtLoginModule string in this file.
d. Add a new entry for Login-Module to configure the external LDAP. Change the values highlighted yellow according to your search base.
7. Restart JBOSS.
| The examples provided in this section use a PTC and Servigistics InService LDAP system for demonstration purposes. Edit the commands and code as necessary for your environment. |
| To disable use of internal LDAP set the com.ptc.sc.allowInternalAccountsCreation property to “false” in wt.properties. |
| The following procedures assume that your external LDAP directory has already been installed and configured. |
Configuring LDAP with Active Directory
Active Directory is a directory services database implemented by Microsoft, which supports LDAP.
Configuring Servigistics InService to use LDAP system with Active Directory involves the following steps.
Configuring JNDI Adapter
To configure the JNDI Adapter, follow these steps:
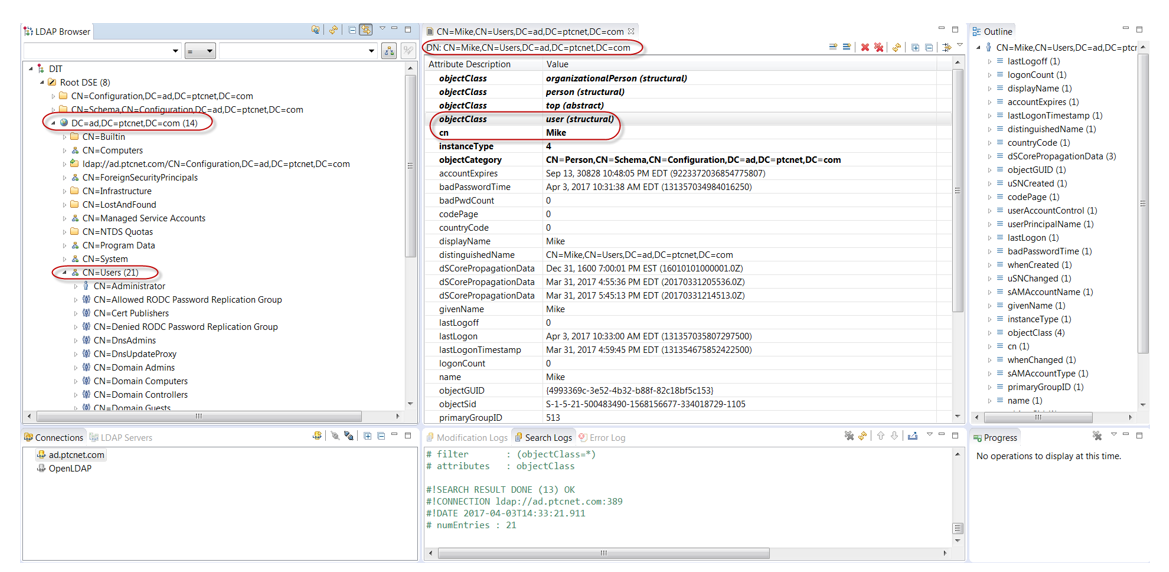
1. Get the following parameters from your Active Directory setup, for example:
◦ Host: ad.ptcnet.com
◦ Port: 389
◦ Service Account User: CN=Mike,CN=Users,DC=ad,DC=ptcnet,DC=com
◦ Service Account Password: W1ndch1ll
◦ Search Base: CN=Users,DC=ad,DC=ptcnet,DC=com
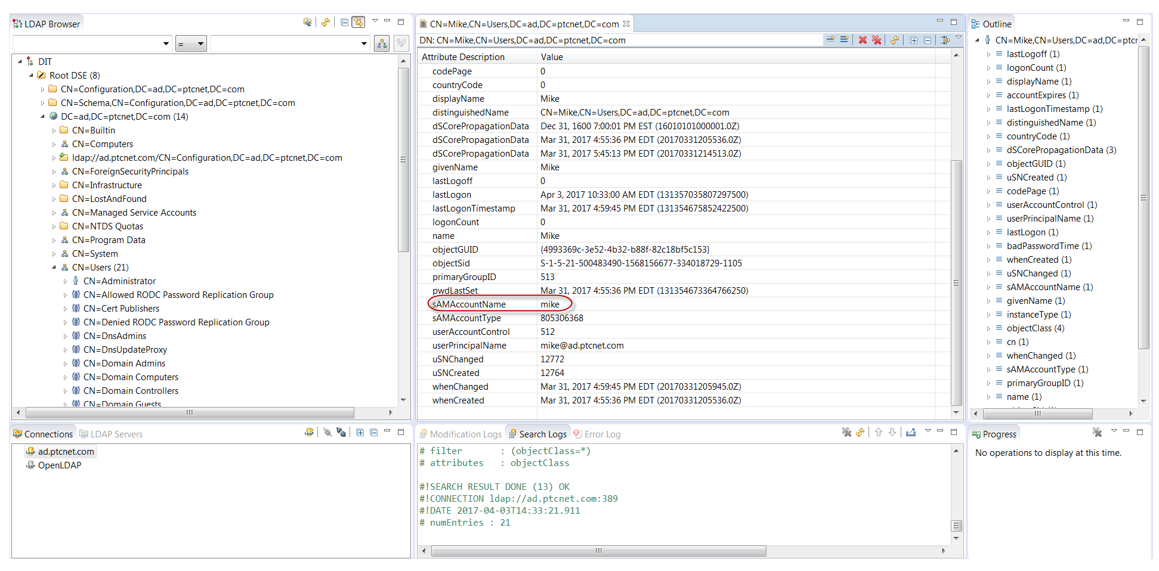
Also check whether the attribute sAMAccountName exists as highlighted in the following image:
2. Create and enable JNDI Adapter.
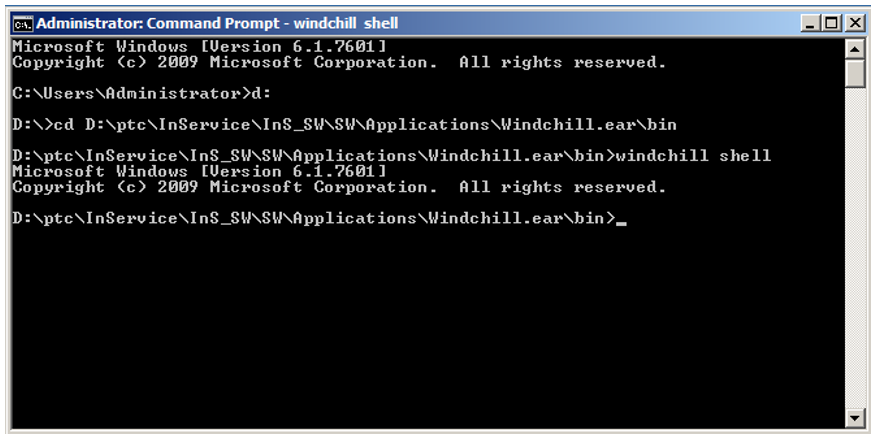
a. Go to the bin folder:
b. Open Windchill shell and run the following command:
xconfmanager -s
wt.federation.org.directoryServices="$(wt.federation.org.defaultAdapter),
$(wt.federation.org.enterpriseAdapter) ,com.ptcnet.ptc-training.jndiAdapter.ad"
-t codebase.war/wt.properties –p
In this command, replace com.ptcnet.ptc-training.jndiAdapter.ad with your service name.
c. Enter the following values in sc.wt.properties.xconf/site.xconf located in <WT_HOME\>.
▪ Provider URL: ldap://<host>:<port>
▪ Search Base distinguished name: This is the Search distinguished name of your Active directory setup.
▪ Add the following properties. Check whether these exist in your Active Directory as well:
<ServiceName>.windchill.config.directoryType - ADS
<ServiceName>.windchill.mapping.cn - cn
<ServiceName>.windchill.mapping.user.objectClass - user
<ServiceName>.windchill.mapping.user.uniqueIdAttribute – sAMAccountName
Example:
xconfmanager -s
com.ptcnet.ptc-training.jndiAdapter.ad.providerUrl=
"ldap://10.192.73.254:389" -t codebase.war/wt.properties –p
xconfmanager -s
com.ptcnet.ptc-training.jndiAdapter.ad.searchBase=
"CN=Users,DC=ad,DC=ptcnet,DC=com" -t codebase.war/wt.properties –p
xconfmanager -s
com.ptcnet.ptc-training.jndiAdapter.ad.windchill.config.directoryType=
"ADS" -t codebase.war/wt.properties –p
xconfmanager -s
com.ptcnet.ptc-training.jndiAdapter.ad.windchill.mapping.cn=
"cn" -t codebase.war/wt.properties –p
xconfmanager -s
com.ptcnet.ptc-training.jndiAdapter.ad.windchill.mapping.user.objectClass=
"user" -t codebase.war/wt.properties –p
xconfmanager -s
com.ptcnet.ptc-training.jndiAdapter.
ad.windchill.mapping.user.uniqueIdAttribute=
"sAMAccountName" -t codebase.war/wt.properties –p
3. Configure the service account credentials:
a. From the same location as specified in step 2b, run Windchill shell.
b. If the mapcredentials.admin.adapters property is not present in site.xconf, add this property by running the following command:
xconfmanager -s
mapcredentials.admin.adapters='com.ptc.Ldap^cn=
Manager^encrypted.com.ptc.Ldap.cn=Manager’
-t codebase.war/wt.properties –p
c. Create and run the following command to modify mapCredentials:
xconfmanager --add
"mapcredentials.admin.adapters=
<jndiAdapter name>^<distinguished name of service account user>^<user password> "
-t " codebase.war/wt.properties " -p
Example:
xconfmanager --add
"mapcredentials.admin.adapters=
com.ptcnet.ptc-training.jndiAdapter.ad^CN=Mike,
CN=Users,DC=ad,DC=ptcnet,DC=com^W1ndch1ll"
-t " codebase.war/wt.properties " -p
4. Add password to JBOSS Vault.
a. To add the Active Directory Server password to Vault, run the following command:
<InS_Home>\InS_SW\SW\System\WildFly\standalone\configuration\vault.keystore
--keystore-password wcadmin --alias PTC --iteration=10
--sec-attr <Actual_Password> --vault-block ldap1 --attribute password
--enc-dir <InS_home>\InS_SW\SW\System\WildFly\standalone\configuration\
The <Actual_Password> is what you must pass for the external LDAP, and ldap is the key for standalone-full-<database-name>.xml file that you have to modify while copying with ldap2 as per this command. For example,
vault.bat –keystore
D:\ptc\InService\InS_SW\SW\System\WildFly\standalone\
configuration\vault.keystore
--keystore-password wcadmin --alias PTC --iteration=10
--sec-attr W1ndch1ll --vault-block ldap2
--attribute password --enc-dir D:\ptc\InService\InS_SW\SW\System\
WildFly\standalone\configuration\
b. Edit the standalone-full-<database-name>.xml file to add Vault information. This file is located at <InS_Installation_Dir>\InS_SW\SW\System\WildFly\standalone\configuration\standalone-full-<database-name>.xml
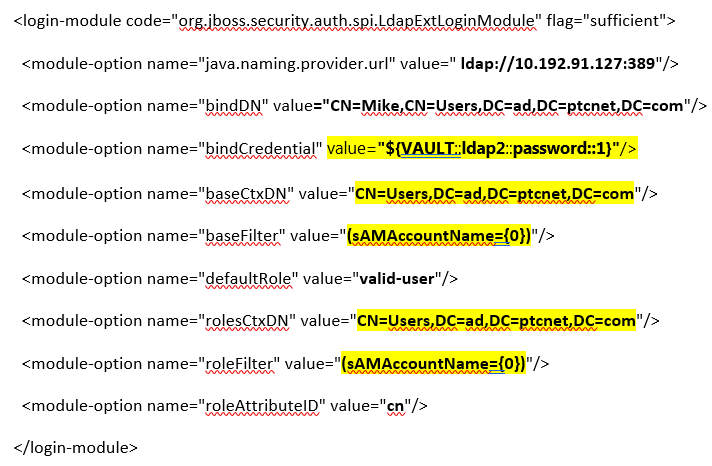
5. Add Login-Module to the standalone-full-<database-name>.xml file.
a. Edit standalone-full-<database-name>.xml, where database-name is the backend database that is used while installing with your Active Directory details gathered in step 1. File path is <InService Installation Diretory>\InS_SW\SW\System\WildFly\standalone\configuration\standalone-full-<database-name>.xml. For example, if the database used during installation is oracle, then modify standalone-full-oracle.xml.
Example:
b. Save and close the file, and restart the JBOSS server.
6. To check whether the configuration has completed successfully, log in to the Task Manager.
Clearing User Credentials from JBOSS Cache — REST End Point Details
After a user logs in to the Active Directory server, the user is added to the administrator database. To remove the user from the database, perform the following steps:
1. From the Servigistics InService home page, go to Users and delete the user.
2. In the Active Directory server, disable the user account.
3. Run the following REST All to clear the user credentials from the cache.
REST End Point Url:
http://{HOST}:{PORT}/InService/servlet/servicecenter/rest/user/clearCache?userName=xyz
HOST: Host name
PORT: Port number on which inService application is deployed.
Xyz: Name of the user whose cache must be cleared.
Request Type: PUT
Header Details
Set the following header details:
• Authorization : Basic (credentials of administrator account of Servigistics InService)
• Accept: application/vnd.ptc.sc+json;version=2
• Content-Type: application/vnd.ptc.sc+json;version=2
Authentication
The REST end point requires basic authentication with session user set. This session user must be an OEM administrator user or a user with administrative privileges for Servigistics InService. Only these users can use this feature.