Using the Servigistics InService Deployment Configurator Utility
The Servigistics InService Configurator utility guides you through the process of creating and updating all the configuration files required for deploying Servigistics InService. It streamlines the post-setup configuration of all the Servigistics InService deployment components (split configuration viewers, publishers, Core, CoreCMI, License Server, Load Balancer, Internal LDAP). It also allows you to set up the configuration for the first time deployment as well as later time changes, additions on nodes, and so on.
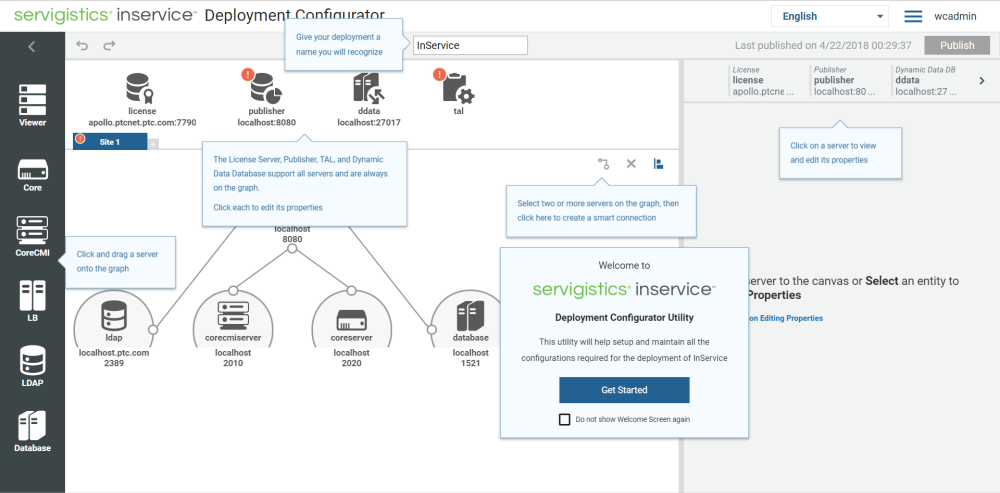
The following image displays the Configurator user interface after you log in:
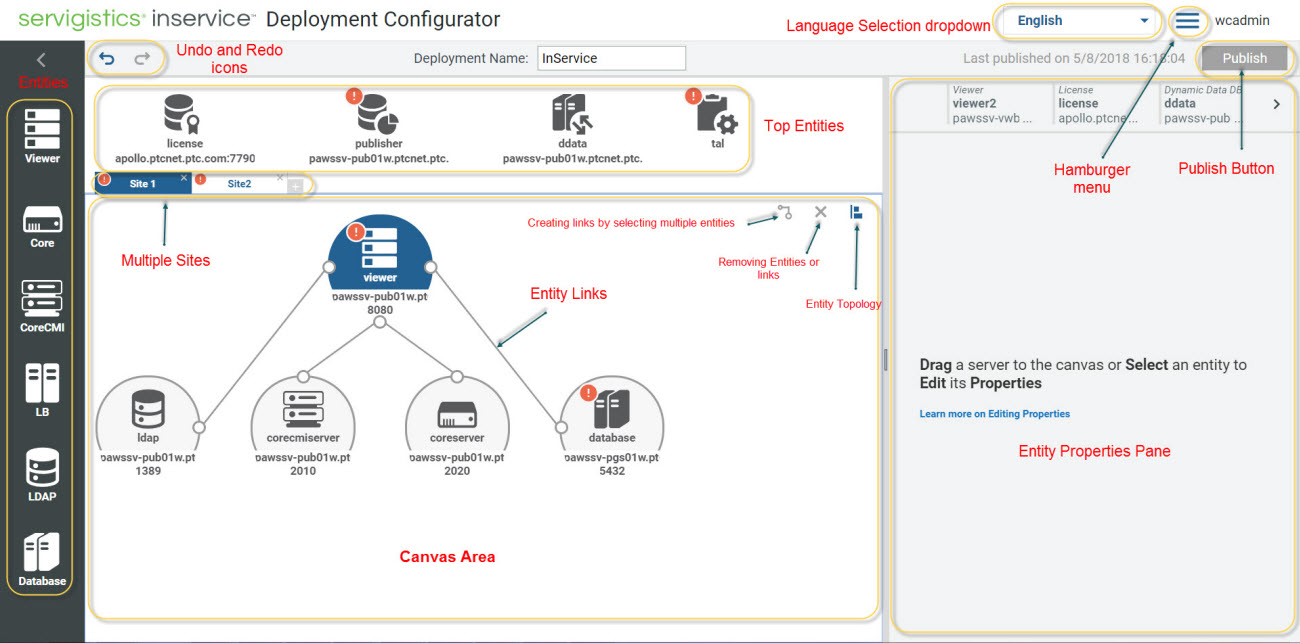
Click Get Started to start configuring the properties of the entities for your environment. The following image displays the various panes and entities topology in the Configurator UI:
The end-to-end flow of configurator is as follows:
1. Install the Publisher. A new shortcut is added in the InService folder that you can access from the Start menu of your operating system of the Publisher machine. Using this shortcut, you can access the Configurator URL http://<host:port>/Configurator/.
2. Using the URL, launch the Configurator user interface in a new browser window. Define the configuration for all the entities in the environment, based on whether it is monolithic or multi-site (full deployment containing several sites, cluster of viewers, or split (monolithic plus additional viewer on another machine). The siteDescriptor.xml file contains the details of all the sites.
3. Specify the path to the InService_configurator_<Release>.<Build>.xml file that the services pull after all the entities are configured. This file must be on a shared location, accessible by all the entities.
This completes the deployment, and you can start working in a fully operational deployment. After you complete the configuration, you must restart the entity (service) to apply the configuration (both in first-time setup and later updates).
Pre-requisites
When launching the Configurator for the first time, the canvas area must consist of the environment settings components: Publisher, License and TAL. Later, you can provide the default values for these components. The properties for the same are provided as part of Publisher setup (pre-requisite for using the Configurator).
Configurator Panes
The Configurator contains the following panes:
• Entities: Consists of all the entities that can be added in the deployment: Viewer, Core, Core CMI, Load Balancer, LDAP, Database.
• Canvas: Contains all the components defined in the deployment. When launching the Configurator for the first time, the canvas area consists of the environment settings components: Publisher, License and TAL (later, these are provided with the default values). You can connect the entities in the canvas area using connector links. For example, you can connect a viewer to a Core Server, Database, LDAP using links.
• Properties: Contains the information on the specific entity selected. This pane holds a section that lists all the entities connected to the entity that is currently selected in the canvas. For more details on editing the properties of each of the entities in this pane, see
Editing Properties of the Configurator Entities.
The Configurator also contains a header field, where the name of the deployment appears. The default value is InService, which you can rename to distinguish between Production, STG, configurations, and so on.
The top-right corner contains the language selection drop-down menu and a hamburger menu. The hamburger menu contains the following actions.
Action | Description |
Load Template | Launches the LOAD TEMPLATES dialog box, where you can select a template to load: • Multiviewer • Monolithic(default) These contain pre-defined configurations for Servigistics InService that help you load data for deployment easily, instead of creating it from the scratch. The templates are stored in the InS_SW/Config/Applications/Configurator/templates server folder path. To create your own template, you must use the existing template and then add it in the InS_SW/Config/Applications/Configurator/templates server folder. |
Help | Redirects to the corresponding help section. |
Welcome screen | Selecting this check box launches the welcome screen again. |
Publish | Clicking this button applies the configuration changes that you have worked on locally. That is, the changes take effect only when you click this button. You can also view the details (date and time) of the last publish. However, each time you make a change to the configurator properties, entities, or relationships, you must restart the relevant entity services, including the monolithic/Publisher (on which the configurator resides). This applies to the first time deployment as well as later time updates. Also, when you publish the changes, a backup of InService_configurator_<Release>.<Build>.xml file is created in the <InS_HOME>\InS_Data\Work\Applications\Configurator\Publishing_History folder. This can help you to restore this file manually, if required. Because the JBOSS is restarted by any means, you cannot undo this step to an infinite level. In such case, you can use the backup of the configurator file to restore the previous configurations. | If the Configurator displays an exception error, the corresponding logs are captured in the configurator log file that resides in the <InS_HOME>\InService\InS_SW\Log\System\Log\Configurator_logs directory. |
|