Upgrading Microsoft SQL Server
Before upgrading to Windchill Modeler to 9.4 or later, ensure to upgrade the old Microsoft SQL Server version to a supported version. Refer to the Windchill Modeler Release Notes for more information about supported versions of Microsoft SQL Server.
|
|
Before beginning the upgrade, ensure to take a backup of all your databases. For instructions on how to back up your database, see Backing up a Database.
|
This topic explains how to upgrade to a supported version of Microsoft SQL Server. To upgrade, you can perform any one of the following:
• Upgrade the existing SQL Server instance
• Install a supported SQL Server application
Upgrade the existing instance of the Microsoft SQL Server
The following steps explain how to upgrade the existing SQL Server instance.
1. Launch the installer of the existing Microsoft SQL Server application by clicking setup.exe.
This opens the SQL Server Installation Center dialog.
2. On the left pane. click Installation. This opens the Upgrade to SQL Server version number dialog.
3. Click Next until you reach the Select Instance screen.
4. Select the instance that is to be upgraded and click Next. The upgrade process begins.
5. After the upgrade is completed, start SQL Server Management Studio (SSMS) and connect to the upgraded instance.
6. Modify the compatibility level of each database to the upgraded SQL Server Instance compatibility level.
a. Expand the database, right-click on each user database and select Properties.
b. In the Options menu, change the compatibility level.
Install a supported Microsoft SQL Server application
The following steps explain how to install a supported Microsoft SQL Server application for Windchill Modeler.
1. Uninstall the existing Microsoft SQL Server application from Windows. You can do this from > .
2. Restart your computer.
3. Launch the Microsoft SQL Server installer from a DVD or a USB drive and click setup.exe.
The SQL Server Installation Center dialog opens.
4. On the left pane, click Installation and then click New SQL Server stand-alone installation or add features to an existing application.
5. Click Next until you reach the Feature Selection screen.

6. On the Feature Selection screen, select Database Engine Services and SQL Server Replication check boxes and click Next.
7. On the Instance Configuration screen, select Named Instance and enter Modeler. Click Next.
8. On the Database Engine Configuration screen, click Add Current User and click Next
9. On the Ready to Install screen, click Install.
After the installation is completed, open SQL Server Management Studio and connect to the instance.
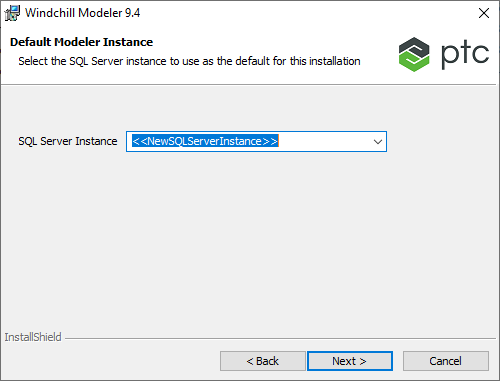
Install Windchill Modeler
After you have upgraded Microsoft SQL Server instance or application, you can now install Windchill Modeler. Note that you if you have installed a new SQL Server application, then while installing Windchill Modeler, for Server-only and Standalone installations, on the Default Modeler Instance dialog, you must enter the new SQL Server instance.
Restore databases
Post installation of Windchill Modeler, you can restore all your databases.
1. Open Model Explorer and add the new instance (perform this step only if you have created a new instance).
2. Right-click the instance, select Restore Database.
3. Click Select to navigate to the folder of your backed up database and click Open.