Tutorial for Windchill Modeler to ThingWorx Code Generator
This topic serves as a tutorial, providing step-by-step instructions on how to use the Modeler to ThingWorx code generator.
Prerequisites
The Modeler and ThingWorx versions you can use are:
• Modeler version 9.0 or later
• ThingWorx version 8.3 or later
Do the following in ThingWorx:
• Create a Thing named “Timer1s” (a timer that triggers every second), such that:
◦ Thing Template is “Timer”
◦ The Thing is active
◦ In Configuration, set the following: Update Rate = 1000 milliseconds, Automatically Enable Timer on Startup must be checked, any user for context (the active user must logged in ThingWorx in the browser)
◦ This Thing is used in this tutorial
• Create a user in ThingWorx with the following features:
◦ The user name must start with “ACS_” (for example, ACS_John)
◦ The user must have read/write permissions to the the ThingWorx database
◦ Ensure that only the logged in user (<ACS_user>) is the one who will use the code generator when connected to ThingWorx. No other user should connect to ThingWorx with the ACS_User credentials using the browser. The code generator uses the ACS_User to be able to identify if the body of a service or subscription has been updated most recently by (a) the code generator or (b) by a regular user using the browser. The code generator uses this information to determine if the body should be reversed into Modeler or generated from Modeler. The ACS_User need not be unique; you can define as many ACS-Users you wants. It is imperative that no other user logs on in the browser with any ACS-User credentials to change the ThingWorx database.
In the folder location, %ProgramData%\PTC Integrity Modeler, the TWConfig.xml file contains the ThingWorx server URL. This file should be edited to reflect the correct address of the ThingWorx server.
An example TWConfig.xml file is provided among the deliverables. You can modify this file and put it into %ProgramData%\PTC Integrity Modeler renaming it to TWConfig.xml.
In this file, the following section appears near the beginning of the file:
<Model Directory='default'>
<Protocol>http</Protocol>
<URI>localhost:80</URI>
<UserName>anyname</UserName>
<Password>anypassword</Password>
<AcceptSelfSigned>false</AcceptSelfSigned>
<ConnectedClients>
<Client DottedName='MyDottedName'>
<AppKey>MyAppKey</AppKey>
<URI>protocol://address:port/ThingWorx/WS</URI>
</Client>
</ConnectedClients>
</Model>
In place of localhost, replace it with the actual URL of the ThingWorx server and the port number after the :.
In place of Protocol, replace it with either http or https depending on the settings of your ThingWorx server. Note that if you are using https and if the server certificate is self-signed, replace the the AcceptSelfSigned value to true.
For versions after Modeler 9.0, you can disregard the UserName and Password values in this file.
This file can be customized for a specific model instead of generally modifying for all models. Fore more information, you can reference the Modeler documentation.
Notes to consider
• Before you begin, if you have attempted this tutorial earlier, ensure to delete all objects that you have created in ThingWorx earlier for the same example.
• When using ACS, disable the Enable Or Disable Code Generator button on the ACS toolbar. You must only generate code on demand as explained in this tutorial. If you leave the button enabled, the code will be generated for incomplete models (that ThingWorx cannot handle).
• Data types for properties, parameters, fields, will be taken from the ThingWorxDataTypes package under ThingWorxLocalProfile. The code generator works only with those types, and the link between the typed object and the type itself shall be reliable (the type must appear in the object’s properties pane with Using existing model data type checked).
• In the example, when you edit an entity in ThingWorx, it is recommended to cancel the edit mode (click the Cancel Edit ThingWorx button) after saving the entity with Save, before going back to Modeler to continue your work. Failing which if the entity remains in the Edit model, and ThingWorx will raise an Edit conflict warning the next time you generate with Modeler. If you come across this warning, you must cancel the edit in ThingWorx (discarding the changes in ThingWorx) and generate code again.
• ACS may log an issue while exporting into ThingWorx. The reason of the issue may be found in the ThingWorx Application log. There are certain operations that may raise an error, for instance while attempting to reference a (possibly non-modeled) ThingWorx entity, or while generating an entity (for example, a subscription) on which the tag definitions have not been set or have been set incorrectly. Incorrect imports in to Modeler which may contain syntax errors may cause ThingWorx to reject the code generated by ACS.
• During code generation, if the body code is correct, but the intended parts of code are not being executed within ThingWorx, then the cause may be a Thing has not been activated (the TWX Active tag definition on <<TWX Thing>>, must be set to TRUE) or a subscription has not been enabled (TWX Active tag definition on <<TWX Subscription>>, must be set to TRUE).
• When deleting an item or a node from a model, ensure that you use the Delete From Model option. The Delete just removes the object from the diagram, but not from the model.
Preparing for the tutorial
Perform the following steps:
1. Create a new Example package in the model, and apply the <<TWX Project>> stereotype.
2. Create an Example class diagram in the package.
3. Start ACS. In the ACS/TDK Control tab, click Start.
4. Select the Example package as the Model Root object.
5. Select the ThingWorxGen.dll as the generator DLL.
6. Select any writable disk directory as the Target Directory. Do not leave this field blank.
7. In Launch Options, specify DomainTerm:AnExample. This will assign the term “AnExample” to all the objects created in ThingWorx created in this sessions.
Once ACS begins, a Credential Dialog appears requesting the credentials to enable the code generator to exchange data with ThingWorx. Enter the ACS User user name and password and click OK. You can use the same credentials until you stop the ACS.
Simple Thing Modeling
We want to design a simple Counter. The counter must be able to increase or decrease a value using a service that adds a number to the value. The counter should also be able to compare the value against a range and indicate if it is under the range, normal or over the range. We can design the compare logic on a Thing Shape to make the task more interesting.
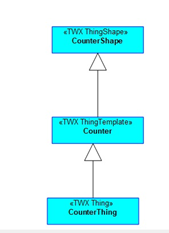
In the Example class diagram, add three classes, CounterShape, Counter and CounterThing. Apply the <<TWX ThingShape>>, <<TWX ThingTemplate>> and <<TWX Thing>> stereotypes respectively (drag the stereotypes from the ThingWorxLocalProfile package onto the class symbols). Connect the three classes with two Generalizations as shown in the diagram below:
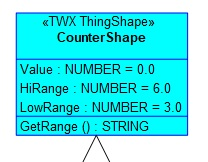
Add three attributes to CounterShape, Value, HiRange and LowRange, all of NUMBER data type, with default values set to 0.0, 6.0, 3.0 respectively.
Add a GetRange operation to CounterShape, with no parameters, and returning a STRING.
Generate code (right click on any class and select Generate Now – this generates code for the entire ACS scope, not only for the selected class). Ensure that the ACS log does not show any error, confirming that the interface with ThingWorx is correctly setup.
Log on to ThingWorx with a browser (do not use the ACS User login) and confirm you have an Example Project, a CounterShape Thing Shape, a Counter Thing Template and a CounterThing Thing. Edit the CounterShape service GetRange (in ThingWorx) and set the body as shown below:
// ## PTC@IMScriptBody [there is a GUID here, do not change it]
if (me.Value < me.LowRange) {
result = "UNDER RANGE";
}else if (me.Value > me.HiRange) {
result = "OVER RANGE";
}else {
result = "Normal";
}
// ## ScriptBody End
if (me.Value < me.LowRange) {
result = "UNDER RANGE";
}else if (me.Value > me.HiRange) {
result = "OVER RANGE";
}else {
result = "Normal";
}
// ## ScriptBody End
Do not delete the // and ## markers do not change their contents. Write the body within the markers. These markers are used by the code generator to reverse the changes into Modeler. |
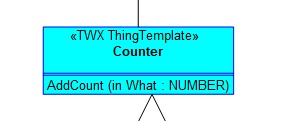
Save the entity in ThingWorx, return to Modeler and generate code again. Confirm that the ACS log shows the body of the service has been reversed. Add an AddCount operation to the Counter class, with a What parameter of type NUMBER. Set the body in Modeler as below:
me.Value += What;
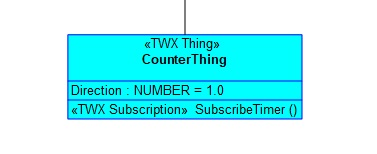
Add a Direction attribute to CounterThing, typed by NUMBER with default value set to 1.0.
Add a SubscribeTimer operation to CounterThing. Apply the <<TWX Subscription>> stereotype to the operation.
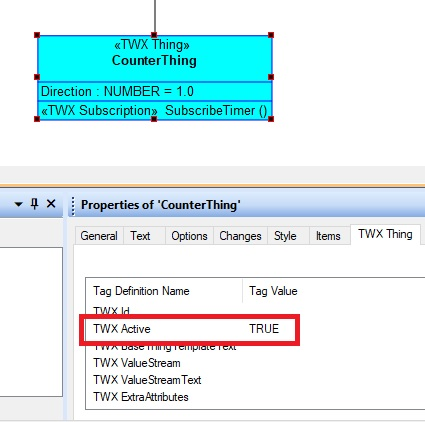
Select the CounterThing on the diagram, go to the Properties pane, select the TWX Thing tab, locate the TWX Active tag definition and set it to TRUE (this sets the status of the Thing in ThingWorx to Enabled).
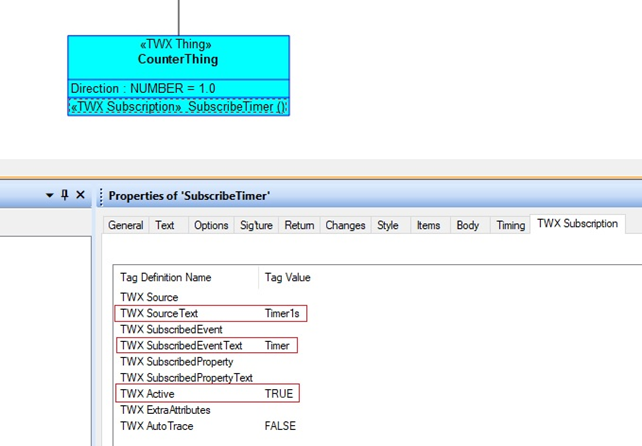
Select the SubscribeTimer operation on the diagram, go to the Properties Pane, select the TWX Subscription tab, and set the tag definitions as shown below:
Generate code, and then in ThingWorx edit the subscription body as shown below:
// ## PTC@IMScriptBody [there is a GUID here, do not change it]
var params = {
What: me.Direction /* NUMBER */
};
me.AddCount(params);
// result: STRING
var result = me.GetRange();
if (result == "OVER RANGE") {
me.Direction = -1.0;
}else if (result == "UNDER RANGE") {
me.Direction = 1.0;
}
// ## ScriptBody End
var params = {
What: me.Direction /* NUMBER */
};
me.AddCount(params);
// result: STRING
var result = me.GetRange();
if (result == "OVER RANGE") {
me.Direction = -1.0;
}else if (result == "UNDER RANGE") {
me.Direction = 1.0;
}
// ## ScriptBody End
Save the entity in ThingWorx, and in Modeler generate the code again. Confirm the body of the subscription is reversed into Modeler.
In ThingWorx, verify the CounterThing works as expected:
1. View the CounterThing.
2. Go to the Properties page.
3. In the section related to CounterShape, refresh the property values repeatedly (click the circular arrow button) and verify that Value is counting from 2 to 7, then back from 7 to 2.
Hierarchy (composite structure) modeling
Model the new entities as shown below in the Example class diagram:
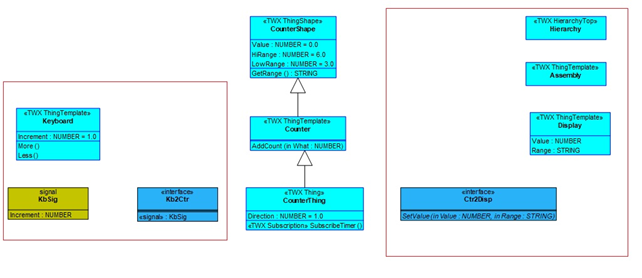
Keyboard is a UML Class with <<TWX ThingTemplate>> and with the following:
• An Increment attribute, type NUMBER, default value 1.0
• A More() operation
• A Less() operation
KbSig is a UML Signal with:
• An Increment attribute, type NUMBER
Kb2Ctr is a UML Interface with:
• A UML reception for the KbSig signal
Ctr2Disp is a UML interface with:
• An operation SetValue with two parameters, Value (type INTEGER) and Range (type STRING)
Display is a UML Class with <<TWX ThingTemplate>> and with:
• A Value attribute, type NUMBER
• A Range attribute, type STRING
Assembly is a UML Class with <<TWX ThingTemplate>>.
Hierarchy is a UML Class with <<TWX HierarchyTop>>.
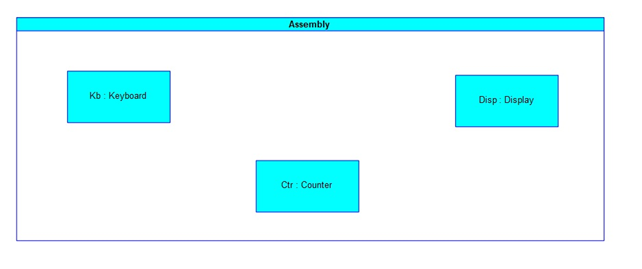
Right click on Assembly, select > . Drag the Assembly class from the Package Browser into the diagram. Drag the Keyboard class into the Assembly symbol, this way a part is created. Repeat the same with Counter and Display, in a way you get a diagram as shown below. Name the three parts Kb, Ctr and Disp respectively.
We now add Ports and Interfaces to the Parts.
Click on the Port  button, then click on the lower border of the Kb part, the Select Object dialog appears. Click on the Untyped button. This creates a new Port on the Kb part:
button, then click on the lower border of the Kb part, the Select Object dialog appears. Click on the Untyped button. This creates a new Port on the Kb part: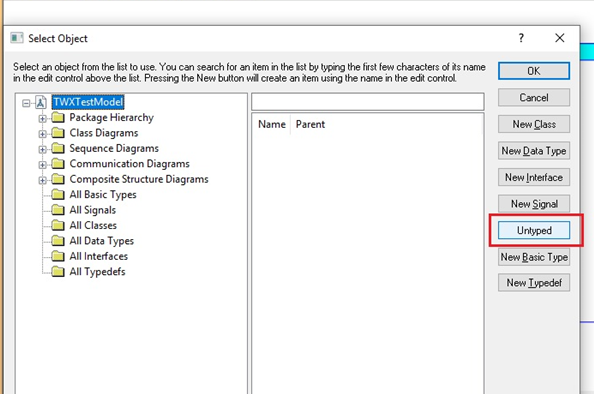
Name the port KbOut. Similarly, create a DispIn port on Disp, and both a CtrIn and a CtrOut ports on Ctr:

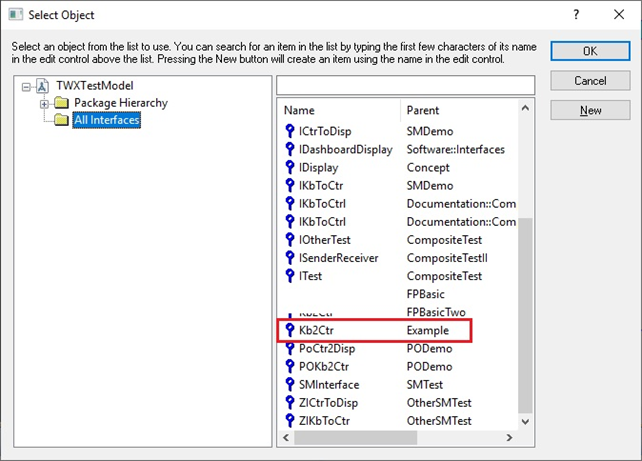
Click on the Required Interface  button, then click on the KbOut port, move the cursor outside the Kb part and double right-click:
button, then click on the KbOut port, move the cursor outside the Kb part and double right-click:
The Select Object dialog appears, select the Kb2Ctr interface of the Example package then click OK:
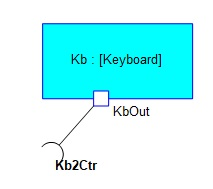
The result should look similar to the following diagram:
Perform the same operations for:
• The CtrIn port on Ctr, use the Provided Interface button, select the Kb2Ctr interface.
• The CtrOut port on Ctr, use the Required Interface button, select the Ctr2Disp interface
• The DispIn port on Disp, use the Provided Interface button, select the Ctr2Disp interface
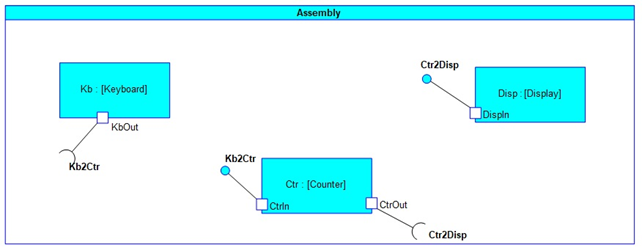
After performing the above operations, the diagram should look like the one shown below:
Roll up the features for all the parts. Right-click on each part and select Roll Up Features. The diagram should now look like the one shown below: (note the square brackets around the part’s class names now do not appear):
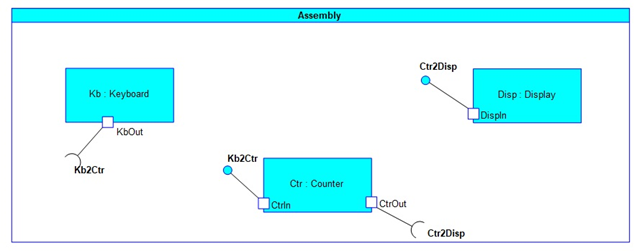
We now add associations to instruct the system to wire the parts together. Use the Shallow Unidirectional Association  button and connect KbOut to CtrIn, then CtrOut to DispIn with two associations:
button and connect KbOut to CtrIn, then CtrOut to DispIn with two associations: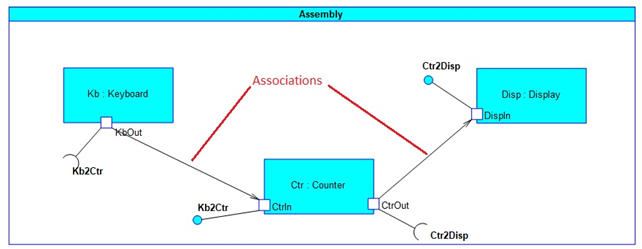
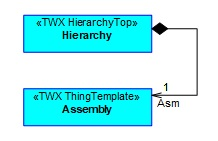
In the Example class diagram, model the composite aggregation as shown below, using the Composite Association  button:
button:• On the Start Role properties tab, set the multiplicity to Only One.
• On the End Role properties tab, set the role name to Asm and the multiplicity to tbd.
Generate code. Note the errors in the ACS log, such as:
! Error:File: CS1Port.sdl line 192
! CS1ThingTemplateOrShape: Display [Example.]: Operation 'SetValue' on 'Example::Display [Class]' is needed to provide interface 'Example::Ctr2Disp [Class]'
! Error:File: CS1Port.sdl line 193
! CS1ThingTemplateOrShape: Display [Example.]: Operation is present on the interface, missing on class
! Error:File: CS1Port.sdl line 245
! CS1ThingTemplateOrShape: Counter [Example.]: Operation 'CtrIn_KbSig' on 'Example::Counter [Class]' is needed to subscribe to event 'KbSig' provided by interface 'Example::Kb2Ctr [Class]' on port 'CtrIn'
! Error:File: CS1Port.sdl line 246
! CS1ThingTemplateOrShape: Counter [Example.]: Operation is missing on class
Such errors are caused by the lack of suitable operations on the classes that provide the interfaces. You can define those operations by right-clicking on the related class and selecting the Implement Interface entry.
Right-click on the Counter class and select Implement Interface. Do the same for the Display class. Two more operations are created, one on Counter, the other on Display, as shown below:
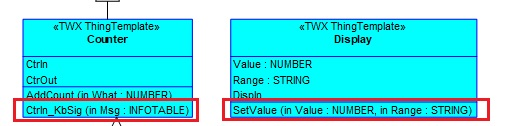
Note that only the skeleton operations are being done for you; you will have to provide the implementation (the code body). |
Generate the code again. There should no error messages this time.
We now implement all the operations that do not have body. For each operation, enter the code body as shown in the following table. You can do this either in ThingWorx or in Modeler (in ThingWorx, you must write your body code within the markers):
Class operation | Body |
|---|---|
Keyboard.Less | var params = { Increment: -me.Increment /* NUMBER */ }; me._KbSig(params); |
Keyboard.More | var params = { Increment: me.Increment /* NUMBER */ }; me._KbSig(params); |
Counter.CtrIn_KbSig | var params = { What: Msg.Increment /* NUMBER */ }; me.AddCount(params); var params = { Value: me.Value /* NUMBER */, Range: me.GetRange() /* STRING */ }; me._CtrOut_SetValue(params); |
Display.SetValue | me.Range = Range; me.Value = Value; |
In ThingWorx, ensure that the design works as follows:
1. Open the Hierarchy.Asm.Kb in view mode.
2. Open the Hierarchy.Asm.Disp in view mode.
3. On Hierarchy.Asm.Kb, go to Services, and use the service Test button to execute multiple times.
4. Check Hierarchy.Asm.Disp properties (refresh the values) and confirm the display Value is incremented, and the Range property switches from under range to normal to over range.
5. Repeat the using the keyboard.Less service.
Adding another assembly instance
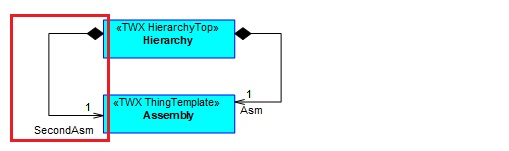
Model a second composite aggregation on the Example class diagram from the Hierarchy class to the Assembly class (set the Start Role multiplicity to Only One, the End Role multiplicity to tbd, the End Role name to SecondAsm, as shown below:
By performing the above function, we automatically get a second assembly of keyboard, counter and display that works exactly as the previous one. Generate code. Confirm in ThingWorx that you have the following objects:
• Hierarchy.SecondAsm
• Hierarchy.SecondAsm.Kb
• Hierarchy.SecondAsm.Ctr
• Hierarchy.SecondAsm.Disp
Test both the Hierarchy.Asm.Kb and the Hierarchy.SecondAsm.Kb by calling the Less/More services in ThingWorx, as done before, and ensure the two assemblies behave the same and independently.
We will now change the under/over range thresholds of the SecondAsm and ensure that we are able to deploy the same design multiple times with different configurations, such that they behave differently.
In the Example diagram, right-click on the Hierarchy class, select > . Expand the Hierarchy class in the Part Browser. Select the HiRange member of the Ctr of the SecondAsm. In the Properties pane, change the default value to 10.0. (While doing this, the Part Browser may hide some members, you can expand the relevant objects again).
Repeat the same steps for the LowRange member of the Ctr of the SecondAsm, and set its default value to 5.0.
Generate code. Go to ThingWorx and open both the Hierarchy.Asm.Ctr and Hierarchy.SecondAsm.Ctr Things in view mode. Go to the Properties of both Things.
• Ensure the Value of LowRange and HiRange properties for the Hierarchy.Asm.Ctr is still 3.0 and 6.0 (same as their default values).
• Ensure the Value of LowRange and HiRange properties for the Hierarchy.SecondAsm.Ctr is 5.0 and 10.0 (their default value is still 3.0 and 6.0)
Now the SecondAsm behaves differently as its Range indication will be Normal when the Value of the counter is between 5 and 10.