Changing the size of an item on a diagram
Most diagram item types are resizable. If a diagram item is resizable, the Autosize command appears on the item's shortcut menu and the mouse pointer changes to one of the following shapes when hovered over a handle.

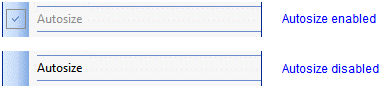
When you first add an item to a diagram, autosize is enabled. While autosize is enabled, the item's size will change to accommodate the text it displays. If you manually change the size of a diagram item, autosize is disabled. You can tell whether a symbol is autosized through its context menu.
To manually change the size of an item:
1. Select the item you want to resize.
2. Drag a handle to resize the item as required.

To resize multiple items on a diagram to the same width and height:
1. Select the item that is the size you want to change to.
2. Press and hold down the Ctrl key, and then select the item you want to resize.
When you have two or more items selected, the items will be made the same size as the 'reference selection', that is the item that has red handles. If you click a selected item, that item becomes the reference selection.
3. On the Format tab:
◦ Click the  Make Same Height button to make all the items of the same height.
Make Same Height button to make all the items of the same height.◦ Click the  Make Same Width button to make all the items of the same width.
Make Same Width button to make all the items of the same width.◦ Click the  Make Same Width and Height button to make all the items of the same width and height.
Make Same Width and Height button to make all the items of the same width and height.To disable autosizing for a diagram item:
• Manually change the size of the diagram item.
To enable autosizing for a diagram item:
• Right-click the diagram item, and then click Autosize