Performing a Server Only Installation
To perform a Server Only installation:
1. Log on to the Windows as a user that has Local Administrator rights. If you want the installation program to set up an Oms user account on the server's domain, you must log on to Windows as a user that also has Domain Administrator rights.
2. If you want to use XMI Import/Export, you must download and install the 32–bit version of Oracle Java 8 JRE.
3. To start a standard installation of Modeler, run the Modeler installation application IntegrityModeler9_2Setup.exe.
4. Follow the installation program instructions.
|
|
Installation of the Windows .NET Framework can take up to 10 minutes; during installation, the Cancel button on the dialog is not available.
The installation program enables the Transport Layer Security (TLS) 1.2 protocol as part of a Server Only installation.
|
◦ On the Setup Type page, select the Server Only option.
◦ On the Custom Setup page, the following options are selected by default:
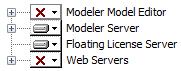
◦ To install Web Interface or Model Manager, expand the Web Servers entry, click the drop-down arrow next to the web site, then click This feature will be installed on the local hard drive.
◦ If you do not want to install the empty Models database or the Examples database, expand the Modeler Server entry, and then choose to not install the Models or Examples as appropriate.
Also on the Custom Setup page, if you want to install the Modeler application, click the Modeler Model Editor entry, and then click This feature will be installed on the local hard drive.
◦ You must provide the path to the ModelerATFiles folder location. This folder can be located on the local directory or on a mapped drive. You can provide a UNC path to the folder location.
The ATFiles folder should be a unique folder and the same folder should not be used for other Modeler installations. Also, the path that you provide should not have a trailing “\”. |
◦ If you choose to install Web Interface, a dialog will be displayed that allows you to set the password for the PTC-IM-WSU account.
◦ If you choose to install Web Interface or Model Manager, a dialog will be displayed that allows you to select an SSL certificate for HTTPS connections. The list shows self-signed and commercial certificates found on the local IIS server.
If you continue without selecting a certificate, you must configure bindings manually using IIS Manager after the installation is finished. For more information, see
Configuring the Web Interface Website to Use HTTP.
◦ By default, the installation program sets up a SQL Server instance named MODELER. The default instance will not be installed if an existing SQL Server instance is detected. To install using an existing SQL Server instance, do the following:
▪ On the Default Modeler Server page, enter the name of an existing SQL Server instance, or select one from the drop-down list.
5. If you are prompted to restart your computer after SQL Server Express is installed, restart your computer.
The installation wizard should start again automatically once you log in. Enter the same options that you set before you restarted and complete the installation.
6. After the installation is complete, perform the necessary post-installation tasks. For more information, see
Post-server only installation tasks.
If you are prompted to restart your computer, ensure that you log on to Windows using the same user name as you did before starting the installation. |
Moving the location of the ATFiles folder
While performing the server-only installation, Modeler creates the UNCpath.sql file located in the [Modeler installation path]\Modeler\System\SQLScripts folder. This is used to modify the location of the ATFiles folder in your server.
To modify the ATFiles folder location:
1. Open the UNCpath.sql file.
2. Replace ‘$(FilePath)’ with the path of the new ATFiles folder location. Note that the path should be a fully qualified local path, having no trailing “\”.
3. Save and close the UNCpath.sql file.
4. Execute the UNCpath.sql query from SSMS.
You may also modify the path from SSMS and execute the query.