Installing Modeler Through a Customized MSI File
When you install Modeler, the Modeler installation MSI file (IntegrityModeler9_2.msi) determines the default options that are used for the installation program. These default options can be changed in the pages of the Modeler installation wizard.
If you are rolling out Modeler to a large number of users, you can create a customized version of the Modeler installation MSI file so that the default options result in the required installation of Modeler.
This topic covers setting the default installation folders for Modeler, and setting up the default license server and database server.
In addition to rolling out Modeler through a customized MSI file, you can perform administrator installs by installing Modeler through the Windows Installer (msiexec.exe) command line interface and passing installation parameters through command line arguments. You can also make use of Systems Management Server (SMS) to install Modeler. These methods for installing Modeler are not covered in the Help. For more information, contact customer support.
|
|
• Changing properties in the Modeler MSI file that are not covered in this topic may result in invalid installations of Modeler and can potentially damage your Windows system.
• After modifying the Modeler installation MSI file, thoroughly test the changes you have made to ensure that it creates a valid Modeler installation.
|
Orca Database Editor
You can use the Microsoft Orca database editor to change the Modeler installation MSI file.
The Orca database editor is provided with the Windows Installer SDK. For information about installing the Orca database editor, see
How to use the Orca database editor to edit Windows Installer files.
Modeler Installation MSI file
Copy the Setup folder to a network location and then make the required changes to the Modeler installation MSI file (IntegrityModeler9_2.msi) through the Orca database editor.
Users can then install Modeler through the Modeler installation exe application (IntegrityModeler9_2Setup.exe), which will then call the modified MSI file.
Changing the Installation Path for Modeler
From the Orca database editor, open the Modeler installation MSI file (IntegrityModeler9_2.msi) you want to change.
In the Tables pane, select the Directory entry, and in the adjacent pane locate the INSTALLDIR entry in the Directory column. The INSTALLDIR entry specifies the top-level folder for the Modeler installation.
By default:
• The INSTALLDIR entry references the ARTISAN_SOFTWARE_TOOLS entry.
• The ARTISAN_SOFTWARE_TOOLS entry creates the PTC Integrity Modeler folder in the Program Files folder.
• The ARTISAN_REAL_TIME_STUDIO entry creates the Modeler folder as a subfolder of the PTC Integrity Modeler folder.

ProgramFilesFolder is a special property for specifying the Windows Program Files folder. For more information on these special properties, see the
Windows Installer Guide. |
In the following example, we want to install Modeler to a folder named C:\MyFolder:
• The new MY_FOLDER entry creates the MyFolder folder in Windows volume (typically C:).
• The INSTALLDIR entry is changed to reference the MY_FOLDER entry. Note that WindowsVolume is another special property and the ARTISAN_SOFTWARE_TOOLS entry is no longer used.
• The ARTISAN_REAL_TIME_STUDIO entry creates the Modeler folder as a subfolder of the MyFolder folder.

Following on from the previous example, we now want to install Modeler to a folder named C:\MyFolder\MySubfolder:
• The new MY_SUBFOLDER entry creates the MySubfolder folder as a subfolder of the MyFolder folder.
• The INTALLDIR entry is changed to reference the new MY_SUBFOLDER entry.

Changing the default license server and database server instance
Often you will want to specify a default license server and database server instance to use.
From the Orca database editor, open the Modeler installation MSI file you want to change.
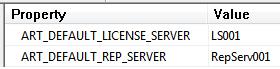
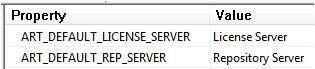
In the Tables pane, select the Property entry, and in the adjacent pane find the ART_DEFAULT_LICENSE_SERVER and ART_DEFAULT_REP_SERVER entries in the Directory column. The values set appear as defaults in the Modeler installation program.
In the following example, we change the default license server to LS001, and change the default database server instanceto RepServ001.