Installing Modeler for a Project Team
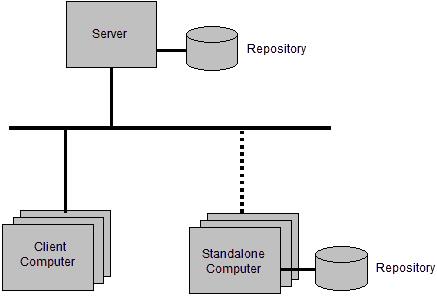
This section describes the installation of Modeler for a project team using a central server and many client computers. The project team includes both static and mobile team members. The static team members are permanently connected to the network, the mobile team members sometimes work on project data when not connected to the network.
For information about working across sites, see
Overview of working across sites.
Step | Consideration |
|---|---|
1. Perform a Server Only installation on the project server. | Which server will be used to share information? The server needs to be accessible to all team members. |
2. Create the repositories required for the project. | Use a single database to group related work. It makes sense to place related models within the same database. |
3. Perform a Client Only or Standalone installation on each team member's computer. | A Client Only installation requires less computer resources than a Standalone installation. A Client Only installation can be upgraded to a Standalone by performing a Standalone or Server Only installation on that computer. |
For static team members | Perform a Client Only installation. |
For mobile team members | Perform a Standalone installation. If a Standalone user does not require local storage, they can save resources by either: • Unbookmarking, stopping and deleting local repositories, and stopping the database service. • Uninstalling the Standalone installation and performing a Client Only installation. |