User Roles > XML elements used in user role configuration files
XML elements used in user role configuration files
A User Role configuration file defines which user interface features are removed from Modeler, and which items and diagrams are hidden in the Packages pane.
A User Role can remove the following features from Modeler:
• Modeler Panes—Use the <ExcludedBrowser> element.
• Folders from Modeler browser panes—Use the <ExcludedBrowserFolders> and <Folder> elements.
• Context menu submenus and commands—Use the <ExcludedModelItemUI> and <Menu> elements.
• Diagram toolbar buttons—Use the <ExcludedModelItemUI> and <ToolbarButton> elements.
A User Role can hide the following items and diagrams in the Packages pane:
• Items and diagrams of a specific type—Use the <ExcludedModelItems> and <ExcludedModelItem> elements.
• Items and diagrams of a specific type that have a specific property value—Use the <ExcludedModelItems>, <ExcludedModelItem> and <Property> elements.
In addition, a User Role can specify which pane is made active when the User Role is selected in Modeler through the <DefaultBrowser> element.
The User Role configuration files reside in the ModelerATFiles\UserRoles folder on a Modeler server. If you have installed Integrity Modeler to the default location, the path of the ModelerATFiles\UserRoles folder is as follows:
• If your User Role configuration file contains any errors, it will not be listed for selection in the User Roles dialog. Using an XML-aware editor will help prevent errors.
• If this is the first time you have edited a User Role configuration file, you may find it useful to look at the content of the provided User Role configuration files.
Element structure
The structure of the XML elements in a User Role configuration file is as follows:
• <version number> must be the same as that used in the provided User Roles.
• <display name> specifies the name that appears in the User Role dialog when selecting a User Role to use in Modeler.
• <description> specifies the description of the User Role, which is displayed in the User Role dialog.
Removing Modeler panes: <ExcludedBrowser> element
This element removes a pane from Modeler.
Syntax:
<ExcludedBrowser ID="<pane name>"/>
Where:
• <pane name> specifies the name of the pane you want removed, that is, the name of the pane as it appears in Modeler. This is case sensitive.
Example:
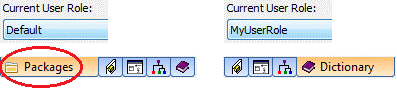
In this example we want to remove the Packages pane from Modeler. We create a User Role named MyUserRole and in its configuration file we include the following element.
<ExcludedBrowser ID="Packages"/>
When the MyUserRole user role is selected, the Packages pane is removed from Modeler.
Removing folders from Modeler browser panes: <ExcludedBrowserFolders> and <Folder> elements
These elements remove folders from specific browser panes in Modeler.
<!-- An ExcludedBrowserFolders element can contain many Folder elements. -->
Where:
• <pane name> specifies the name of the browser pane from which you want the folders removed, that is, the name of the pane as it appears in Modeler. This is case sensitive.
• <folder name> specifies the name of the folder you want removed, that is, the name of the folder as it appears in the Modeler pane. This is case sensitive.
Example:
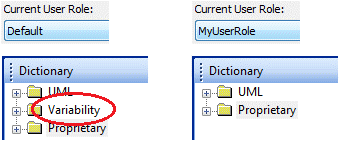
In this example we want to remove the Variability folder from the Dictionary pane in Modeler. We create a User Role named MyUserRole and in its configuration file we include the following elements.
When the MyUserRole user role is selected, the Variability folder is removed from the Dictionary pane.
Removing context menu submenus and commands: <ExcludedModelItemUI> and <Menu> elements
These elements remove submenus and commands from context menus for all or specific item and diagram types in Modeler.
Syntax:
To remove submenus or commands from the context menus of all item and diagram types.
<ExcludedModelItemUI> <Menu ID="<submenu or command>"/> </ExcludedModelItemUI>
<!-- An ExcludedModelItemUI element can contain many Menu (and ToolbarButton) elements. -->
To remove submenus or commands from the context menu of a specific item or diagram type.
<ExcludedModelItemUI DynamicClassName="<type name"> <Menu ID="<submenu or command>"/> </ExcludedModelItemUI
<!-- An ExcludedModelItemUI element can contain many Menu (and ToolbarButton) elements. -->
Where:
• <type name> specifies the type of the item or diagram for which you want to remove context menu submenus or commands. This is case sensitive.
The type of an item or diagram is shown on the General tab of its Property Pages. Alternatively, you can use the TellMe utility to find out its type, ensuring that you use the DynamicClassName attribute of the item or diagram. Note that for a General Flow Diagram, use Activity Diagram.
For context menu submenus or commands of diagram symbols, use the type of the underlying item.
• <submenu or command> specifies the name of the submenu or command that you want to remove from context menus in Modeler. Delimit menus, submenus and commands through a backslash. Include ellipsis when the command does. This is case sensitive.
For example:
• To remove the Comments... command on the Links submenu, use <Menu ID="Links\Comments..."/>.
• To remove the Links submenu, use <Menu ID="Links\"/>.
Example:
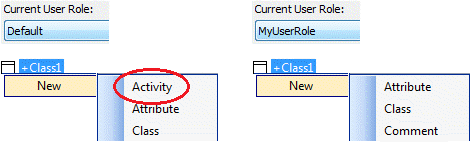
In this example we want to remove the New > Activity command from the context menu of a Class. We create a User Role named MyUserRole and in its configuration file we include the following elements.
<!-- An ExcludedModelItemUI element can contain many ToolbarButton (and Menu) elements. -->
Where:
• <type name> specifies the type of the diagram for which you want to remove diagram toolbar buttons. This is case sensitive.
The type of a diagram is shown on the General tab of its Property Pages. Alternatively, you can use the TellMe utility to find out the type of a diagram, ensuring that you use the DynamicClassName attribute of the diagram. Note that for a General Flow Diagram, use Activity Diagram.
• <button name> specifies the name of the button that you want to remove from diagram toolbars in Modeler. Use the name that appears in the tooltip when you hover the mouse pointer over the button. This is case sensitive.
Example:
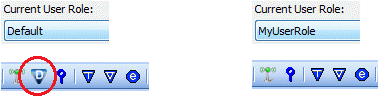
In this example we want to remove the Data Type button from the Class Diagram toolbar. We create a User Role named MyUserRole and in its configuration file we include the following elements.
<!-- An ExcludedModelItems element can contain many ExcludedModelItem elements. -->
Where:
• <type name> specifies the type of the item or diagram that you want to hide in the Packages pane. This is case sensitive.
The type of an item or diagram is shown on the General tab of its Property Pages. Alternatively, you can use the TellMe utility to find out the type of an item or diagram, ensuring that you use the DynamicClassName attribute of the item or diagram. Note that for a General Flow Diagram, use Activity Diagram.
In the Packages pane, this symbol is shown on an item or diagram's icon when it is expanded and one or more of its child items are hidden because of the User Role.
• Be careful when deleting an item or diagram that has hidden child items, because you will be deleting items you cannot see. Note that the Contents pane shows items that are hidden in the Packages pane.
• When an item or diagram type is hidden, you can still create items or diagrams of that type in the Package pane, but the new items or diagrams will not be shown.
Example:
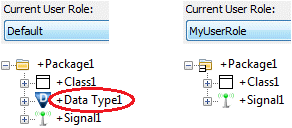
In this example we want to hide Data Type items in the Packages pane. We create a User Role named MyUserRole and in its configuration file we include the following elements.
When the MyUserRole user role is selected, Data Types are hidden in the Packages pane.
Notice that when MyUserRole is selected and Package1 is expanded, its icon changes because it contains hidden child items.
Hiding Items and diagrams of a specific type that have a specific property value: <ExcludedModelItems>, <ExcludedModelItem> and <Property Name> elements
These elements hide in the Packages pane, items and diagrams of specific types that have a specific property value.
<!-- An ExcludedModelItems element can contain many ExcludedModelItem elements. --> <!-- An ExcludedModelItem element can contain many Property elements. -->
Where:
• <type name> specifies the type of the item or diagram that you want to hide in the Packages pane. This is case sensitive.
The type of an item or diagram is shown on the General tab of its Property Pages. Alternatively, you can use the TellMe utility to find out the type of an item or diagram, ensuring that you use the DynamicClassName attribute of the item or diagram. Note that for a General Flow Diagram, use Activity Diagram.
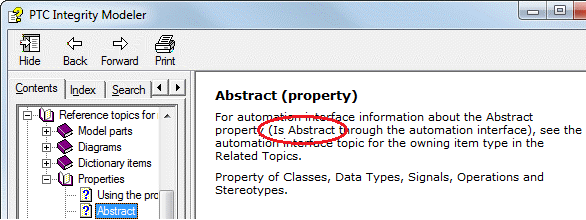
• <property name> specifies the name of the property that you want to use to identify items or diagrams to hide in the Packages pane. This is case sensitive.
You must use the Modeler Automation Interface name of a property (properties are called attributes through the Modeler Automation Interface). You can find out the Modeler Automation Interface name of a property through its reference topic in the Modeler Help.
Note that using a property that is not observed in Modeler may have an adverse affect on performance. To quickly see which properties of an item are observed: in the TellMe utility show the item's properties, right-click a property, point to Highlight Properties, and then click Observed.
• <property value> specifies the value of the property that is used to identify items or diagrams to hide in the Packages pane. This is case sensitive.
In the Packages pane, this symbol is shown on an item's icon when the item is expanded and one or more of its child items are hidden because of the user role.
• Be careful when deleting an item or diagram that has hidden child items, because you will be deleting items you cannot see. Note that the Contents pane shows items that are hidden in the Packages pane.
• When an item or diagram type is hidden, you can still create items or diagrams of that type in the Packages pane, but the new items or diagrams will not be shown.
Example:
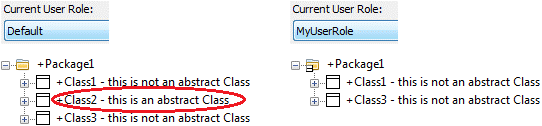
In this example we want to hide abstract Classes in the Packages pane.
A Class is abstract when the Abstract check box is selected on the Options tab of the Class' Property Pages. In the Modeler Help we find the topic for the Abstract property and see that its name through the Modeler Automation Interface is 'Is Abstract'.
We create a User Role named MyUserRole and in its configuration file we include the following elements.
When the MyUserRole User Role is selected, Classes that are abstract are hidden in the Packages pane.
Notice that when MyUserRole is selected and Package1 is expanded, its icon changes because it contains hidden child items.
Setting the default pane <DefaultBrowser> element
This element specifies which pane is made active when the User Role is selected in Modeler.
Syntax:
<DefaultBrowser BrowserID="<pane name>"/>
Where:
<pane name> specifies the name of the pane that is made active when the User Role is selected in Modeler, that is, the name of the pane as it appears in Modeler. This is case sensitive.
Example:
In this example we want the Diagrams pane to be made active when our user role is selected in Modeler. We create a User Role named MyUserRole and in its configuration file we include the following element.
<DefaultBrowser BrowserID="Diagrams"/>
When the MyUserRole User Role is selected in Modeler, the Diagrams pane is made active.