Worked example: Creating a lightweight extension of an item type
Create a new item type named MyBlock that is an extension of the SysML Block type.
1. Right-click the Model, point to New, and then click Package. Name the Package MyExts.
2. Apply the «LightweightProfile» stereotype to the MyExts package, or else Modeler will ignore any lightweight extensions you create in the Package. Right-click the MyExts package, point to Links > Stereotypes, and click LightweightProfile.
3. Open the Property Pages of the MyExts package and then select the Profile Package check box.
The name of the Package is important because in selection dialogs it will be used to scope the new item types you create. Note that if the name of the package ends in Profile, the text 'Profile' will be removed when it appears in dialogs.
4. Create a Profile Diagram in the MyExts package. This way you can create a new Stereotype and define it as an extension of the SysML «Block» stereotype. Right-click on the Package, point to New, point to UML, point to Profiles, and then click Profile Diagram.
5. On the Profile Diagram, create a Stereotype named MyBlock for the new item type - click the Stereotype toolbar button, click in free space, and then type MyBlock.
6. Add the SysML «Block» stereotype to the diagram. Click the Stereotype toolbar button, right-click in free space, and then select the SysML «Block» stereotype.
By default on a Profile Diagram a Stereotype's Scripts and Tag Definitions are shown. In the examples shown in this topic the Scripts and Tag Definitions of the Stereotypes are hidden.
7. If you have not done so already, unprotect the SysML Profile package that contains the profile item type you want to extend.
To unprotect a SysML Profile package, open the SysML Profile package's Property Pages, click the Access Permissions tab, clear the Protected check box, and then click the Copy Protected Flag to Child Packages button.
8. Define the MyBlock type as a subtype of the Block type by creating a Generalization from the «MyBlock» stereotype to the SysML «Block» stereotype. We click the Generalization button, click the «MyBlock» stereotype, and then click the SysML «Block» stereotype.
The MyBlock type now inherits all the properties and scripts of the Block type.
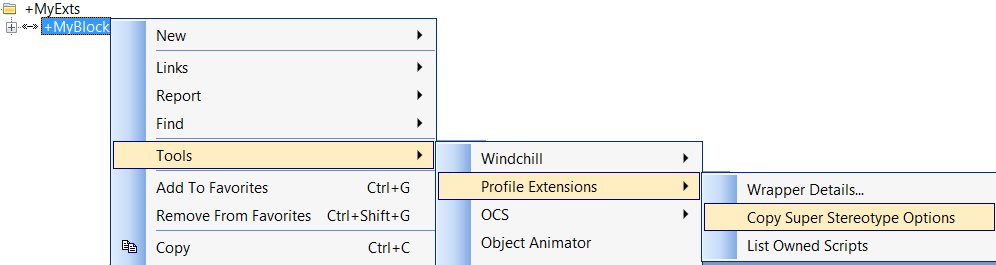
9. Set the check boxes on the Options and Directly-Stereotyped Options tabs of the «MyBlock» stereotype's Property Pages to the same as those of the Stereotype you are extending. You can do this quickly through the Copy Super Stereotype Options command.
10. Specify an icon to use for the new item type, which will be used in the Modeler browsers and for its toolbar buttons. In addition, define the presentation of the new item type on diagrams. To do this, open the «MyBlock» stereotype's Property Pages, click the Style tab, click the Edit button, and then through the Style Modification dialog set up the icon and presentation.
11. Confirm that the new MyBlock type is available in the same places as the Block type in the Modeler user interface. To do this, create a Block in a Package and then create a Block Property on that Block. Modeler opens the Select Type dialog so that you can select a type to use for the Block Property. Because you can select a Block to use as a type, you can now select a MyBlock item to use as a type because MyBlock is a subtype of Block.
Notice that the Block folder is shown under the SysML folder, because the SysML «Block» stereotype appears in the SysML Profile package; the MyBlock folder is shown under the MyExts folder because the «MyBlock» stereotype appears in the MyExts package. At present there are no MyBlock items in the model, but the folder for selecting MyBlock items is available.
12. Create a SysML Requirement in the model. Right-click on Requirement, point to Links, point to Traceability, point to Requirements, and then click Satisfied By. Previously the Links Editor listed Blocks as valid items; now MyBlocks are listed as well, because it is a subtype of the valid Block type.
13. Open a Block Definition Diagram and confirm that a new toolbar button for creating MyBlock items has been created. The My Block button is grouped with the Block button.
If you make further changes to the lightweight extensions in the Model, you must change the Lightweight Profile Version to a later version number. The changes made to the lightweight extensions will take effect only after updating the Lightweight Profile Version. To change the Lightweight Profile Version, use the Build Cache/Extensions command.
While developing lightweight extensions you can see the effects of any changes you make without having to change the Lightweight Profile Version number by disabling Profile Helper caching. To disable Profile Helper caching, use the Caching Enabled command, and set caching enabled to False.

 Stereotype toolbar button, click in free space, and then type MyBlock.
 Copy Protected Flag to Child Packages button.
 Generalization button, click the «MyBlock» stereotype, and then click the SysML «Block» stereotype.