There are two ways to create an OSLC Surrogate which are described below. Update of OSLC Surrogates is also explained.
Convert an existing item to be an OSLC surrogate
1. Launch Modeler and open a model in which you wish to create OSLC Surrogates.
2. Select the OSLC browser and navigate to the appropriate DOORS project or folder.
3. Select a DOORS item, such as a requirement, requirement diagram or folder.
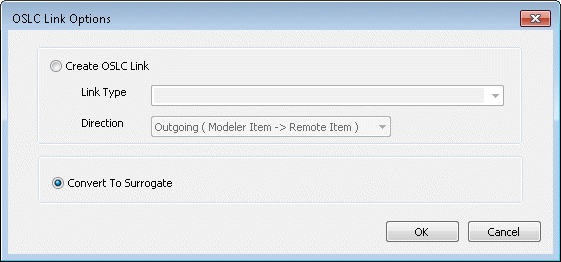
4. Drag the DOORS item and drop onto the Modeler item that you wish to convert to be an OSLC Surrogate. You can drop onto an item displayed on an open diagram, or an item displayed in a browser (e.g. Packages browser).
You can also use copy and paste to convert an item to be an OSLC Surrogate. Copy the remote DOORS item in the OSLC browser and then paste onto a local Modeler item.
5. In the pop-up dialog, select the Convert To Surrogate checkbox.
6. Click OK to confirm. The item's symbol now displays the text <<Surrogate>>.
When converting an item to be an OSLC Surrogate, the model itemname is changed to match the remote OSLC item. If that name is already used in the current package, then the model itemexisting name is retained.
7. The Properties pane for the new OSLC Surrogate is displayed. The General tab displays standard properties for the OSLC Surrogate.
An OSLC Surrogate is a special type of OSLC Link with distinct behavior.
8. Select the Options tab to view Server Type, Resource Type and Link Type properties. Note that the Link Type is disabled as this is not a valid property for an OSLC Surrogate.
9. Select the Text tab to view additional properties for the OSLC Surrogate and the linked DOORS item. The OSLC Surrogate Description property can be updated and supports rich text.
10. Select the URL tab to view the URL and a small preview for the linked DOORS item. Select the View… button to view the large preview for the linked DOORS item.
Create a new item as an OSLC Surrogate
1. Launch Modeler and open a model you wish to create OSLC Surrogates in.
2. Open a diagram where you will create the new OSLC Surrogate.
3. Select the OSLC browser and navigate to the appropriate DOORS project or folder.
4. Select a DOORS item, such as a requirement, requirement diagram or folder.
5. Drag the DOORS item and drop it onto empty space in the diagram.
You can also use copy and paste to create a new item as an OSLC Surrogate. Copy the remote DOORS item in the OSLC browser and then paste onto empty space in a diagram.
6. If required, choose the Modeler item type that will be created as the base item for the new OSLC Surrogate from the popup menu that appears.
7. Click on OK to confirm. The new item will be created as an OSLC Surrogate and the item's symbol displays the text <<Surrogate>>.
8. The Properties pane for the new OSLC Surrogate is displayed. The General tab displays standard properties for the OSLC Surrogate.
An OSLC Surrogate is a special type of OSLC Link with distinct behavior.
9. Select the Options tab to view Server Type, Resource Type and Link Type properties.
The Link Type is disabled as this is not a valid property for an OSLC Surrogate.
10. Select the Text tab to view additional properties for the OSLC Surrogate and the linked DOORS item. The OSLC Surrogate Description property can be updated and supports rich text.
11. Select the URL tab to view the URL and a small preview for the linked DOORS item. Select the View… button to view the large preview for the linked DOORS item.
Updating an OSLC Surrogate
1. Launch Modeler and open a model with OSLC Surrogates you wish to update.
2. Select the OSLC browser and navigate to the appropriate remote DOORS item.
3. Drag a remote DOORS item and drop onto the local Modeler OSLC Surrogate that you wish to update.
You can also use copy and paste to update an OSLC Surrogate. Copy the remote DOORS item in the OSLC browser and then paste onto an existing Modeler OSLC Surrogate.
4. In the pop-dialog, select the Update Surrogate checkbox.
5. Click on OK to confirm. The item's symbol now displays the text <<Surrogate>>.
It is also possible to update an OSLC Surrogate to be a HTML Surrogate. To do this, create a new HTML Link for the existing OSLC Surrogate and select the Update Surrogate option.
For more information, see the chapter OSLC Integrations.