SysML 2.0 Textual Importer
The Textual Importer is a tool in PTC Modeler that allows you to import .sysml files into model packages. This topic explains how to import these text files into Modeler.
Importing SysML 2.0 Textual Notation files into PTC Modeler
The following steps explain how to import Textual Notation files into Modeler:
1. In the Package Browser, right-click on a SysML2 package and select > . The Import SysML 2.0 Textual Notation dialog opens.
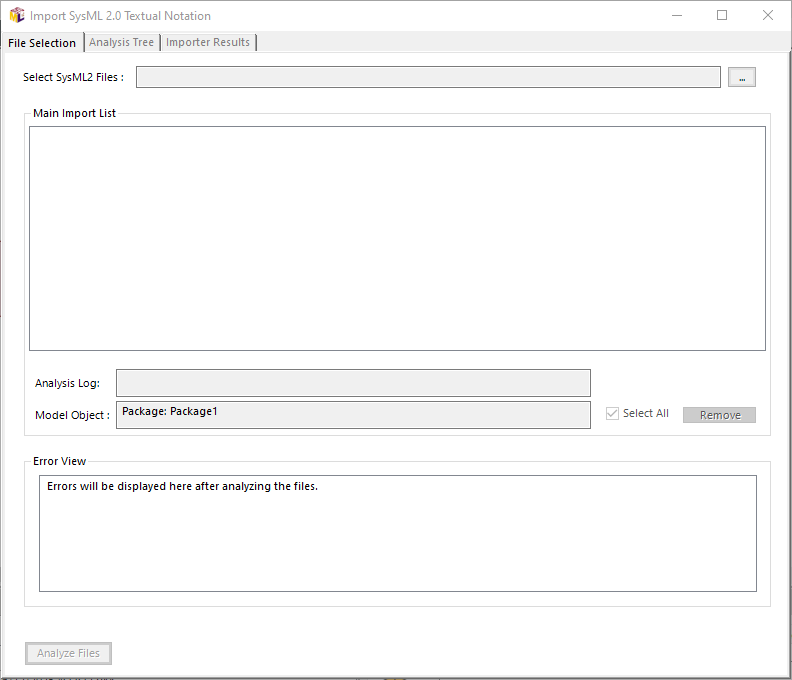
2. Click  to select the SysML2 files.
to select the SysML2 files.3. Locate and select the .sysml files that you want to import and click Open. The files that you have selected to import are listed in the Main Import List section.
4. From the list, select the files that you want to import. To select all the files, select the Select All check box..
To remove any files from the list, select the files that you want to remove and click Remove.
The Analysis Log displays the name and the path of the log file that is created during the analysis. The Model Object displays the name of the package into which the selected files are imported.
5. After you have selected the files to import, click Analyze Files. PTC Modeler begins to analyze the files for syntax and the errors are listed in the Error View section.
6. To view an error message in more detail, double-click on the error message. A dialog opens displaying information such as the type of error, the line number, and the name of the file in which the error was found.
To proceed further, you can open the relevant files, correct the errors, and perform the above steps again. If no corrections are required, you can proceed to the next step.
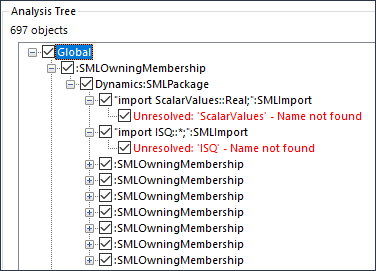
7. Click on the Analysis Tree tab. This tab displays the hierarchical list of errors. When you click on an item, the Textual Notation View displays the filename and the location of the error in the file.
You can also perform the following functions:
◦ Click Filter to filter the hierarchy to list only certain keywords.
◦ Click Search to look for a certain keyword in the hierarchy.
◦ Click Go to Parent to go higher up in the hierarchy.
◦ Click Back or Forward to move back or forward in the hierarchy.
8. After you have reviewed the errors, click Import. The Importer Results tab is displayed and the status bar updates the progress of the import.
To abort the import without completing, click Stop.
9. After the import is completed, click Close.
You can now view the selected files in the Package Browser.