Adding a new Windchill Modeler OSLC Server
To allow Modeler users to access a remote Modeler Server, an OSLC Server must be added to the OSLC browser.
To add a new OSLC Server, follow these steps:
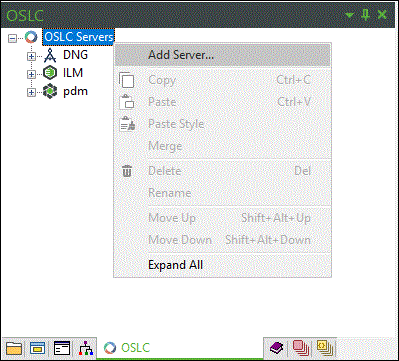
1. Launch Modeler and open a model.
2. Select the OSLC browser.
3. Right-click on the OSLC Servers node and select Add Server….

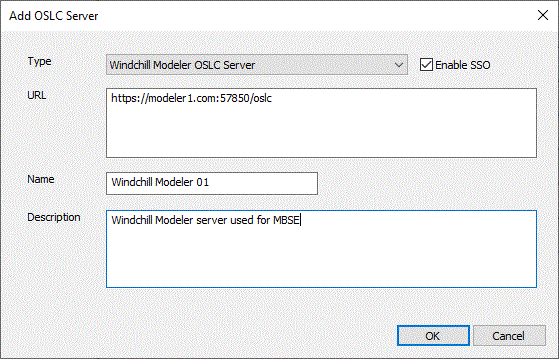
4. Select the Windchill Modeler OSLC Server option from the Type drop down menu.
5. To enable single sign-on authentication when connecting to this OSLC server, select the Enable SSO check box.
6. Enter the URL for the remote system's OSLC Provider Service. For example: https://modeler1.com:57850/oslc.
7. Enter a Name for the new server.
8. Optionally enter a Description for the new server.

9. Click OK.
10. If you selected the Enable SSO check box, then a dialog prompting you to enter the Client and Key appears, after which a login dialog for Windchill Modeler server will appear. Enter a valid username and password for that Windchill Modeler server.
However, if you have added an SSO-enabled server earlier, then Modeler does not prompt you to enter either the Client/Key combination or login credentials for the server (username/password).
For more information, see topic Connect to Single Sign-on (SSO) Enabled OSLC Servers
11. Confirm that the server has now been added and is visible in the OSLC browser.
As well as allowing Modeler users to access a remote Modeler Server, it is also possible to connect to the OSLC provider service of the "local" Modeler Server (i.e. the Modeler Server that contains the current model). This allows for creation of OSLC Links to data in other models stored in the same Modeler Server. |