Use the
canny function for detecting edges in an image. The algorithm finds locations of edges very accurately and minimizes the appearance of false edges.
1. Use the
READ_IMAGE function to read in an artificial image.
2. Use the
zoom function to enlarge the image and use the
WRITEBMP function to write the zoomed image to a file.
3. Apply the canny function to the original image, and write the result to a file.
4. Insert the new image and compare it with the zoomed image.
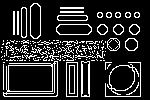
(pattern_zoomed.bmp)
(pattern_canny.bmp)
5. Change the above function argument values and view the effect on the edges in the output image.
◦ Larger values of sigma produce coarser edges (better for the noisy horizontal strip), but a loss of detail elsewhere (for example, two edges may start merging into one).
◦ Larger values of the lower threshold leads to a cleaner edge image because only edges above a certain gradient value are retained.
◦ Larger values of the upper threshold illustrates the effect of hysteresis thresholding.
◦ Larger values of high result in the complete disappearance of edges corresponding to objects with no pixel on a connected edge of intensity greater than high.
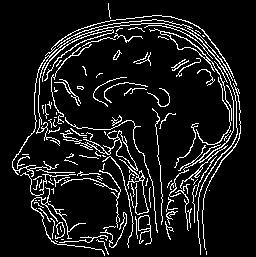
Natural Image
Detecting boundaries within a head image.
1. Read in a brain image and apply the canny function to it.
2. Write the result to a file.
3. Insert and compare the two images.
(brain.bmp)
(brain_canny.bmp)
The canny function detects the most salient edges including the head and brain boundaries. You can tweak the level of detail by adjusting the values of the function arguments.
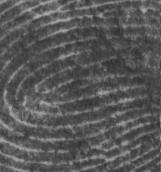
4. Read in a finger print image and apply the canny function to it.
5. Write the result to a file.
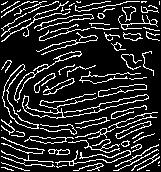
6. Insert and compare the two images.
(fingerp.bmp)
(fingerp_canny.bmp)
The canny function detects the boundaries of the major contours on the fingerprint image, which can then be input to a pattern-recognition system.
7. Read in a human image and apply the canny function to it.