Create a UA Gateway Server Endpoint
|
|
UA Gateway functionality requires ThingWorx Kepware Server version 6.14 or higher.
|
Create a UA Gateway Server Endpoint
|
|
The terminology of Server Interface and Server Endpoint is from the perspective of the gateway, in which gateway is acting as a UA server to which UA Clients can connect.
|
1. In the tree, expand UA Gateway node.
2. In the tree, select Server Interface.
3. Right-click on the 3-dot configuration menu and select New Server Endpoint….

4. In the dialog, enter a Name for this endpoint.
5. Select the Network Adapter connected to the server.
Run “IPCONFIG” command on the system where you installed the Kepware server to identify the available network adapters, such as local host for internal communication, a network or wireless adapter for communication outside the firewall (such as a dashboard). |
6. Enter a unique Port on which the UAG should listen for incoming connections.
7. Select the Protocol for this communication.
8. Click Save.
There can be up to 128 server endpoints (unique adapter-port combinations). |
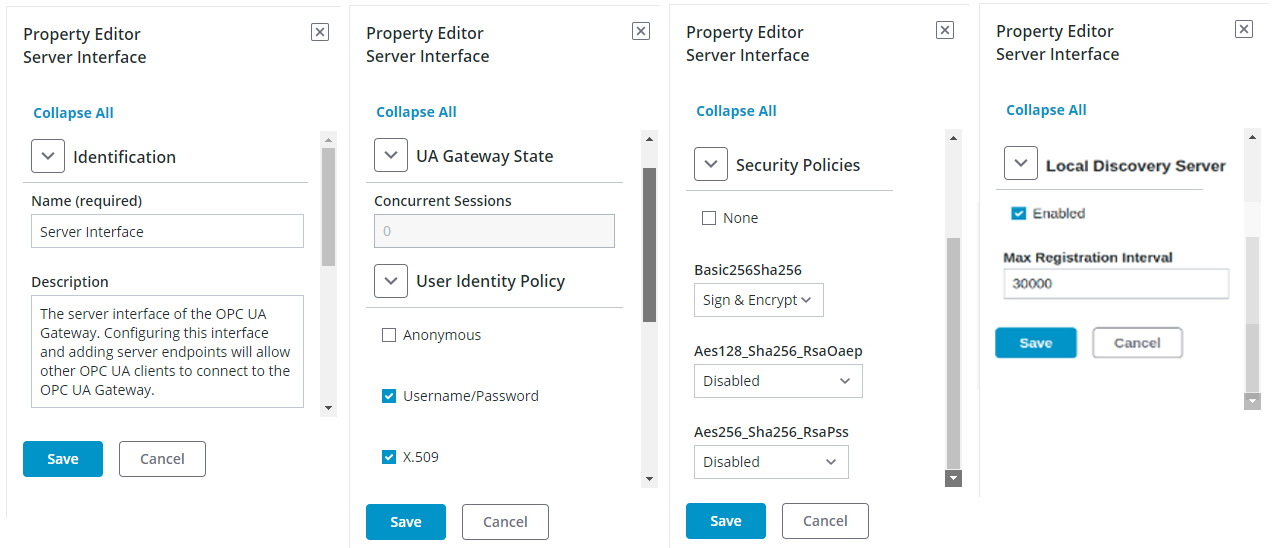
Configure the UAG Server to Accept Connections
1. In the tree, expand UA Gateway node.
2. In the tree, select Server Interface.
3. Right-click on the 3-dot configuration menu and select Properties....
4. Select the authentication method(s) and communication security parameters the server allows (such as Anonymous, Username Password, X.509, None).
5. Select the Basic256Sha256 method from the drop-down.
6. Select the Aes128_Sha256_RsaOsep support (enable / disable) from the drop-down.
7. Select the Aes256_Sha256_RsaPss support (enable / disable) from the drop-down.
These settings are very important to communication security and must match the settings and policies in the server being connected. If a property is changed in one place, it must be updated in the other to ensure communication succeeds. |
8. Expand the Local Discovery Server property group.
9. Check the box to Enable automatic registry with the LDS.
Disable if there is no LDS involved. |
10. Enter the Maximum Registration Interval for the cycle of time between registrations with the LDS.
11. Click Save.
These security settings apply to all endpoints defined on this server interface. |
Connect a Third-Party UA Client (Optional)
1. In the Kepware+ tree, expand the UA Gateway node.
2. In the tree, select Server Interface.
3. Select the endpoint to use.
4. Copy the Endpoint URL.
5. Launch a third-party UA client (such as UaExpert).
6. Create a new connection.
7. Paste the URL into the “Endpoint URL” field (or equivalent).
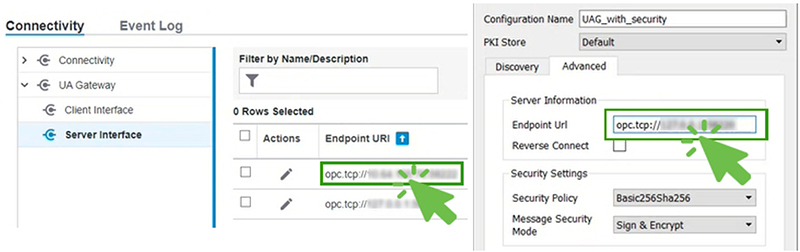
8. Verify the security settings are the same (as the server endpoint above).
9. If configured with username and password authentication, enter those variables.
10. Click OK.
Establish a Trusted Connection
1. In the third-party application, select the new connection and attempt to connect.
This connection attempt contacts the UA Gateway and presents a certificate. It fails unless that certificate is trusted by Kepware+. |
2. In Kepware+, select the endpoint being connected.
3. Change the view to Certificates in the drop-down View menu to the right.
4. Click  to access the property editor.
5. Locate the Trust Status field.
6. In the drop-down menu, select Trusted.
7. Click Save.

Verify in UA Application (Optional)
1. In the third-party application, select the new connection and attempt to connect again.
2. If the connection succeeds now that a trust relationship is established, browse the namespace to verify visibility into the target server.
Follow the instructions to Create a Client Interface if contiuning with that process. |