Contour Sets Window
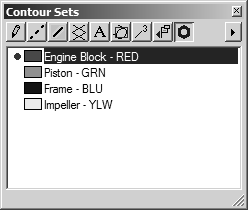
The Contour Sets attribute window lists all contour sets in the current file. The color box next to the contour set name is the fill color for that contour set. The red dot indicates the active contour set.
To Open the Contour Sets Window
1. Click > .
2. In the attribute window, click
Contour Sets
. The
Contour Sets window opens in the attribute window.
Click the arrow at the top right corner of the
Contour Sets window to open the pop-up menu of commands for contour sets. (See
Contour Sets Pop-up Menu Commands.)
You can tear off, move, and resize the Contour Sets window. To close it, click the Close button.
To Activate a Contour Set
You must activate a contour set before you can add objects to it. If you only have one contour set, it is active by default. If you have multiple contour sets, perform the steps below to activate the one you want to add objects to. Only one contour set can be active at a time.
1. In 3D mode, open the Contour Sets window. (See To Open the Contour Sets Window.)
2. In the contour set list, click the space to the left of contour set you want to activate. The red dot appears next to that contour set to indicate that it is activated. You can now add objects to it.
To Preview Contour Sets in 3D Mode
In 3D mode, click > to show contour sets in the 3D drawing. Objects in contour sets appear filled with the contour set fill color. They appear the same way after you project the 3D drawing to 2D.
To Make the Contour Set Fill Color Transparent or Visible
1. In 3D mode, open the Contour Sets window. (See To Open the Contour Sets Window.)
2. In the contour set list, click the color box next to the contour set name. A diagonal line appears in the color box to indicate that the contour set fill is transparent; for example,

.
3. Click the color box again to make the fill color visible. The diagonal line disappears.