Read File for IGES, VRML, and Wavefront
With a number of formats such as IGES, VRML and Wavefront, a structured import process is used for the 3D data. Because of this additional functionality, the dialog boxes for the structured import are described below using the example of format IGES. All dialog boxes for these formats and the dialog boxes for the other two formats AutoCAD DWG and DXF are described in the sections on these formats in the Arbortext IsoDraw Data Exchange Reference.
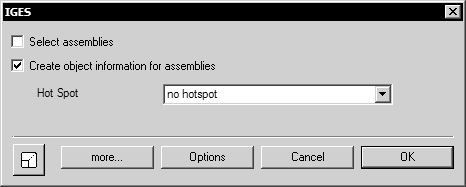
When a file is selected in IGES format, the following dialog box opens for importing IGES files:
Select Assemblies
If you select this option, the Selection of Structures dialog box appears when the file is opened. You can use this to select, which assemblies are to be imported. If you do not select this option, all assemblies in the file will be imported.
Create Object Information for Assemblies
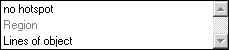
The pop-up menu allows you to select one of the two setting options.
If you select no hotspot, object info is created for each assembly. The name in each case corresponds to the designation assigned in the CAD system for the particular assembly.
If you select Lines of object, a hotspot will be generated in addition to the object info. This allows you to trigger an action later by simply clicking the object.
If you do not select the option, the name Group will appear in the object window for each assembly once import has been completed.
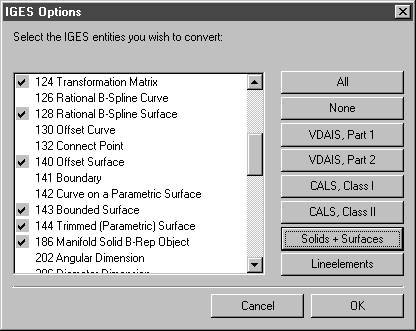
Since only surface elements and solids (entity 186) are required for automatic conversion of 3D data to a technical illustration, it is possible with data in IGES format to ignore a large number of other elements during conversion.
To make the appropriate setting, click Options. A further dialog box appears:
If you click Solids + Surfaces, only the elements actually required for conversion will be selected. All elements preceded by a tick have been selected. Click OK to confirm your setting. You are returned to the initial dialog box for importing the format (here IGES).
| If you want to import multiple 3D files of the same format with the same specifications for processing assemblies, you can select the settings as a general default. Choose > , then click the import symbol for the format. The dialog page for the format then appears. Select the required setting and deselect Show dialog. Click OK. The settings are then applied automatically when importing files. |
Clicking Cancel in the opening dialog box cancels the import process. Clicking OK confirms that you are happy with your entries. Even without selecting the Select assemblies option, the file is converted and is available for further processing in 3D mode.
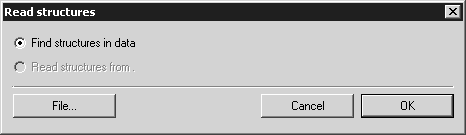
If you have chosen Select assemblies, a further window opens.
Find Structures in Data
If you select this option, all specified assemblies or elements will be recorded together with their names and structures. Clicking OK in the dialog box opens a further dialog box entitled Selection of Structures. This displays the recorded assemblies and elements of the file in structured form. If the file appears in 3D mode after import is complete, you will find the same structures in the object window.
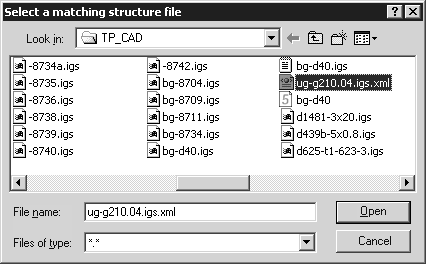
Read Structures from igs.xml
If the file already has a structure file, the name of the file will be displayed here. (See Export.) Selecting this option results in Arbortext IsoDraw CADprocess accessing a file already saved in XML format for selection of the structures. This cuts import time quite considerably, particularly when files are very large. In situations where the option cannot be selected despite there being a structure file (grayed out), the latter will no longer be located at the original storage location. You can search the file by clicking File.
The following dialog box appears:
Click the file you require. Clicking Open returns you to the Read structures dialog box. The file name is displayed. The file is used for the structure display.
If the file name has been changed, the wrong file selected or the contents do not agree with the current file, the structure file will be rejected. The option can then no longer be selected (grayed out). Repeat the search or recreate the structure via Find structures in data.
Clicking Cancel returns you to the opening dialog box for the import process. Clicking OK confirms that you are happy with your entries.
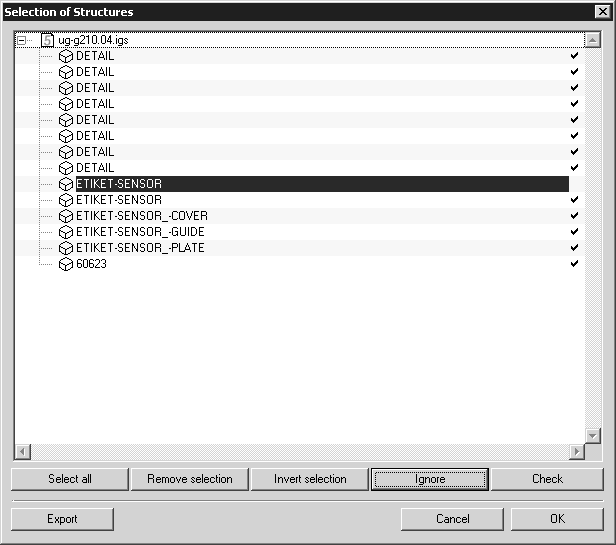
A further dialog box opens:
Selection of Structures shows the assemblies and elements together with their names in a tree structure. Clicking the + symbol in front of the file name opens the top level of the structure. Holding down the CTRL key and clicking the + symbol, reveals the entire tree structure of the assemblies. One click on the + symbol turns it into a - symbol. Clicking the - symbol in front of the file name closes the structure display. You can use the structure display to specify which assemblies are to be imported. Clicking the name selects an assembly. Holding down the CTRL key while clicking names enables you to select several assemblies in succession. If you hold down the SHIFT key, all the assemblies between the one, which is already selected, and the one you are currently clicking will be selected. Clicking on the far right, behind the name of the assembly, tells you whether an assembly will be imported or not. A tick indicates that the assembly will be imported.
The functions of the five keys below the structure display will help you to specify which assemblies or elements are to be imported.
Select All
Click this button if you wish to select all assemblies. This function is useful if you only want to import individual assemblies. Once you have made your selection, click the Ignore button. Then select the desired assemblies one after the other while holding down the CTRL key. Select the assemblies by clicking Select.
Remove Selection
Clicking this button removes the selection. Whether an assembly in the selection has been selected or ignored remains unaffected by the removal.
Invert Selection
Clicking this button cancels selection of the selected assemblies and, at the same time, selects all other assemblies in the structure. Like Select all, this function is useful if you only want to import individual assemblies. Select the assemblies you want to import. Then click the Invert selection button. All assemblies in the structure that you do not want to import are now selected. Then click the Ignore button.
Ignore
All assemblies, which are displayed without a tick, are not imported. You can cancel selection of assemblies. Select the assemblies you do not want to import. Click the Ignore button. The tick behind the name disappears. If an assembly that contains subassemblies is not ticked, all the subassemblies will also be ignored.
Selecting
If you have selected Find structures in data a tick indicates all assemblies and/or elements in the file. The tick indicates that the assemblies will be imported.
If you use the saved structure file (XML format), for example, you can also select assemblies or elements without ticks. Select all the assemblies you require. Click the Select button. A tick appears after all the names. If an assembly has been selected which contains subassemblies, these are also selected automatically.
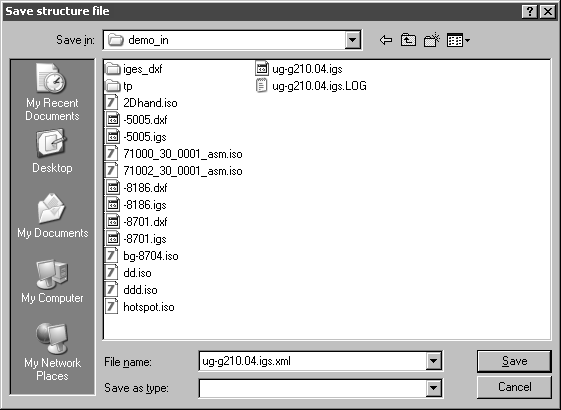
Export
Selecting Export lets you save the file structures.
If you want to import a file for the first time, you should save the file structures first, which is particularly important with large files. You can use this structure file for recent imports of the file (see Read structures dialog box). This not only saves time, but is also useful if you want to always ignore specific assemblies or elements. Clicking Export opens the following dialog box:
The file name is already defaulted. Clicking Save saves the file in XML format. Clicking Cancel exits the dialog box without saving the file.
Once you have completed your settings in the Selection of Structures dialog box, click OK. The file is converted and appears in 3D mode for further processing. Clicking Cancel returns you to the Read structures dialog box.