Edit Style
To edit a style, select the command Edit style. The Linestyle dialog box opens:
The displayed values refer to the current style. The
Example field shows you how your style will look. You can page through the list of styles using the two arrow buttons

.
This dialog box allows you to edit the attributes of all the styles which have been defined for the active illustration. You can also create new styles or delete existing ones.
Your changes will only be valid if you click OK. Clicking Cancel quits the dialog box without changing the style list.
| If you delete a style, the elements or pens using this style will be assigned a substitute style. This change cannot be undone even by canceling the dialog box. |
Modifying Style Attributes
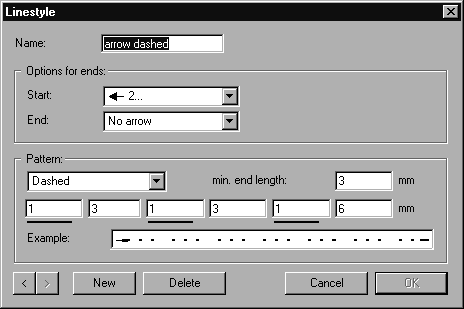
Each style must have a unique Name. The names of the seven standard styles cannot be overwritten.
The two fields below this are pop-up menus which you can use to select a form for the ends of the lines. As well as the normal line end, various arrow and dot shapes are also available for selection.
If you choose the form with arrow, four different widths are available which derive their names from the angle of the arrow tip. Three lengths are provided for the arrow tip, each of these being a multiple of the line thickness. All these options can be used for all three major isometric planes.
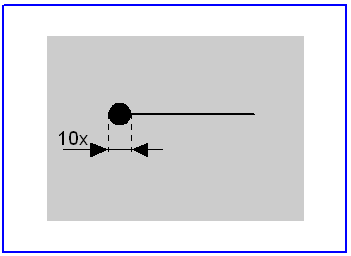
The diameter of the dot is derived from a multiple of the line thickness. The Start and End lists under Options for ends allow you to select dot diameters which are from two to ten times the line thickness.
| The forms for the start and end of lines without arrows or dots is governed by the setting under Options in the pop-up menu of the Styles window. |
The next step is to define the Pattern for the style. There are three types of patterns: Solid, Dashed, and Dotted. You choose the type from the list under Pattern.
If you select Dashed or Dotted, additional entry fields appear.
If you select Dashed, you can enter up to six values for the pattern. The value of the first field determines the length of the first line segment. The second field defines the length of the first gap. The remaining fields then specify additional lengths and gaps alternately.
| These values must always be entered in pairs, e.g. 5 in the first field and 5 in the second or 20 in the first field, 5 in the second, 4 in the third and 5 in the fourth. |
Finally, you also need to enter a minimum end length for the line. This signifies that there must be a line segment of at least this end length at both ends of the line even if this changes the pattern.
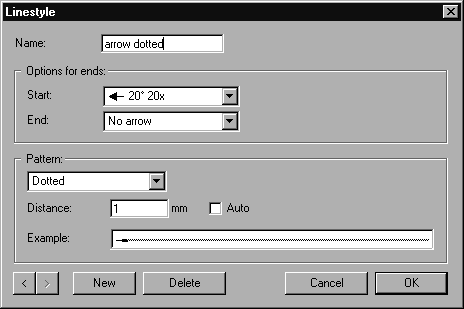
If you choose Dotted from the list, different fields will appear:
The diameter of the dots is governed by the line thickness of the pen selected for the drawing. If the Auto box is checked, the dot spacing is set to twice the line thickness. If this box is not checked, you can enter a fixed value instead.
| The dotted pattern of the lines is only visible in preview mode above a specific enlargement factor, dotted patterns below this factor are merely intimated. |
Creating a New Style
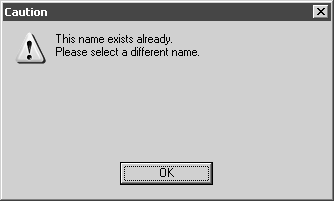
You can create a new style by clicking the New button. This style will initially have the attributes of the last style displayed. Assign the text format a unique name. If a style with that name already exists, the following warning window appears:
Confirm with OK and change the name. You can now change the settings as required.
If you have clicked New by mistake or want to abort the creation process, you can delete the style as described below.
You can also create a new style by selecting the New style command from the pop-up menu.
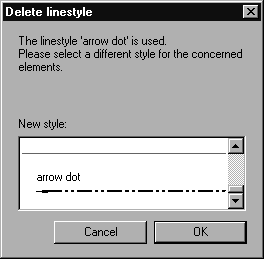
Deleting a Style
You can delete the style currently displayed by clicking the Delete button.
| Standard styles cannot be deleted. |
The style will be deleted immediately if it is not being used in the illustration or by a pen. Otherwise, a substitute style must first be defined for assigning to the affected elements:
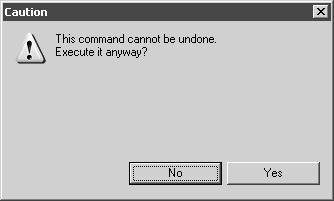
The new style must be assigned directly in order to avoid conflicts. This assignment cannot be undone. Consequently, the program will ask you for final confirmation if you click OK:
Click No if you do not want to make the changes. Click Yes to assign the new style with immediate effect. While you can still cancel the Edit style dialog box afterwards, the assignments will be retained.